• Skip to main content
  • Skip to primary sidebar

Design Dazzle logo

menu icon
go to homepage
  • Home
  • Home Decor / Design
  • Holidays
  • Crafts
  • All Categories
    • Facebook
    • Instagram
    • Pinterest
    • YouTube
  • search icon
    Homepage link
    • Home
    • Home Decor / Design
    • Holidays
    • Crafts
    • All Categories
    • Facebook
    • Instagram
    • Pinterest
    • YouTube
  • ×
    Design Dazzle » Crafts » top tutorials

    Published: Jun 17, 2014 · Modified: Jul 10, 2020 by Toni Roberts · This post may contain affiliate links · 2 Comments

    Straw Weaving Bracelets

    Artzy Creations_Straw Weaving_Feature

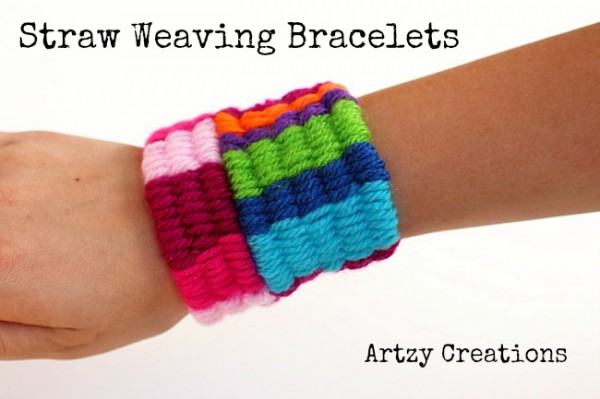
    Hi Everyone! I’m Melanie from Artzy Creations and I’m so happy to be your Summer Camp Counselor today. Growing up during the summers, I would make tons of bracelets. There could never be enough string or yarn around the house. It was one of the best summer boredom busters for me. My daughter is now showing the love for making bracelets too, so, I introduced her to these Straw Weaving Bracelets. Straw weaving is a great way to make bright chunky bracelets that are perfect for the kids. The best part is that they are inexpensive to make.

    Here’s What You Need For Straw Weaving:

    • Straws
    • Scissors
    • Yarn in Different Colors
    • Tape


    Artzy Creations_Straw Weaving_Directions P1

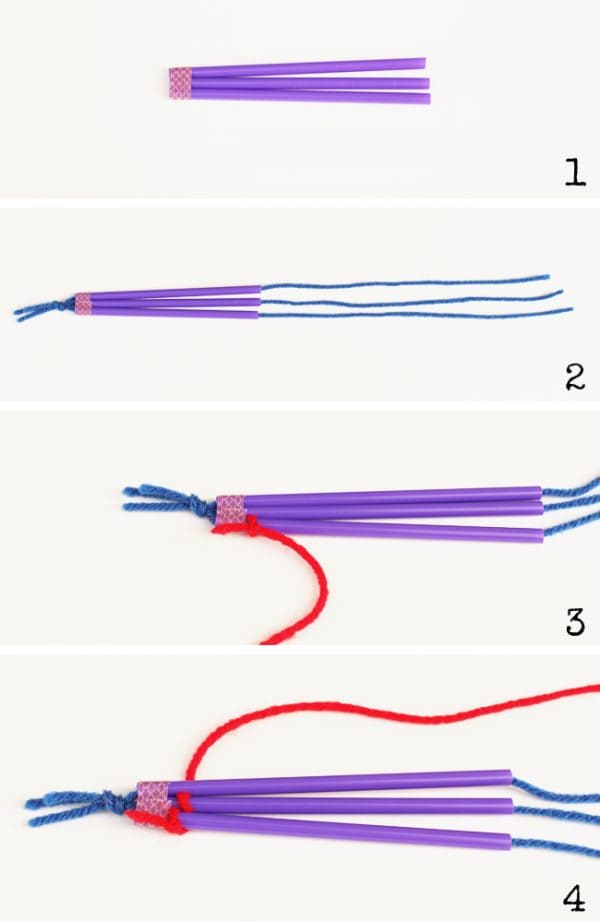
    Step 1: Decide how wide to make your bracelet 3, 4, or 5 straws wide. Cut the straws 5″ in length. This length of straw works well for my daughter who is 9. If you have a child making this that might have a larger wrist, increase to 6″ or 6.5″. Tape the ends of the straws together to hold them in place. Step 2:  Cut three pieces of string that are roughly double the length of the straws and thread each string through a straw. At one end, tie all three strands together in a knot like seen above. Step 3: Choose a color of yarn that you would like to begin weaving with. Tie it to the first straw. I always double knot mine to make sure it’s going to hold.  Step 4: Begin weaving in an under & over pattern. Over the first straw, under the next, back over the next. You get the idea. When going in the opposite direction, make sure to do the opposite pattern of the one before it. After your band of color is the thickness desired, tie on your next colored piece of yarn and continue.

    Artzy Creations_Straw Weaving_ Directions P2

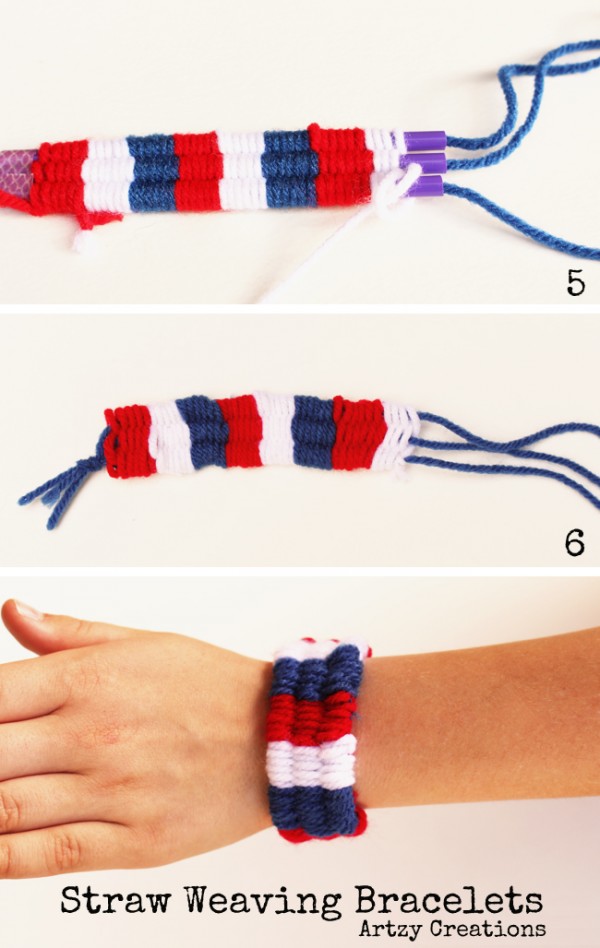
    Step 5: When you get to the end of the straws, wrap the yarn around the end of the straw and make a loop. Pull the end of the yarn through the loop to make a knot. Step 6: Pull this tight and double knot it to tie it off. Carefully, push your weaving up to expose the straws and begin to slide the straws out untill they have been removed. Push the weaving together and straighten it up as needed. Tie it onto your wrist and trim the excess yarn.

    artzy creations fourth of july woven bracelet

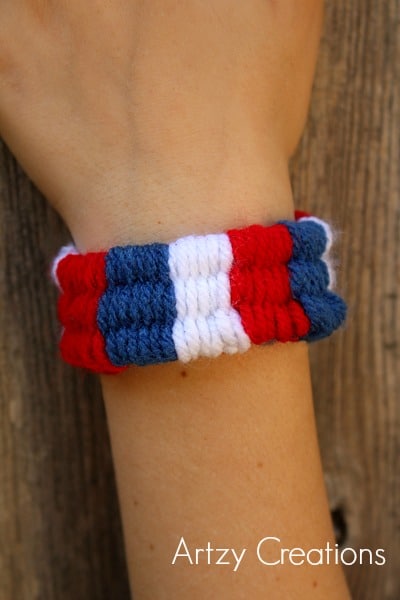
    So easy and simple! Yet, it will literally keep your kiddos occupied for hours.

    Melanie Artz_250W

    Melanie is a mother of two daughters, an Art Educator for seventeen years, and an artist. She loves to do anything creative.

    For lots more DIY, Crafts, and Kids Crafts, visit her at Artzy Creations, You can also follow her on Facebook, Instagram, Pinterest, and Google Plus.

    Artzy Creations_Logo 250W

    More top tutorials

    • Taylers bridal shower favorites 41
      How To Make A Balloon Garland (that’s gorgeous)!!!
    • Pokemon Painted Rocks for Kindness Rocks!
    • DIY Bridal party T-shirts | Design Dazzle
      DIY Gold Foil Bridal T-Shirts Using The Cricut
    • Mason Jar Aquarium

    Sharing is caring!

    Reader Interactions

    Comments

    1. lpandure says

      June 13, 2022 at 11:08 am

      love your ideas for our summer camp

      Reply
      • Toni - Design Dazzle says

        June 13, 2022 at 4:20 pm

        You are welcome!

        Reply

    Leave a Reply Cancel reply

    Your email address will not be published. Required fields are marked *

    Recipe Rating


    Primary Sidebar

    Toni medium

    Hi, I’m Toni! I love designing and decorating. Join me for home inspiration and creative living! More about me →

    Popular

    Spring/Easter

    • Setting an Easter Table
      Decorating An Easter Table
    • elegant recipes with rose
      Rose Petal Sweets
    • IMG 9043
      Simple Easter Table Decor
    • Edible Bunny Box with candy inside. - Design Dazzle
      It’s An Adorable, Edible Easter Bunny! D-I-Y

    Footer

    ↑ back to top

    About

    • Privacy Policy
    • About Toni

    Contact

    • Contact
    • Press & Partnerships

    Toni Roberts is a participant in the Amazon Services LLC Associates Program, an affiliate advertising program designed to provide a means for sites to earn advertising fees by advertising and linking to amazon.com

    DesignDazzle.com is protected by copyright laws. DO NOT distribute or copy the content or share multiple images or collage images without written permission. You can use ONE Design Dazzle image only if there is a link back to DesignDazzle.com. DO NOT edit, crop, or remove watermarks from any image. Please contact me at [email protected] with any questions.

    Copyright © 2026 Design Dazzle