• Skip to main content
  • Skip to primary sidebar

Design Dazzle logo

menu icon
go to homepage
  • Home
  • Home Decor / Design
  • Holidays
  • Crafts
  • All Categories
    • Facebook
    • Instagram
    • Pinterest
    • YouTube
  • search icon
    Homepage link
    • Home
    • Home Decor / Design
    • Holidays
    • Crafts
    • All Categories
    • Facebook
    • Instagram
    • Pinterest
    • YouTube
  • ×
    Design Dazzle » Crafts » top tutorials

    Published: Dec 14, 2011 · Modified: Jul 13, 2020 by Toni Roberts · This post may contain affiliate links · 7 Comments

    DIY Embroidery Kit Using The Cricut Machine!

    how to draw on fabric for embroidery transfer - Design Dazzle

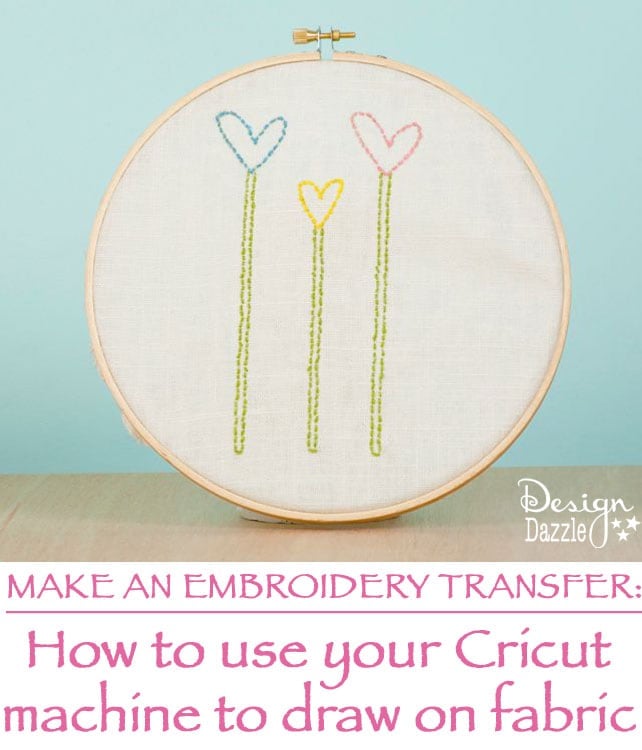
    Need a simple and inexpensive DIY Christmas gift? Make an embroidery gift kit using the Cricut personal cutting machine. How do you do that, you ask? Well, it’s simple – Cricut markers are perfect for making an embroidery transfer on fabric. I LOVE this idea! If you have a Cricut machine, get yourself some Cricut ink markers. These markers draw shapes instead of cutting out shapes. Just replace the blade holder with a marker and voila you can have beautiful drawn images. Imagine all the possibilities, paper, fabric and more?? This project was my daughters first try at embroidery (it was easy and fun)! This is a perfect activity for girl scouts, activity days and your own girls! Keep reading to see how to make this into a kit that you can give as an inexpensive gift.

    Instructions

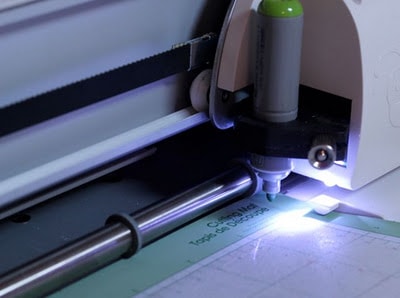
    Replace the cutting blade in the Cricut with the marker as shown above. Make sure to adjust the speed and pressure. Place paper onto mat and experiment on paper at first. Load mat, hit cut and the marker draws the images you’ve chosen! Remove the marker and replace the cap right after your project,  you don’t want it to dry out.

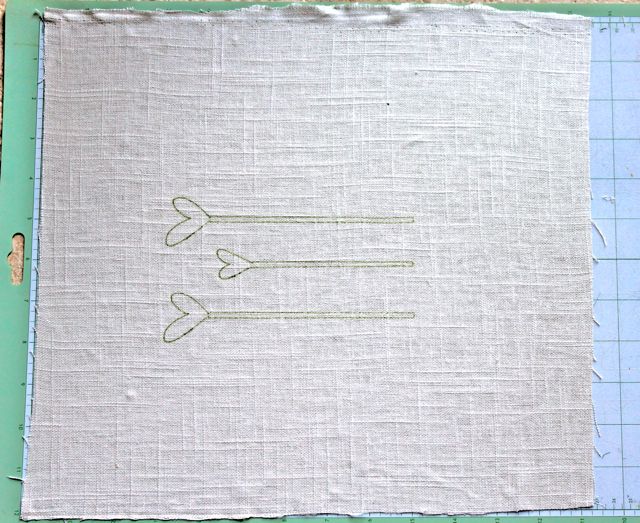
    Linen fabric is easy to embroidery with. Place linen fabric directly on sticky mat (no need to use heat n bond). I use a fondant roller to help adhere the fabric to the sticky mat (apply pressure). The mat needs to be sticky for the fabric to adhere well. Load your mat into the machine. Choose the image you would like to use as an embroidery transfer. The image shown above is “Stick Pin” from the Opposites Attract cartridge. Hit cut and the image you chose is drawn on your fabric! Imagine all the fun with the thousands of images Cricut offers ; )

    To make an embroidery GIFT KIT:

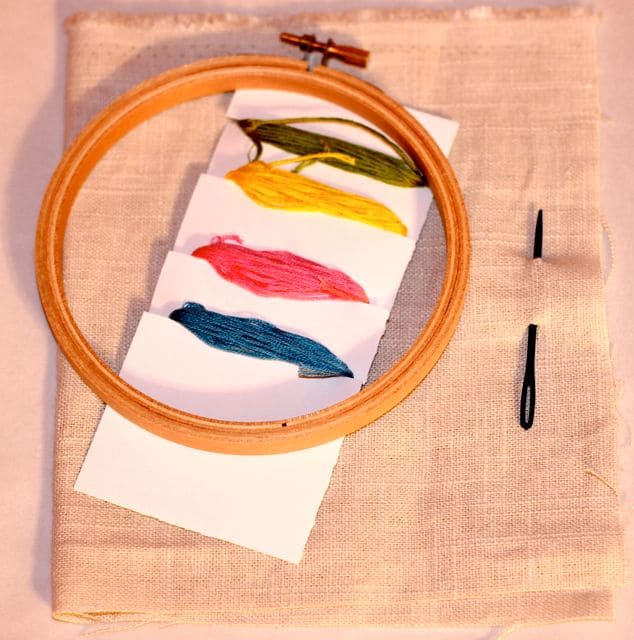
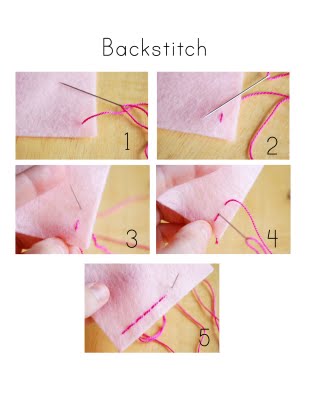
    needle (the plastic needle shown is for little kids)
    embroidery thread
    embroidery hoop
    fabric with drawn image (created on your Cricut machine)
    paper bag
    print instructions (if needed)- see below

    Check out the instructions for embroidery stitching basics from Abby of Projects For Your Nest.

    How to make designs on a paper bag…

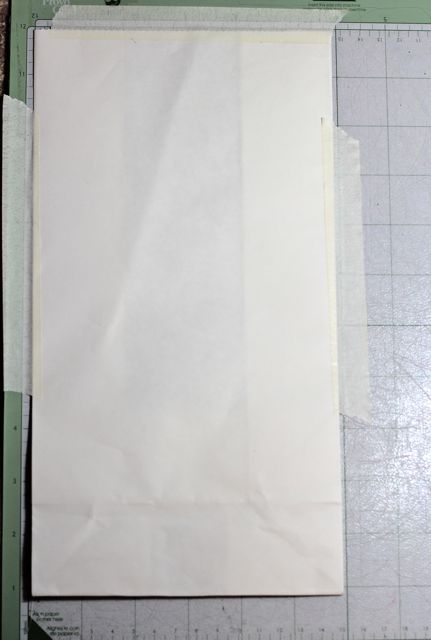
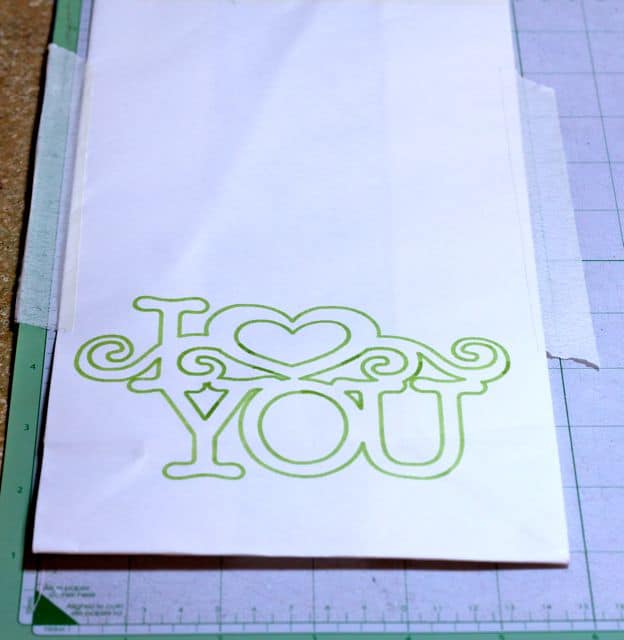
    I also used the Cricut markers to make a design on a paper bag. Tape bag down using masking or painters tape onto sticky mat. Use the steps shared above to draw a design on the bag.

    Cute, heh??


    Here is the final product. I placed all the embroidery items in the bag, folded the top down and used a zigzag seam finish (on my sewing machine) to close the bag. The supplies cost about $3 for one kit.
    This is a wonderful idea for Christmas!

    More top tutorials

    • Taylers bridal shower favorites 41
      How To Make A Balloon Garland (that’s gorgeous)!!!
    • Pokemon Painted Rocks for Kindness Rocks!
    • DIY Bridal party T-shirts | Design Dazzle
      DIY Gold Foil Bridal T-Shirts Using The Cricut
    • Mason Jar Aquarium

    Sharing is caring!

    Reader Interactions

    Comments

    1. Lisa says

      December 14, 2011 at 4:07 am

      Great idea!

      Reply
    2. gail says

      December 14, 2011 at 3:19 pm

      LOVE it! oh my! brilliant!
      gail

      Reply
    3. Kailie says

      May 10, 2013 at 2:37 pm

      I love this! Now to get my hands on a cricut 😉

      Reply
      • Toni - Design Dazzle says

        May 13, 2013 at 10:53 am

        Kailie,
        We are giving away two Cricuts soon. One will be for a reader and one will be for a school teacher.

        Reply
    4. Rachael Sheely says

      January 17, 2020 at 2:15 pm

      Hi,
      Is it possible to use the cricut to draw on needlepoint canvas for needlepoint ? Or even Aida cloth for cross stitch?

      Reply
    5. Rachael SHEELY says

      January 17, 2020 at 2:19 pm

      And if the above questions is a yes than can you give me a list of items I would need? Also which Cricut
      I don’t have one…
      thank you

      Reply
      • Toni - Design Dazzle says

        February 19, 2020 at 12:12 pm

        Any Cricut machine that uses markers would work. My Cricut was an older model (this post is several years old) that used markers to write on the embroidery fabric.

        Reply

    Leave a Reply Cancel reply

    Your email address will not be published. Required fields are marked *

    Recipe Rating


    Primary Sidebar

    Toni medium

    Hi, I’m Toni! I love designing and decorating. Join me for home inspiration and creative living! More about me →

    Popular

    Spring/Easter

    • Setting an Easter Table
      Decorating An Easter Table
    • elegant recipes with rose
      Rose Petal Sweets
    • IMG 9043
      Simple Easter Table Decor
    • Edible Bunny Box with candy inside. - Design Dazzle
      It’s An Adorable, Edible Easter Bunny! D-I-Y

    Footer

    ↑ back to top

    About

    • Privacy Policy
    • About Toni

    Contact

    • Contact
    • Press & Partnerships

    Toni Roberts is a participant in the Amazon Services LLC Associates Program, an affiliate advertising program designed to provide a means for sites to earn advertising fees by advertising and linking to amazon.com

    DesignDazzle.com is protected by copyright laws. DO NOT distribute or copy the content or share multiple images or collage images without written permission. You can use ONE Design Dazzle image only if there is a link back to DesignDazzle.com. DO NOT edit, crop, or remove watermarks from any image. Please contact me at [email protected] with any questions.

    Copyright © 2024 Design Dazzle