


Did you see my Santa’s Cabin in the Woods Christmas Dream Tree? It’s all about Santa’s favorite things, especially reindeer and plaid! I decided to create a large Christmas tree topper with the reindeer head as the focal point.
Sometimes it’s nice to have a small tree topper and sometimes it’s nice to have a large one. I decided to go large with this tree. In this post, I will share how to make a large Christmas tree topper and how to secure it on the tree.
One of my best Christmas tree decorting hacks:
Also, another tip I’ve learned over the years – is a bag of rice is an excellent way to anchor the tree at the bottom. I purchase a 10 pound bag of rice and place it in a pillowcase. I put the bag on top of the tree stand brackets in the very back. The rice bag ends up laying flat and hides very well under the tree skirt. You would never know it’s there.
Of course, I use the rice after Christmas and there is no waste! You can see more of my Christmas tree decorating tips and hacks here.
For the first part of the tutorial I share how to make the…
Plaid Reindeer Antlers
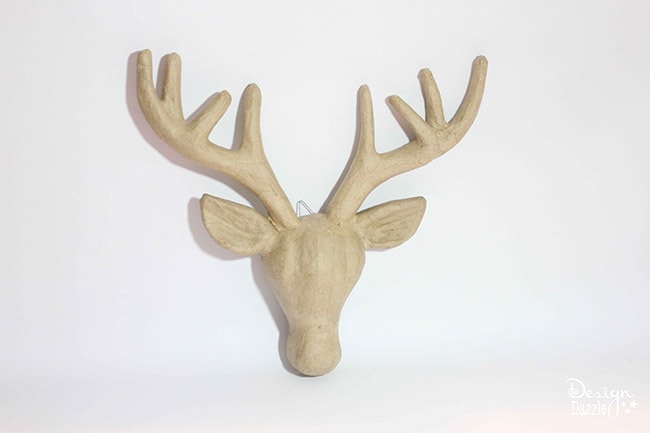
Supplies
- Paper mache reindeer head from Michaels
- Plaid ribbon from Michaels
- tacky glue, foam paintbrush, and scissors
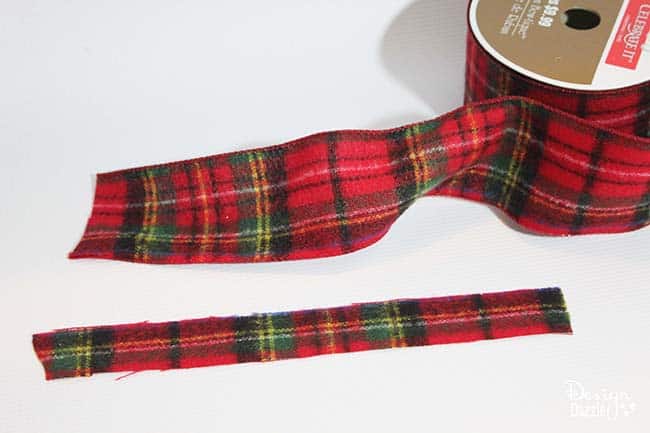
Step 1: I love the plaid ribbon I found at Michaels! For this project, I wanted it to be as smooth as possible, so I cut the wire off the edges of the ribbon. I then cut the ribbon in half to make thinner strips.
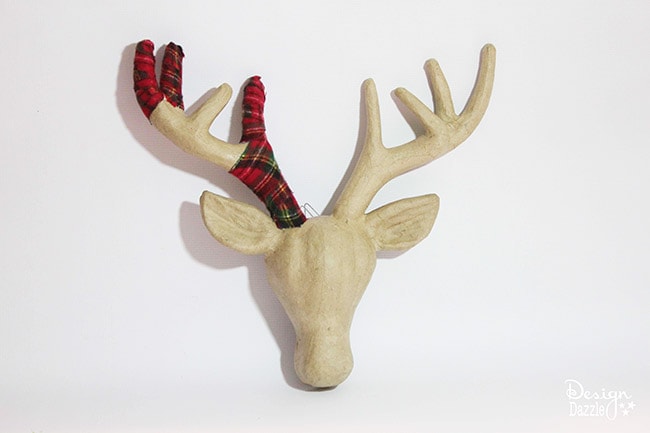
Step 2: Wrap the antlers with the ribbon! I painted the antlers with tacky glue before I wrapped the ribbon to ensure that it would stay smooth and stay in place.
Painting the antlers with tacky glue made it so much easier to wrap the ribbon smoothly and securely! That is how easy it was to create the plaid antlers on the reindeer
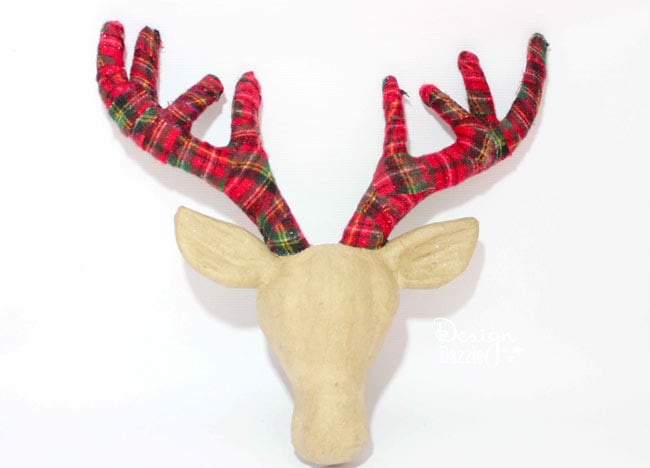
This would be awesome all by itself to hang on a wall or place in a bookcase.
How To Make A Large Christmas Tree Topper

Supplies
- dry green foam blocks
- scrap ribbon
- approximately 8-10 floral picks (all different sizes)
- hot glue gun
- ribbon to match tree decor
Step 1:
To make an ornate tree topper that will stay attached to the tree, you will need to make sure it is properly secured. Using your hot glue gun, connect the dry foam blocks together (side by side).
Three blocks were used for this project. Make sure you are using the dry floral foam blocks (not the ones you get wet). If you are creating a small tree topper, no need for the floral foam.
Since this is a large and heavy topper, you need the foam to help secure the floral picks and deer head. Putting this many picks in the top of tree can be a little tricky because there the top of the tree is narrow and there is not much volume of tree to place all of these picks.
For a small or average size tree topper no need for foam.
Step 2:
Hot glue the scrap ribbon to the front of the blocks. Make sure you attach the ribbon to the front so that it will add extra strength when you tie it onto the tree.
Any scrap ribbon will do – it just needs to be long enough to wrap around the entire section of the blocks and then around the tree top. My ribbon was about 2 -2.5 feet long. You most likely won’t see the ribbon once you put this on the tree

Step 3:
Place all of the floral picks into the tops and side of the foam. Wire cutters are a good tool to have to cut the length off of floral picks.
The floral picks used on this tree topper were left long in the back and shortened for the sides and front. This image shows the side and back before it was completed. Some of the smaller picks/branches were cut off of larger floral picks.

This is what the topper look like before the deer head and front ribbon was attached. Make sure you use enough picks to hide most of the foam. In the spots that aren’t filled you can glue moss onto it or add very small little floral picks or leaves to cover the foam.
If you can see the back of your tree, you will want to cover the back with small floral picks. If your tree won’t be seen from the back, no need to worry about it.

Step 4:
Add the ribbon bow. I just tied the ribbon into a bow and hot glued it into place. If you would like to know how I created this designer ribbon, check this post.

Step 5:
The last step was attached the deer head which was done with hot glue. What would we do without our glue guns?
Step 6:
I like to place my tree topper on the tree first and then decorate everything around it. This is definitely a two person job. Make sure that you tie it tightly around the tree so that it will stay securely.

I had so much fun with this theme, and looked for creative ways to tie it all together in the little details. One way I tied together the plaid and the reindeer was to give the reindeer’s antlers a makeover!
The festive plaid antlers on your reindeer is a great way to decorate just with the reindeer head or add it to the Christmas tree topper to make a fabulous topper for the Christmas tree!


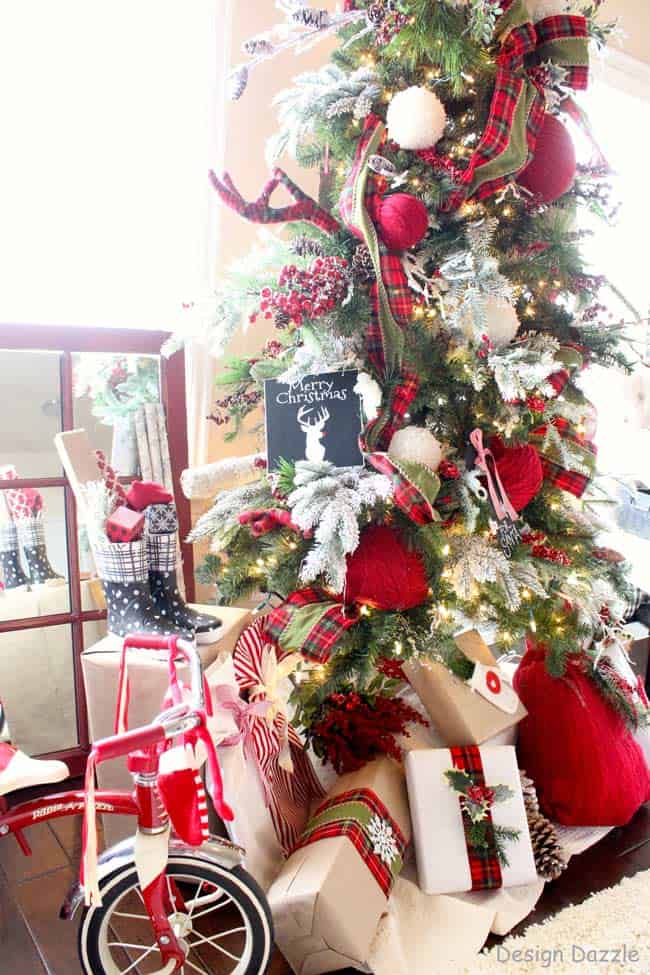
Since plaid and reindeer are two of Santa’s favorite things, I’m sure he would approve of this awesome Christmas tree topper!
Have you checked out my Christmas eBook, Making Christmas Magical? It’s 134 pages of Chrsitmas traditions, recipes, and tips just like the information in this post!

Buy the Making Christmas Magical eBook


Anonymous says
Hey there, You’ve done an excellent job. I certainly digg it
and personally suggest this site to my friends.
Tiffani says
This gorgeous tree instantly caught my eye! Thank you for the tutorial and inspiration.
Toni - Design Dazzle says
Thank you, Tiffani! I so appreciate your kind comments!!
Kathy says
Love this!
Toni - Design Dazzle says
Thanks, Kathy! I really like how it turned out.
Tarrah says
HI – how did you attach it to your tree top? I love the design but am not sure how to secure the floral foam to the tree.
Thank you for your help!
Toni - Design Dazzle says
Hello!
A piece of ribbon is glued to the FRONT of the floral foam and completely around it so you tie it in the BACK. When finished withe the tree topper – tie the ribbon and blocks around the tree. So the back of the tree is where you tie a knot that can be easily undone. That is what holds it to the tree.
Hot glue the scrap ribbon to the front of the blocks. Make sure you attach the ribbon to the front so that it will add extra strength when you tie it onto the tree. Any scrap ribbon will do – it just needs to be long enough to wrap around the entire section of the blocks and then around the tree top. My ribbon was about 2 -2.5 feet long. You most likely won’t see the ribbon once you put this on the tree
judy says
this is truly a wonderful tree.
Toni - Design Dazzle says
It’s lovely. I really enjoy it. Thank you!!
Heather Helfman says
I love this! Where did you get the rain deer head?
Toni - Design Dazzle says
Michaels Stores is where the deer head was purchased. You might be able to find something here online https://amzn.to/2yiKpSi
Kim Johnson says
Are those real branches/pieces of wood sticking out of the tree near the top? If so, did you just add them near the top?
Thanks
Kim J
Toni - Design Dazzle says
I used floral branches from Michaels Stores. You can find them in the floral section. You could also use lightweight tree branches if you have them.
Have fun decorating!
Ashley Leon says
In the pics it looks like the only ribbon that is tied around is tied over the floral picks at the top…I don’t see where you wrapped the the “scrap” ribbon around the green blocks..sorry if I sound dumb …lol I am a visual person!! So do I literally wrap it around the center of the green blocks? Layer various long pieces of scrap fabric and use that to tie it to the tree?
Toni - Design Dazzle says
Ashley,
Sorry I just your comment. Yes, the ribbon (a long piece) gets wrapped around the center of the green foam block. Then it is tied to the tree. So it goes ribbon, foam and tree with the ribbon tied around it all.
JEAN DUNCAN says
Beautiful, very nice, I think covering the antlers was clever.
I would need help to do this, I’ve made a lot of arrangements, but not as detailed as this one.
Toni - Design Dazzle says
Thank you so much for your kind comment, Jean. I started out doing small projects and kept practising on crafts projects. It somehow works out. : )
MAry Frye says
OK I just read a comment I didn’t see earlier about wrapping ribbon around the block! I’ll try it and I hope it works since I’ve already put everything else in the arrangement! I’ll post a picture of it when I get it figured out!
Toni - Design Dazzle says
Oh, I would love to see your pictures. Glad to see you creating a tree topper.
James Snyder says
I have been looking for the papier mache reindeer head for the past 2 years without any luck. If you know of a place that has them please let me know.
Toni Roberts says
It’s sold here https://amzn.to/4fgjwCT (affiliate link)