• Skip to main content
  • Skip to primary sidebar

Design Dazzle logo

menu icon
go to homepage
  • Home
  • Home Decor / Design
  • Holidays
  • Crafts
  • All Categories
    • Facebook
    • Instagram
    • Pinterest
    • YouTube
  • search icon
    Homepage link
    • Home
    • Home Decor / Design
    • Holidays
    • Crafts
    • All Categories
    • Facebook
    • Instagram
    • Pinterest
    • YouTube
  • ×
    Design Dazzle » Kids » kids rooms

    Published: May 19, 2015 · Modified: Aug 20, 2020 by Toni Roberts · This post may contain affiliate links · 1 Comment

    Drum Shade Chandelier Tutorial

    IMG_20150513_164832918_HDR

    My little lady will be turning ten soon. She and I are on a mission to make her room into a sanctuary that matches her personality…and her personality is bright and fun-loving! She loves animal prints and bold colors which is the complete opposite of my style. Add to that the fact that we’re doing this room on a major budget and you can see how this makeover is a slow process. But little by little I am stepping outside my comfort zone and together we are creating a room that she loves.

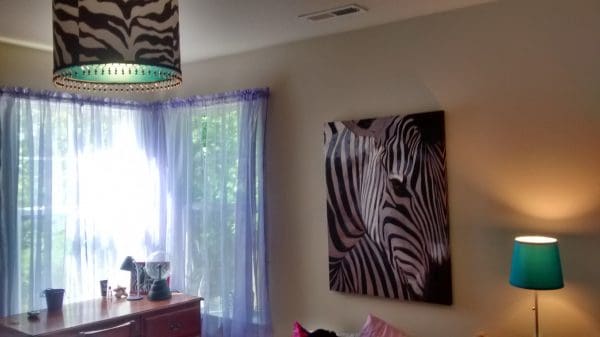
    A few months back I found the most amazing zebra canvas print on clearance. It’s a giant statement piece and she adores it!

    zebra inspiration

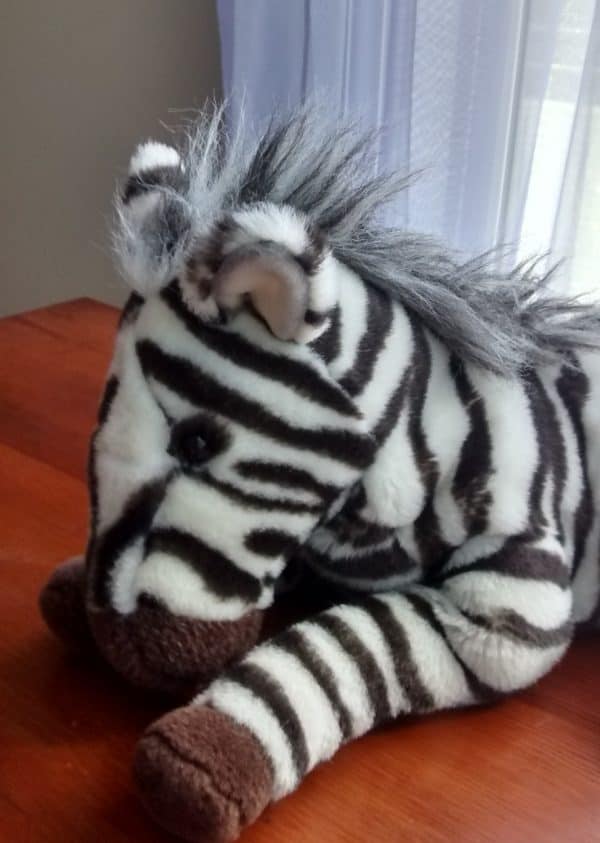
    She also loves that the print matches one of her favorite fuzzy friends.

    drum shade chandelier supplies

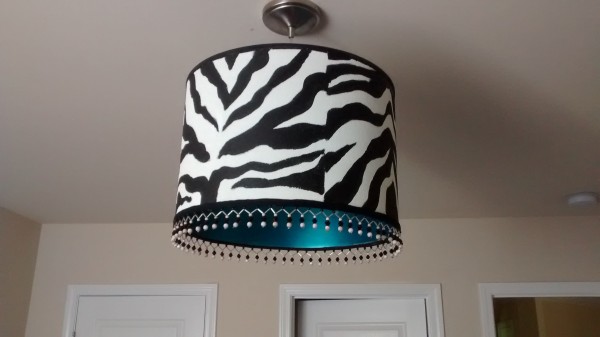
    So when I found a drum shade at Good Will, I had a burst of inspiration. I set out to make a zebra drum shade chandelier. I found a basic drum shade chandelier tutorial online and gathered my supplies.

    Supplies used:

    drum shade

    foam brushes

    metallic acrylic paint for the inside of the shade (it reflects the light beautifully!)

    white semi-gloss paint for the outside of the shade (not shown)

    black acrylic paint for the stripes (not shown)

    glue gun

    beaded trim for the bottom of the shade

    mini-pendant conversion kit

    SteelStik – Steel reinforced epoxy putty (not shown)

    metallic turquoise paint

    First, I painted the interior of the shade with metallic paint. It took 3 coats to get great coverage.

    painting the drum shade

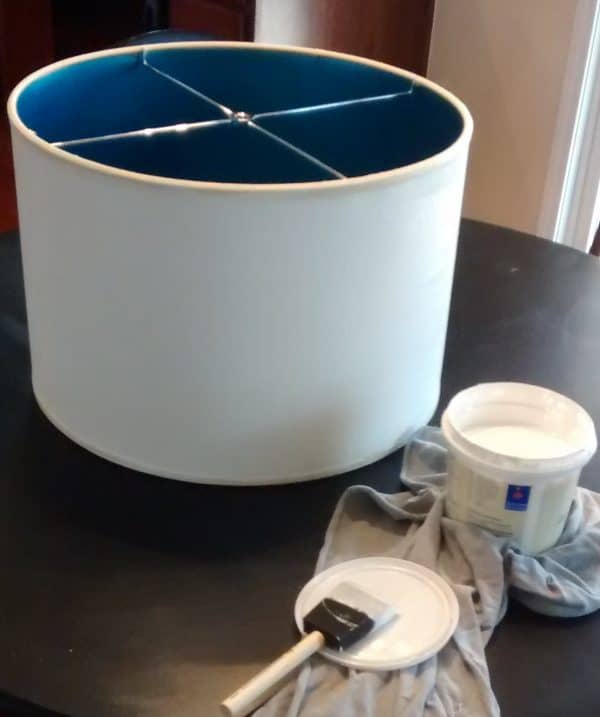
    Then I painted the outside of the shade with white semi-gloss paint. Honestly, I knew I wanted the shade white so I just used the white paint that I had here at the house.

    painting on the zebra stripes

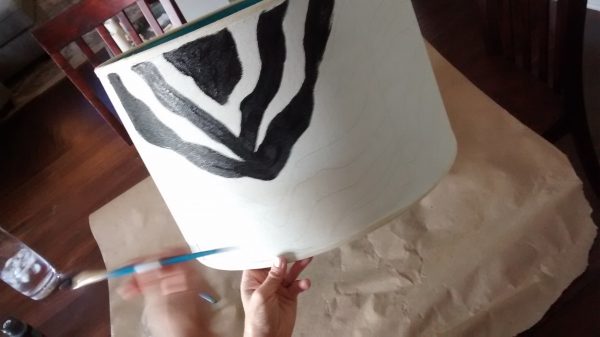
    Then I enlisted the help of a good friend and together we sketched the zebra stripes on the shade using a pencil and painted them using black acrylic paint. I was afraid to try this step on my own but now that I’ve done it, I know that I had nothing to be afraid of…I could have jumped right into this step solo and it still would have turned out great.

    When that was dry, I used my hot glue gun to attach the beaded trim to the bottom of the shade.

    My husband and I followed the steps that came with the pendant light kit to string up the light. We found that the shade didn’t sit quite right on the fixture so we ended up using SteelStik metal epoxy to hold the shade onto the pendant at the proper angle. Basically we glued the shade to the pendant kit. Depending on what your shade looks like you might not have to do this step.

    IMG_20150513_165011822

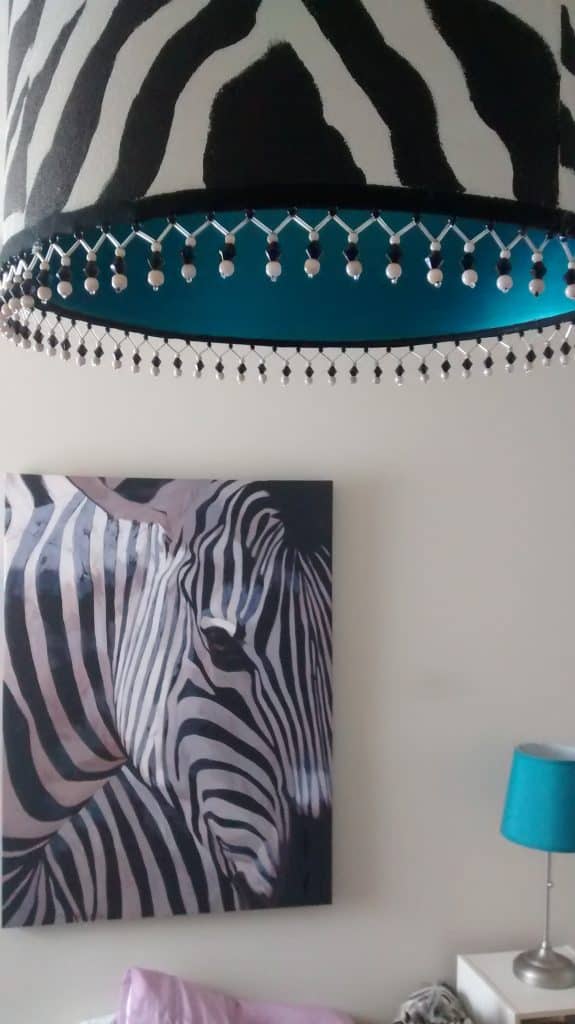
    Here is the zebra drum shade chandelier hanging in her room. Now to decide on a wall color….

    zebra chandelier

    signature_toni.jpg

    More Crafts

    • Creative Ways to Paint Rocks
      20 Creative Ways For Painting Rocks
    • Energetic Whipped Grapefruit Body Butter
      Whipped Body Butter Recipe
    • DIY Paper Ruffle Party Decor made with paper towels!
      Easy DIY Paper Ruffle Party Decor
    • Holiday Santa Sack
      Santa Sack: Do Not Open Until December 25th

    Sharing is caring!

    Reader Interactions

    Comments

    1. Debbie says

      May 19, 2015 at 11:06 am

      Very cute!

      Reply

    Leave a Reply Cancel reply

    Your email address will not be published. Required fields are marked *

    Recipe Rating


    Primary Sidebar

    Toni medium

    Hi, I’m Toni! I love designing and decorating. Join me for home inspiration and creative living! More about me →

    Popular

    Spring/Easter

    • Setting an Easter Table
      Decorating An Easter Table
    • elegant recipes with rose
      Rose Petal Sweets
    • IMG 9043
      Simple Easter Table Decor
    • Edible Bunny Box with candy inside. - Design Dazzle
      It’s An Adorable, Edible Easter Bunny! D-I-Y

    Footer

    ↑ back to top

    About

    • Privacy Policy
    • About Toni

    Contact

    • Contact
    • Press & Partnerships

    Toni Roberts is a participant in the Amazon Services LLC Associates Program, an affiliate advertising program designed to provide a means for sites to earn advertising fees by advertising and linking to amazon.com

    DesignDazzle.com is protected by copyright laws. DO NOT distribute or copy the content or share multiple images or collage images without written permission. You can use ONE Design Dazzle image only if there is a link back to DesignDazzle.com. DO NOT edit, crop, or remove watermarks from any image. Please contact me at [email protected] with any questions.

    Copyright © 2024 Design Dazzle