• Skip to main content
  • Skip to primary sidebar

Design Dazzle logo

menu icon
go to homepage
  • Home
  • Home Decor / Design
  • Holidays
  • Crafts
  • All Categories
    • Facebook
    • Instagram
    • Pinterest
    • YouTube
  • search icon
    Homepage link
    • Home
    • Home Decor / Design
    • Holidays
    • Crafts
    • All Categories
    • Facebook
    • Instagram
    • Pinterest
    • YouTube
  • ×
    Design Dazzle » Kids » kids parties

    Published: Oct 24, 2013 · Modified: Aug 13, 2020 by Toni Roberts · This post may contain affiliate links · 2 Comments

    DIY: How-To Make A Freestanding Party Backdrop

    DIY: How-To Make A Freestanding Dessert Table Backdrop -- Design Dazzle

    Last month I had a Mary Poppins party at my home. There were 12 bloggers (including myself) who put on a spectacular party for 20 of our guests. Since we served some delicious desserts a dessert table backdrop was very necessary. We held this event outdoors and I have no structure or wall to attach a party backdrop to (also great for setting up at a park). So I’m sharing the DIY: how-to make a freestanding party backdrop. This was made heavy duty to the winds and weather (in my area). It took a little longer to make than your usual lightweight indoor backdrop. If you were to make an indoor party backdrop, there is a tutorial for a much lighter version. Check out my foam insulation party backdrop.  With the exception of the paint, the backdrop materials came from Lowe’s.

    It was well worth it to make the backdrop for the cutest dessert display.
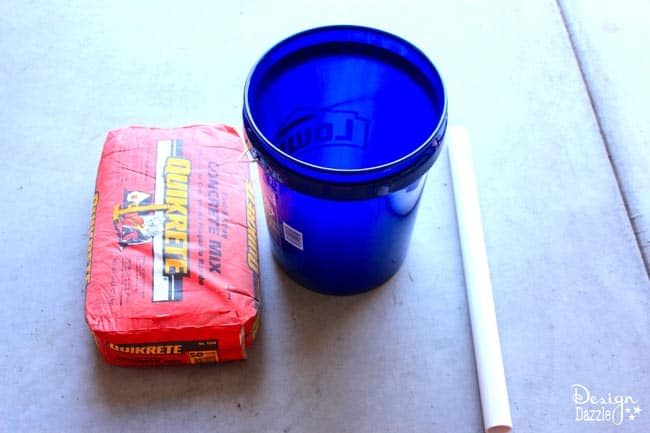
    Materials:

    – 3: bags of Quikrete Concrete Mix

    – 2: PVC Pipe (18 inches long)

    –  2: 5 Gallon Buckets

    – 2: 1″ x 60″ Galvanized Pipes

    – 4: 1″ Galvanized Pipe Strap

    -¼″  4’x8′ Plywood Underlayment (Cut down to 4’x6′)

    – 2: or 3 1″x2″ scrap lumber

    – Screws

    – Black Chalkboard Paint

    – Chalk

    – Red, White and Yellow Paint

    Steps:

    DIY: How to make an outdoor Dessert Table backdrop -- Design Dazzle

    1. Pre-mix the quikrete in a larger bucket or wheelbarrow. Use water and a shovel while mixing.

    DIY: How-to make a freestanding party backdrop -- Design Dazzle

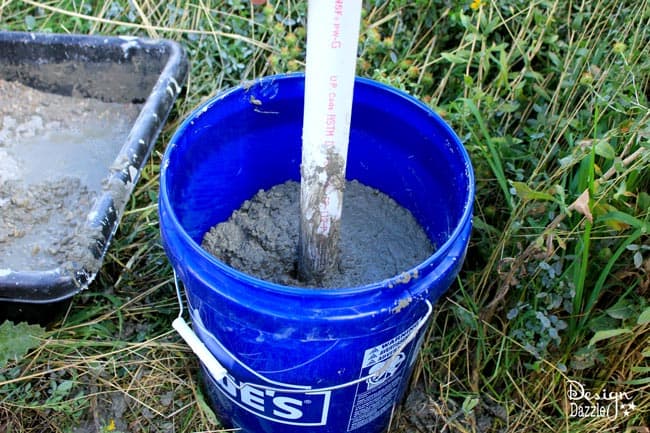
    2. Pour the wet cement in the 5 gallon bucket around the PVC pipe in the middle. Use a level to make sure the PVC pipe is straight up and down.

    DIY: How-to make a freestanding party backdrop -- Design Dazzle

    Allow the cement to dry completely – several hours or overnight.

    DIY: Mary Poppins Dessert Table -- Design Dazzle

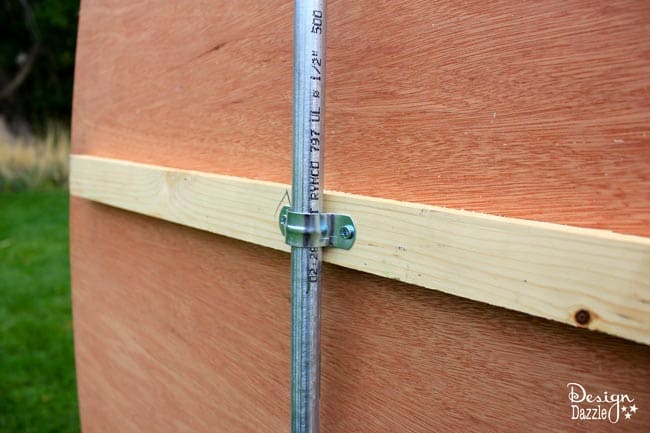
    3. Screw the 1″ x 2″ scrap lumber to the back of the plywood underlay for bracing. You can use a regular thick plywood board for the entire backdrop but that makes the backdrop very heavy.

    4. Screw the galvanized pipe straps to the scrap lumber around the galvanized pipes. Make sure they are tight to clamp the pipe to the board.

    How-to make a dessert table backdrop -- Design Dazzle

    5. Stick the galvanized metal pipes in the PVC pipes.

    DIY: How-to make a Mary Poppins Dessert Table Backdrop -- Design Dazzle

    We painted the board with a black paint and then used chalk to create this lovely Mary Poppins dessert table backdrop. Paint was added to the flowers and cherries for a pop of color. I used cheap hair spray to spray over the entire chalk drawings. Guess what? It doesn’t smudge.


    What is nice about this backdrop is that you change it into a new backdrop by stapling fabric to it to fit your new party theme or painting over it for future parties.

    Thank you to Lowe’s for the supplies to make this backdrop! All opinions are my own.

    signature_toni

    More Crafts

    • Creative Ways to Paint Rocks
      20 Creative Ways For Painting Rocks
    • Energetic Whipped Grapefruit Body Butter
      Whipped Body Butter Recipe
    • DIY Paper Ruffle Party Decor made with paper towels!
      Easy DIY Paper Ruffle Party Decor
    • Holiday Santa Sack
      Santa Sack: Do Not Open Until December 25th

    Sharing is caring!

    Reader Interactions

    Comments

    1. Katie says

      March 27, 2022 at 6:08 pm

      My husband made me one to use for the dessert table at my son’s birthday party. I covered it with gray brick contact paper & it looked gorgeous! Thanks!

      Reply
      • Toni - Design Dazzle says

        April 02, 2022 at 12:55 pm

        So glad it worked out for you.

        Reply

    Leave a Reply Cancel reply

    Your email address will not be published. Required fields are marked *

    Recipe Rating


    Primary Sidebar

    Toni medium

    Hi, I’m Toni! I love designing and decorating. Join me for home inspiration and creative living! More about me →

    Popular

    Spring/Easter

    • Setting an Easter Table
      Decorating An Easter Table
    • elegant recipes with rose
      Rose Petal Sweets
    • IMG 9043
      Simple Easter Table Decor
    • Edible Bunny Box with candy inside. - Design Dazzle
      It’s An Adorable, Edible Easter Bunny! D-I-Y

    Footer

    ↑ back to top

    About

    • Privacy Policy
    • About Toni

    Contact

    • Contact
    • Press & Partnerships

    Toni Roberts is a participant in the Amazon Services LLC Associates Program, an affiliate advertising program designed to provide a means for sites to earn advertising fees by advertising and linking to amazon.com

    DesignDazzle.com is protected by copyright laws. DO NOT distribute or copy the content or share multiple images or collage images without written permission. You can use ONE Design Dazzle image only if there is a link back to DesignDazzle.com. DO NOT edit, crop, or remove watermarks from any image. Please contact me at [email protected] with any questions.

    Copyright © 2026 Design Dazzle