• Skip to main content
  • Skip to primary sidebar

Design Dazzle logo

menu icon
go to homepage
  • Home
  • Home Decor / Design
  • Holidays
  • Crafts
  • All Categories
    • Facebook
    • Instagram
    • Pinterest
    • YouTube
  • search icon
    Homepage link
    • Home
    • Home Decor / Design
    • Holidays
    • Crafts
    • All Categories
    • Facebook
    • Instagram
    • Pinterest
    • YouTube
  • ×
    Design Dazzle » Kids

    Published: May 30, 2013 · Modified: May 25, 2022 by Toni Roberts · This post may contain affiliate links · 2 Comments

    Turn a Wood Shutter into a Window Valance

    Turn a wood shutter into a window valance

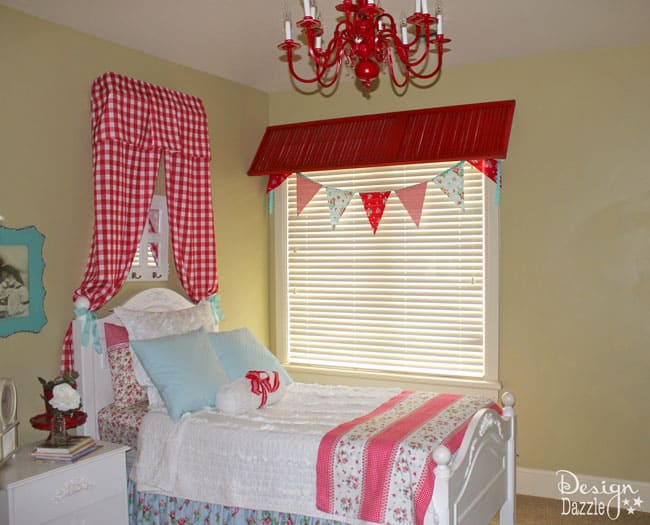
    What to do with old shutters or louver doors? Turn a wood shutter into a window valance! I’ve been working on this guest room for a little while now and have wanted to create a cute valance. Yes, this room is a guest room. The white shabby chic furniture use to be my daughters and I wanted to create a cute room using all the furniture. We moved out of state several months back and have company occasionally come stay. This room is more for my friends and our college student guests who are girls! We have another guest room not so girly ; )

    How to make a wood shutter window valance

    You won’t believe how easy it is to make this wood shutter window valance.

    SUPPLIES:

    wood shutter or wood louver door (purchased at Home Depot)

    metal brackets

    non-mortise hinges

    drywall anchors/screws

    paint (if needed)

    TOOLS:

    drill

    screwdriver

    steps to make a wood shutter valance

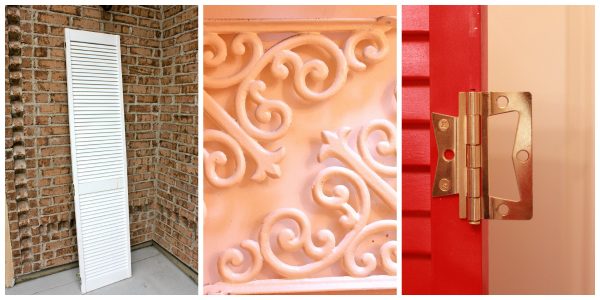
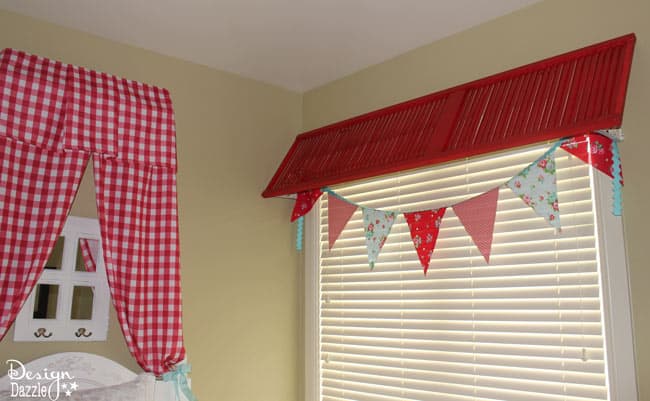
    So, I decided to make a wood shutter valance from a white louver door (we painted red). The hinges that came with the door were removed. Iron brackets were purchased at Hobby Lobby. As you can see, I spray painted them an off-white. The non-mortise hinges were added to hang the shutter on the wall above the window.

    tutorial wood shutter window valance

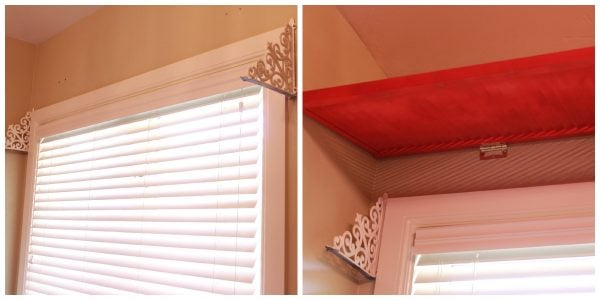
    Use drywall anchors/screws in the wall to secure the hinges and metal brackets. Attach metal brackets to the wall. Screw metal hinges into the wall and it’s done! NOTE TO SELF: make sure to spray paint the bottom of the brackets next time! The wood shutter is raised in the picture so you can see how it is hung.

    wood shutter valance how-to

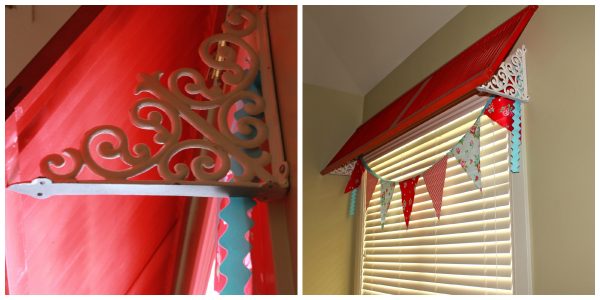
    Here is the side view of the window valance. The pennant banner was made with fabric scraps and rick rack. No sewing required – the hot glue gun works great!

    before picture

    Here is the BEFORE picture.

    red-chandlier-kids-room

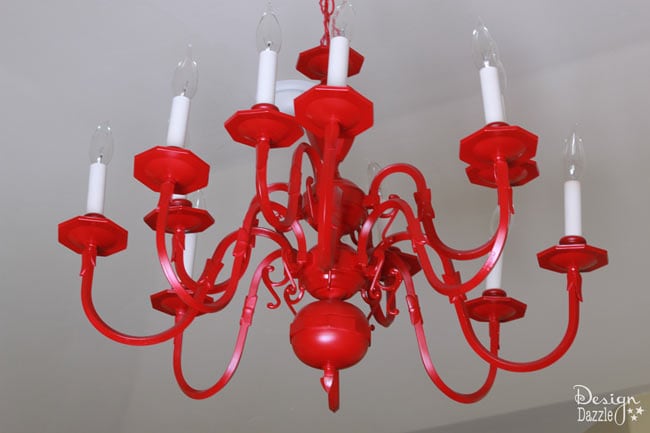
    Check out the before picture of this chandelier. I so love the red!! All it took was 2 cans of red spray paint. I’m hoping to get the mini lampshades soon!

    turn-a-shutter-into-a-window-treatment

    wood-shutter-valance-kids-room

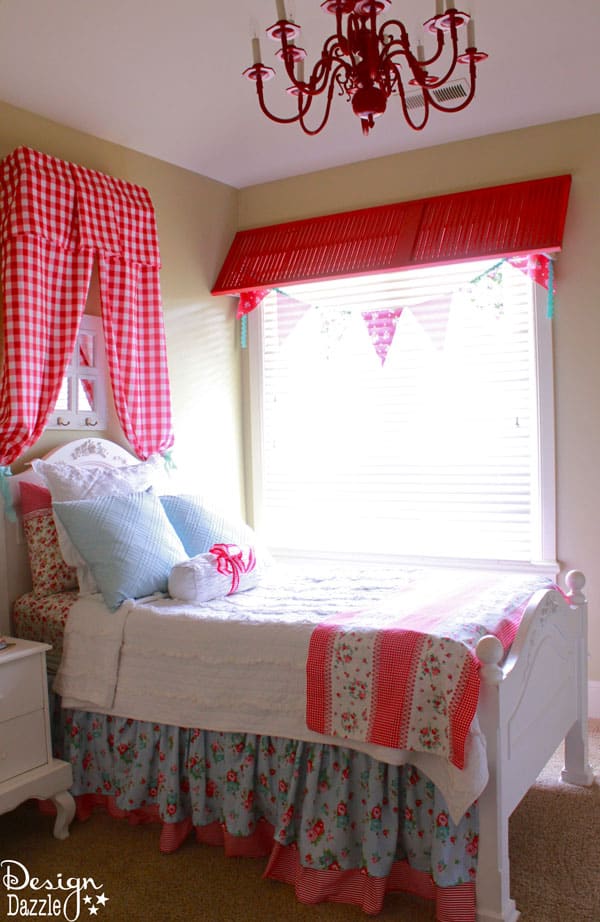
    I love this room. There is also a tutorial coming up soon on how to make the no-sew fabric bed crown.

    This project was made possible by the representatives of  YP – Local Search & Gas Prices app . This wonderful app can provide you with information on many  different businesses in your local area, including  movie theaters, restaurants, gas station, retail shops, contractors, etc. And it’s a FREE app!

    I found a handyman Todd from A Job Well Done from the YP app. He is very efficient and did a great job figuring out how to hang the shutter with non-mortise hinges. He also fixed (and hung) my chandelier that had broken during our move.

     Thanks to YP for the gift card to help with this project!

    More Kids

    • Creative Ways to Paint Rocks
      20 Creative Ways For Painting Rocks
    • banana ocean smoothie bowl
      Banana Smoothie Bowl (Ocean Theme)
    • Easy Christmas Movie Night Party by The Party Teacher
      A Christmas Movie Night Your Kids Will Love
    • grinch party ideas
      Grinch Party Ideas

    Sharing is caring!

    Reader Interactions

    Comments

    1. Mindy Mae's says

      May 31, 2013 at 8:39 am

      so so so cute! color choices are perfect! love!

      Reply
      • Toni - Design Dazzle says

        May 31, 2013 at 9:21 am

        Thanks Mindy Mae! I think it’s pretty cute too!

        Reply

    Leave a Reply Cancel reply

    Your email address will not be published. Required fields are marked *

    Recipe Rating


    Primary Sidebar

    Toni medium

    Hi, I’m Toni! I love designing and decorating. Join me for home inspiration and creative living! More about me →

    Popular

    Spring/Easter

    • Setting an Easter Table
      Decorating An Easter Table
    • elegant recipes with rose
      Rose Petal Sweets
    • IMG 9043
      Simple Easter Table Decor
    • Edible Bunny Box with candy inside. - Design Dazzle
      It’s An Adorable, Edible Easter Bunny! D-I-Y

    Footer

    ↑ back to top

    About

    • Privacy Policy
    • About Toni

    Contact

    • Contact
    • Press & Partnerships

    Toni Roberts is a participant in the Amazon Services LLC Associates Program, an affiliate advertising program designed to provide a means for sites to earn advertising fees by advertising and linking to amazon.com

    DesignDazzle.com is protected by copyright laws. DO NOT distribute or copy the content or share multiple images or collage images without written permission. You can use ONE Design Dazzle image only if there is a link back to DesignDazzle.com. DO NOT edit, crop, or remove watermarks from any image. Please contact me at [email protected] with any questions.

    Copyright © 2024 Design Dazzle