• Skip to primary navigation
  • Skip to main content
  • Skip to primary sidebar
  • Home
  • Blog
  • About
    • Contact
    • Press & Partnerships
    • Copyright/Disclosure
    • Links/Parties/Giveaways
    • HOI Friends
      • Toni Roberts
      • Tauni Everett
      • Tammy Mitchell
      • Randi Dukes
      • Michelle Stewart
      • Mariah Leeson
      • Mandy Beyeler
      • Lindi Haws
      • Kim Byers
      • Ashley Johnston
      • House of Ideas
  • Videos
  • SHOP

Design Dazzle

Inspiration for kids rooms, baby nurseries, and kids parties

  • My Home
    • Home Tour
    • Christmas Home Tour
  • My Projects
    • My Projects
    • Companies I Have Worked With
    • Michaels Makers
  • DIY/Decor
    • top tutorials
  • crafts
  • celebrations
    • parties
    • christmas
    • halloween
    • thanksgiving/fall
    • New Year’s
    • Valentine’s Day
    • St. Patrick’s Day
    • Easter/Spring
    • mother’s day
    • father’s day
    • patriotic
    • School/Teacher/Graduation
    • Gift Ideas
    • weddings
    • best ideas
  • Recipes
    • Meals
    • Instant Pot/Crock Pot
    • Desserts
    • Treats & Snacks
  • travel
  • free printables
  • Lifestyle
    • organization
    • Preparedness
    • Healthy Living
  • kids
    • kids parties
    • kids rooms
      • cool bedroom ideas
    • summer camp/crafts
You are here: Home / celebrations / Make Your Own Childrens’ Nativity Set!

Make Your Own Childrens’ Nativity Set!

This post may contain affiliate links that, at no additional cost to you, I may earn a small commission. Read our Disclosure Policy.

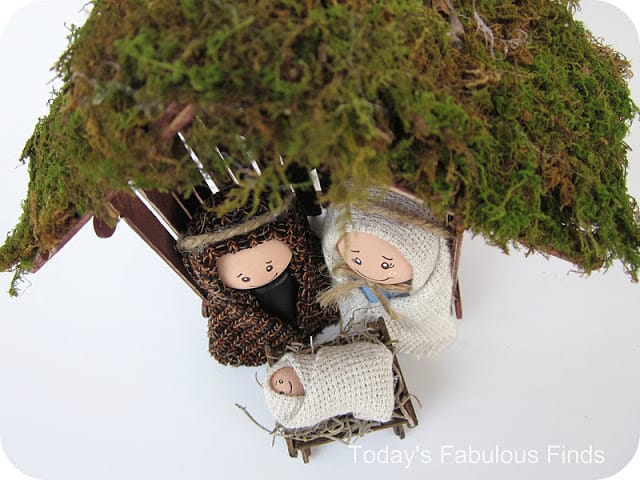
Hi everyone! It’s such an honor to be guest posting here at Design Dazzle! My name is Janet and I blog over at Today’s Fabulous Finds. I just finished my very first Christmas craft of the season:  A Childrens’ Nativity Set made with craft sticks and clay pots. I’m so excited to show you how to make one for your own family or to give away as a gift!

Make your own Children's Nativity Set Featured on Design Dazzle
This nativity set is especially for kids. They can play with it, keep it in their room, and best of all…they can help you make it, which makes it even more special and memorable!
Sweet and Simple Children's Nativity Set {DIY Craft} Featured on Design Dazzle
(The clay pot figures were inspired by a set that a good friend made for me years ago, there are many versions floating around so choose the one that you like best. The stable and manger are my own designs.)
 Craft Stick Nativity Stable
(Finished size:  Height 7″ without the star, width 8″)
Beautiful DIY Nativity featured on Design Dazzle
Supplies Needed
Pkg. of craft sticks
Wire cutters and scissors
Hot glue gun and glue
Sm. pkg. of sheet moss
Dark brown stain or paint
Black craft wire
Wood star
Gold/yellow and cream/gray paint
Rag or foam brush
Sand paper

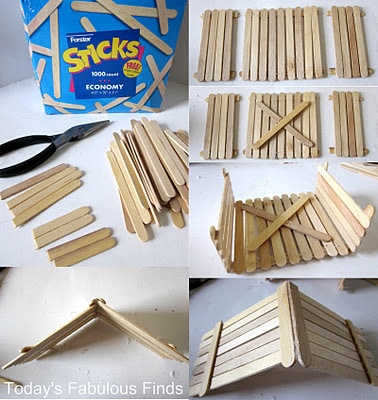
1. Using a pair of wire cutters, cut two paint sticks in half. Pinch the stick tightly with the wire cutters and then carefully break it off in two or one side may just flip across the room. Yes, we know from experience. 🙂  Cut one-fourth of the length off of 4 more paint sticks. The rest of the sticks used will be full-size.

2. Lay out two sets of four sticks. Hot glue the half-size sticks to the top and bottom. Lay out 9 sticks, glue a full-size stick to the top and bottom.

3. Glue the X on. (You may want to wait to do this step until after your stain/paint the back piece.)

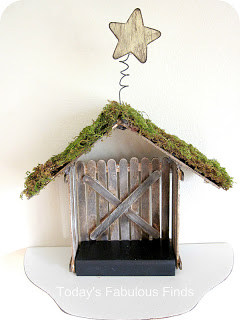
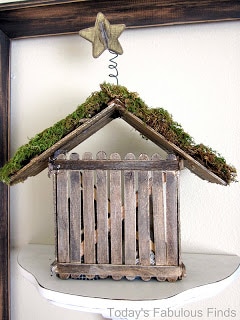
4. Glue the three wall pieces together as pictured above.

5. Lay out two sets of seven sticks. (Leave a small space between two of them to string the wire through for the star.)  Glue a stick across, one inch up from the bottom. Glue another stick across at the top so it hangs over the top of the sticks by 1/8″ (this will be the peak of the roof).

6. Glue the two parts of the roof together in the center. Use plenty of hot glue. Hold the two pieces in place on the sides of the stable and at the angle you want the roof as the glue dries.

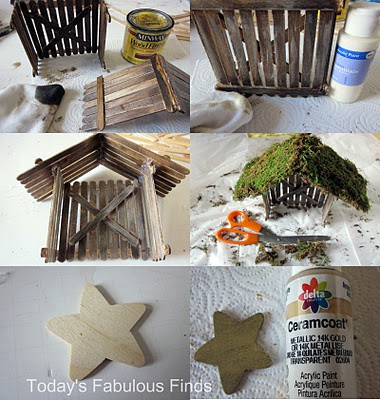
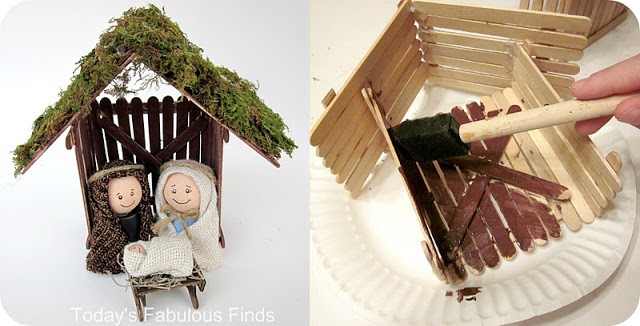
7. Use a rag to stain the craft sticks and the star or paint them dark brown with craft paint and a brush. Let dry. With the rag, gently rub some cream or gray paint over the stain to give it a weathered look. Blend it in with a clean part of the rag as you go.

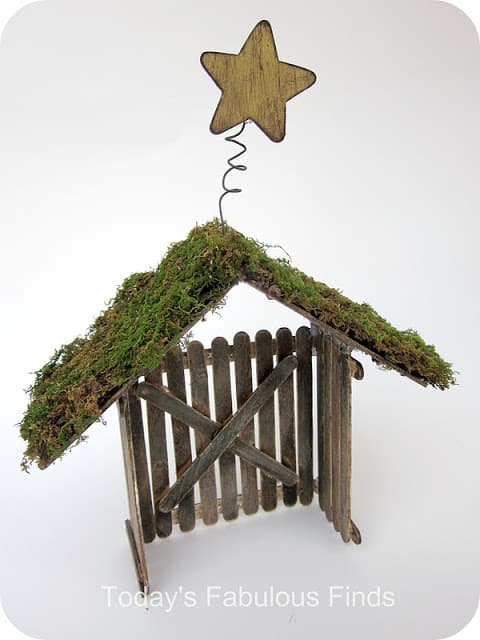
8. Glue the roof in place on the side walls. Lay out sheet moss on the roof, glue in place, and then roughly trim the edges with scissors.

9. For the star: Paint over the stain with gold paint. Sand to distress. Ink around the edges with a distress ink pad if necessary. Cut a piece of wire, thread it through the roof. Curl the end and hot glue it to the underside of the roof. Curl the top of the wire around a pencil and hot glue the star to the wire.


Clay Pot Nativity People


Supplies Needed

2- 1 3/4″ to 2″ clay pots (This is a seasonal item, I found mine at Jo Ann’s)
2- round wood balls (1 1/2″)
1- round wood ball (5/8″)
Fabric scraps
Craft sticks
Permanent marker
Small dowel (you can also use an old foam brush handle)
Spanish moss
Blue, black, and flesh color paint and foam brush
Jute
Hot glue gun and glue
Small pin
Wire cutters
Baby Jesus and Manger
1. Cut 4 sticks just under 2″ long using the rounded end, and 6 sticks 1 3/4″ long. Criss-cross and glue the rounded sticks at the center. The legs must be glued exactly as shown in the picture for the manger to work correctly.
2. Glue 4 sticks on for the bottom of the manger, glue the remaining two sticks to the ends and then glue spanish moss onto the manger.
3. Cut a dowel 1″ long. Glue the 5/8 ball to one end. Paint with flesh color paint. Draw the face on with a fine tip permanent marker. Dip the head of a small pin into white paint and dot the eyes and cheeks.
4. Cut a scrap of fabric. Fold the top of the fabric down an inch, wrap over the head, swaddle the fabric around the baby, tuck the ends under and glue to the back.
Joseph and Mary
1. Paint the pot and the head then hot glue the head to the pot.
2. For the robes, cut a square of scrap fabric. Fold the top inch under and place it over the head. Glue the sides of the robe to the pot. Bring the fabric around and glue at the bottom center. Trim off the excess fabric around the bottom with a pair of scissors.
3. Draw the faces on with a fine tip permanent marker and dot eyes and cheeks with a pin head dipped in white paint.
4. Separate one strand out from a piece of jute and tie it for Mary’s bow. Tie some jute (all strands) in knots for the head bands.
I thought that Joseph and Mary could be a little taller, so I cut a piece of wood, painted it black (brown may have looked better), and set it inside the stable. It made them just the right height, you won’t notice it there when Joseph and Mary are in place.

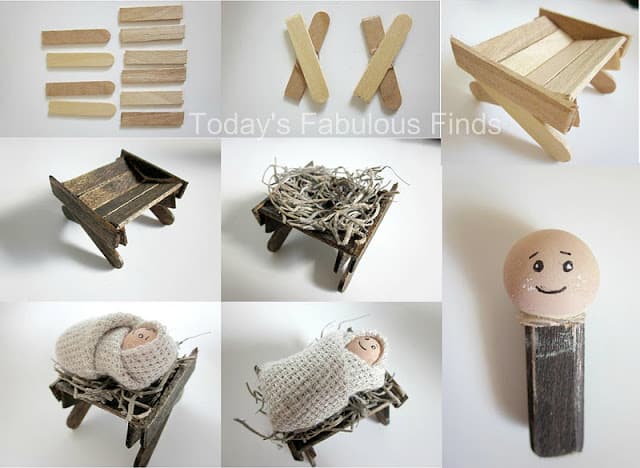
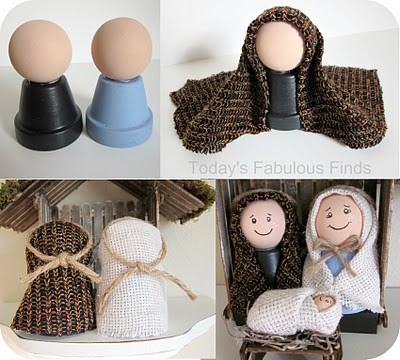
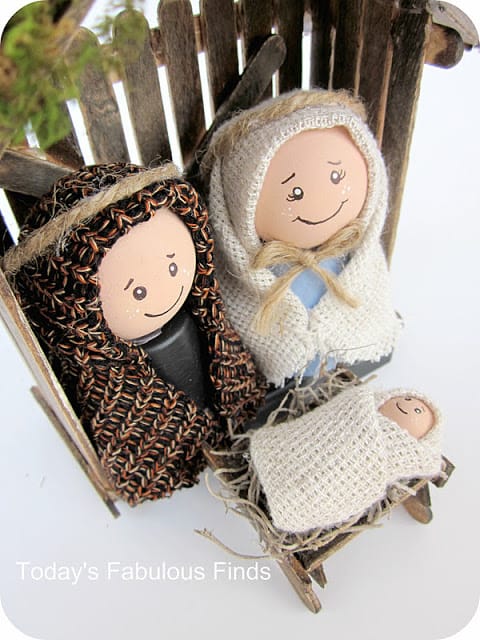
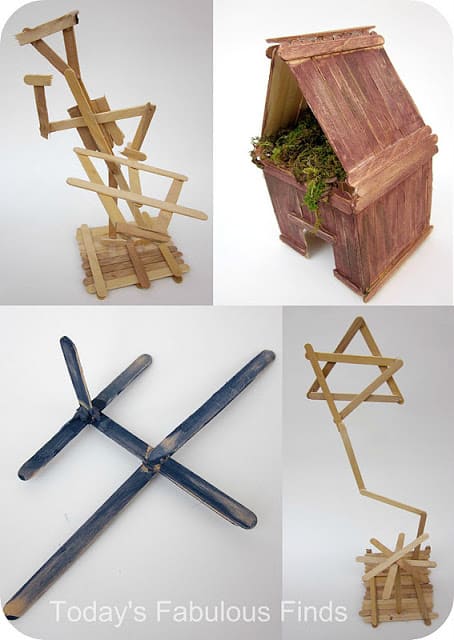
As you can see, this nativity set is not too hard to make. My daughter made the stable pictured below almost all on her own. She painted it a dark brown instead of staining it. Paint made the clean-up a lot easier, as you can imagine. 🙂

If you’re looking for an activity that will entertain your kids/grand kids, I suggest buying a large box of craft sticks. Pictured below are a few of the things my kids have made 100% on their own, without any help. It’s amazing the creativity that can come from a pile of craft sticks, a hot glue gun, and a little paint. It’s so much fun!

We adore our little nativity set and hope that this is something that you can make and enjoy with your family as well!
If you like small handmade crafts and gifts like this one, I have ‘a few’ more over at Today’s Fabulous Finds that I’d love to share with you. 🙂

Have a wonderful Holiday season! Thanks for having me over Toni!

Our 100 Ideas of Christmas Wonderful series will be featured through Christmas!

Related Posts


Nativity Coloring Page


Paint-By-Numbers Nativity


Free Printable Nativity & Coloring Page


FREE Paper Doll Printables – The Nativity, Santa’s Helpers and more!

Holiday Treats the Kids can make!


How To Set A Halloween Tablescape


How to set the perfect Christmas Table

Farkle Game Set


Honey Maid Graham Cracker Nativity

Article Rating:
No rating
Author Bio
Article Info
Popular Posts
Toni - Design Dazzle

Toni - Design Dazzle

Owner at Design Dazzle
Toni Roberts is a DIYer, designer, crafter, traveler, holiday lover, and memory maker. Design Dazzle encompasses ideas and inspiration for life’s celebrations, home projects, DIY crafts, holiday fun (especially Christmas), travel and more.
Power Bio Box by HOI
You are here: Home crafts Make Your Own Childrens’ Nativity Set!
Title:
Make Your Own Childrens’ Nativity Set!
Authors:
  • Toni - Design Dazzle
Categories:
  • celebrations
  • christmas
  • crafts
Mentions:
100 ideas of Christmas wonderful, childrens nativity set, Christmas crafts, christmas wonderful, holiday ideas
Keywords:
Childrens' Nativity Set
Last Updated:
December 1, 2020
  • 33 Cute Valentine's Day Recipes For Kids
  • Minnie Mouse Valentine's Cookie Pops
  • DIY Holiday Truck
  • Harry Potter Quidditch Bridal Shower Centerpiece
  • Christmas Kitchen Tour
  • How to Do a Church Christmas Grinch Party on a Budget
  • Baby's First Christmas Pajamas
  • Santa's Special Delivery Gift Tags
  • Make Faux Birch Logs Using Pool Noodles
  • Straw Weaving Bracelets
  • Summer Camp Giant Bubbles Kit Tutorial With Free Printables
  • How To Make Pom Pom Tissue Flowers

Sharing is caring!

Disclaimer

This post may contain affiliate links, which means that if you click on a product link, we may receive a commission (at no extra cost to you). See my full disclosure for further details.

Reader Interactions

Comments

    Leave a Reply Cancel reply

    Your email address will not be published. Required fields are marked *

    Recipe Rating


  1. Dazie says

    November 10, 2011 at 3:52 am

    Quite possibly the cutest christmas nativity I have seen! Love it!

    dazie
    x

    Reply
  2. Ирина says

    November 10, 2011 at 5:01 am

    Very cute 🙂

    Reply
  3. Ирина(Ирика) says

    November 10, 2011 at 6:15 am

    Какие очаровательные!!!

    Reply
  4. K says

    November 10, 2011 at 6:33 am

    Love this!

    Reply
  5. DesignDazzle.blogspot.com says

    November 10, 2011 at 7:00 am

    Janet – this is so CUTE!
    Thanks for making and sharing such a darling nativity set!

    Reply
  6. Janet says

    November 10, 2011 at 5:59 pm

    Thanks for inviting me to guest post. 🙂 I'm looking forward to seeing the wonderful ideas ahead!

    Reply
  7. Patita says

    November 10, 2011 at 9:01 pm

    So cute! LOve this!

    Reply
  8. lynn says

    November 11, 2011 at 4:34 am

    janet, this is such an adorable nativity! just love it! thanks for sharing the tutorial:)

    Reply
  9. Karen says

    November 11, 2011 at 7:47 am

    This is adorable1 What a great idea to do with the kids:) Thanks so much for sharing Janet!!

    Reply
  10. Fancy says

    November 11, 2011 at 8:24 am

    That is so cute! Very detailed tutorial 🙂

    Reply
  11. Karina says

    November 11, 2011 at 9:49 am

    This is adorable! Very creative 🙂 Thanks for breaking down the steps and making it look easy. I'm pretty sure I can't make it look that nice. Hehe.

    Reply
  12. Tricia @ SweeterThanSweets says

    November 20, 2011 at 5:08 am

    So cute! I love this! Off to Pin it right now. =)

    Reply
  13. Anonymous says

    January 12, 2012 at 7:27 am

    If you always write interesting, I will be your regular reader. skin care Read a useful article about tramadol tramadol

    Reply
  14. Anonymous says

    February 17, 2012 at 7:42 am

    I really liked your article. cardiovascular Read a useful article about tramadol tramadol

    Reply
  15. Dayami says

    November 21, 2012 at 11:49 am

    Adorable!!!

    Reply
  16. Bonita says

    December 2, 2012 at 5:14 pm

    Just letting you know that I linked to this post on my page called Nativity Activities for Kids: https://www.zujava.com/nativity-activities-for-kids

    Reply
  17. Sunday School Teacher says

    December 8, 2012 at 10:00 pm

    i love this craft! and it’s perfect my 4th grade sunday school students. to make it cleaner and quicker in the classroom (and more affordable), would I be able to use magic markers to color the wood instead of paint? i know it won’t be as authentic, but i’m hoping it will be a comparable substitute. let me know what you think!

    Reply
  18. Nellie says

    September 17, 2013 at 3:23 pm

    It’s an awesome piece.

    Reply

Primary Sidebar

Img 0422

Hi, I’m Toni! Welcome to my blog Design Dazzle. I love being a designer, DIYer, traveler, crafter, holiday lover, and memory maker. Read more.

Toni Roberts is a participant in the Amazon Services LLC Associates Program, an affiliate advertising program designed to provide a means for sites to earn advertising fees by advertising and linking to amazon.com

DesignDazzle.com is protected by copyright laws. DO NOT distribute or copy the content or share multiple images or collage images without written permission. You can use ONE Design Dazzle image only if there is a link back to DesignDazzle.com. DO NOT edit, crop, or remove watermarks from any image. Please contact me at toni@designdazzle.com with any questions.

About | Contact Us | Privacy and Legal

© 2017 Design Dazzle · All Rights Reserved. | Hosted by House of Ideas