I’m excited to share with you the tutorial on how to build a sliding wall. About 10 years ago is when I came up with this idea to make a sliding wall. At the time I was taking down our large Christmas tree and putting it away. Of course, this will make anyone start thinking of scenarios to make putting away Christmas EASIER! So I thought what if I had a secret room where I could put all my Christmas decor including my tree that I don’t have to take down and could store the Christmas tree still decorated and of course any other decor that needs storage. I really dislike storing all my decor/Christmas stuff in the garage. Since I don’t need a formal living room (our family room is very well loved and lived in) I’ve decided this will be the year to share how to build a sliding wall and create a secret room. This is the third week that I’m sharing on the One Room Challenge. Make sure to check out all the amazingness going on there with all the room reveals.
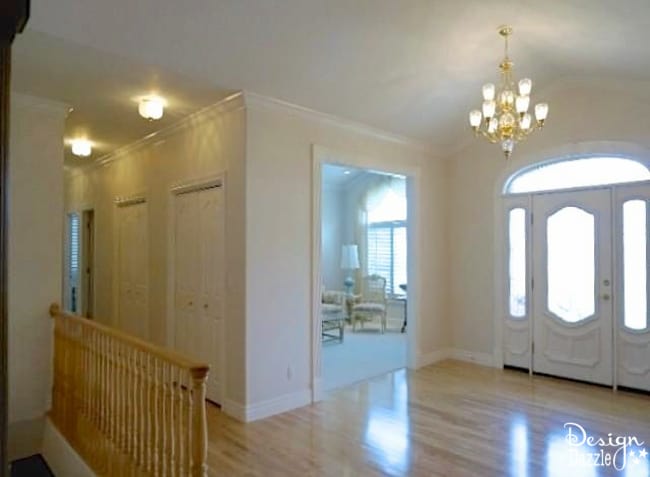
Here’s the before of the entryway and living room…
And the after:
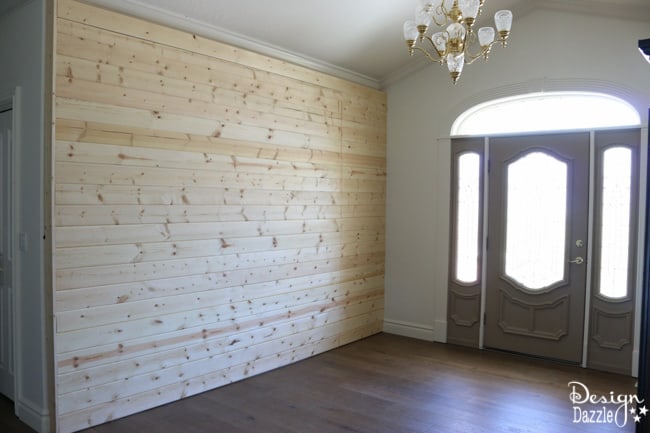
It doesn’t look like a sliding wall but it really is. This wall is 12 feet long and about 9 feet of the wall actually slides.
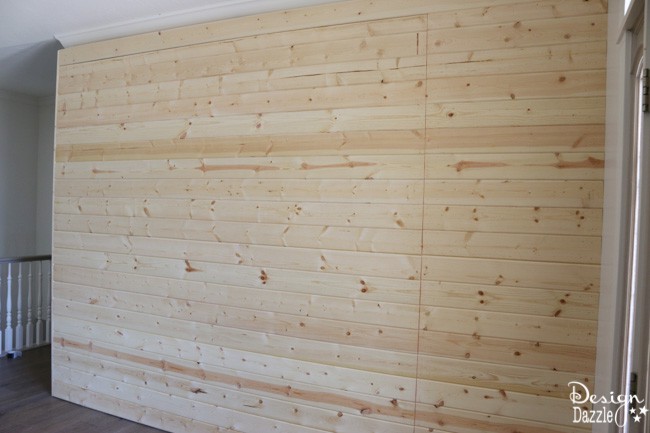
You can see the line in the wall where the sliding wall meets the stationary wall. The small portion of the wall on the right does not move. Click on the image below to see the wall move…
Pretty cool, hey???
To get a feel of the entryway and to see all the before pics start here:
The Sliding Wall and The Secret Room – Post 1
The Sliding Wall and The Secret Room – Post 2
Details:
Engineering a sliding wall took some time to figure out. The one thing that was important to me was to make this wall easily removable. So when there comes a day that we sell our home and the new owners want a formal living room. This wall can be removed with just needing to fill in the wall holes and do some painting. All the trim, baseboards etc were left in place. So this planked wall is pretty easy to remove and not have any evidence it was there (once the holes and painting have been done).
The entire wall is 12 feet long with the sliding portion of the wall about 9 feet long.
This post contains affiliate links at no additional cost to you. For further information, please see our disclosure policy
Materials to build a sliding wall:
These are the basics we used to build the wall. How much to purchase will depend on the size of the sliding wall.
- 2″ x 6″ x 10′ pine board
- 2″ x 4″ x 10′ pine board
- 2″ x 3″ x 8′ pine board
- 1″ x 6″ x 12′ tongue and groove board
- 4 inch exterior wood screws
- Nylon fixed caster wheel
- Elmer’s wood glue
- Trolley track door hanger Designed for doors weighing up to 450 pounds
- Rail trolley wheel hanger – these are the wheels that comes in a set of two packages
- Box rail mounting bracket – I purchased 3 for this trolley track
Tools needed:
- level
- stud finder
- circular saw
- pull saw
- socket set
- drill bits
- drill
- brad nailer
- hammer
- set of sawhorses
- speed square
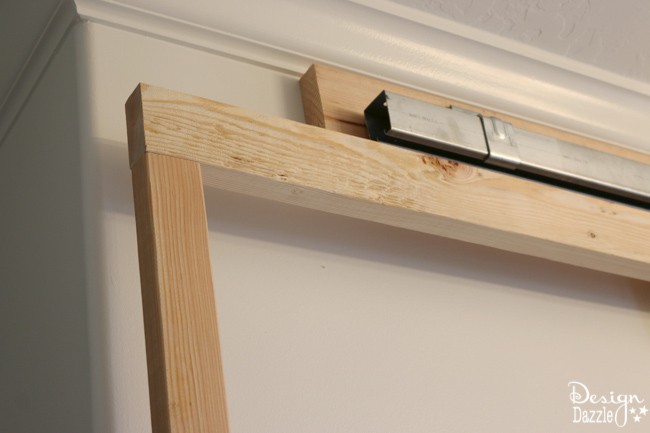
To explain about the sliding hardware for the wall – I purchased what is usually used for barn doors. You will need a track, the brackets to hold the track and the rail trolley wheel hanger that has wheels to slide inside the trolley track. The trolley track door hanger I purchased can hold doors weighing up to 450 pounds. So I knew this is the one that would work well. The rail trolley hanger (with wheels) came in a package of two. Three of the box rail brackets were purchased to hold the trolley track. That is all we needed to make this work. This is a very good hardware system and I’m really happy with how well made it is.
Step 1
A 2″ x 6″ x 10′ was attached to the top of the wall with lag bolts that were counter sunk through the board into the wall. Make sure to use a stud finder for this part. If you don’t, the weight of the wall will pull out of sheet rock. This wall is heavy! Also, use a level to install the 2 x 6 and the rail. Nothing worse than a door not opening (or opening on it’s own) because the track isn’t level. This board was added to the wall to give support to the trolley track door hanger. The box rail mounting bracket came with lag bolts. This bracket was attached to the wood first and the Trolley track was then attached to the 2″ x 6″ wood. Check the top of the image to see the board and the trolley track.
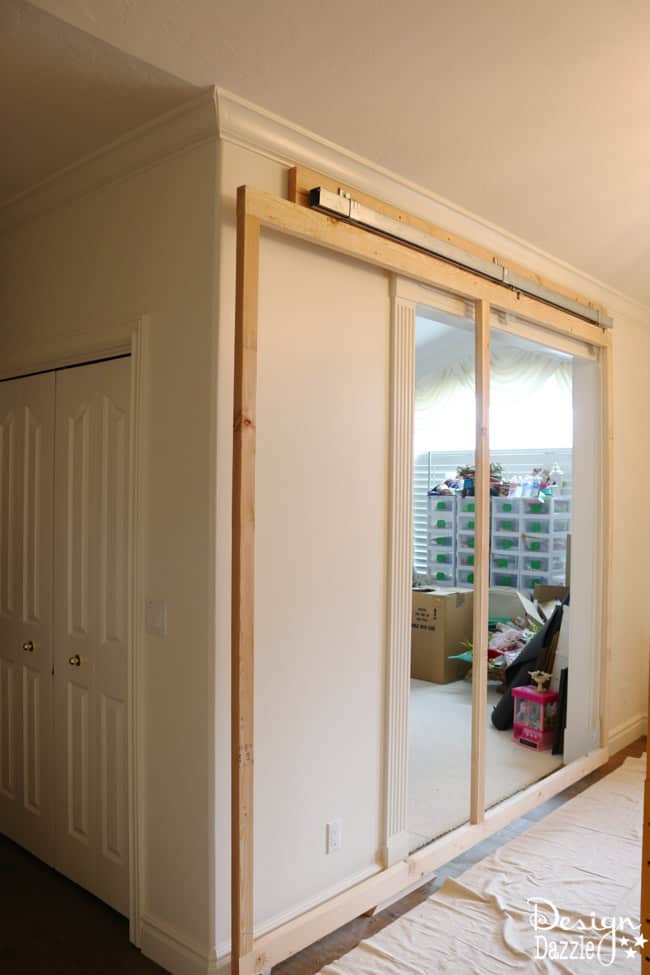
You can see why I wanted to have a wall hide the messy storage room ; ) Even though we moved last summer I’m still working on unpacking quite a few things. Here’s the room that hasn’t been unpacked yet.
Step 2
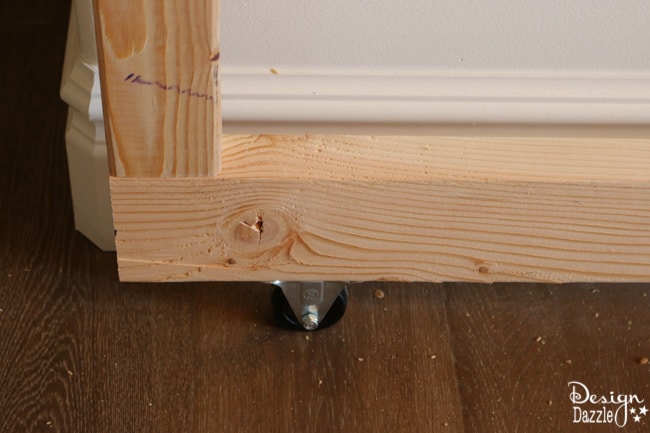
There are TWO frames that need to be built – the sliding wall AND the stationary wall frames. Both frames were made out of the 2′” x 3″ and 2″x 4″ with 4″ exterior wood screws and wood glue. The first frame was created to be the size of the sliding wall (see step 4 for the details on the other stationary frame). Attached to the top of sliding wall frame was the trolley wheel hanger. A nylon fixed castor wheel was screwed on one end of the bottom of the sliding wall frame to help support the end of the sliding wall when it is finished. The trolley wheel hanger slides into the trolley track door hanger.
Step 3
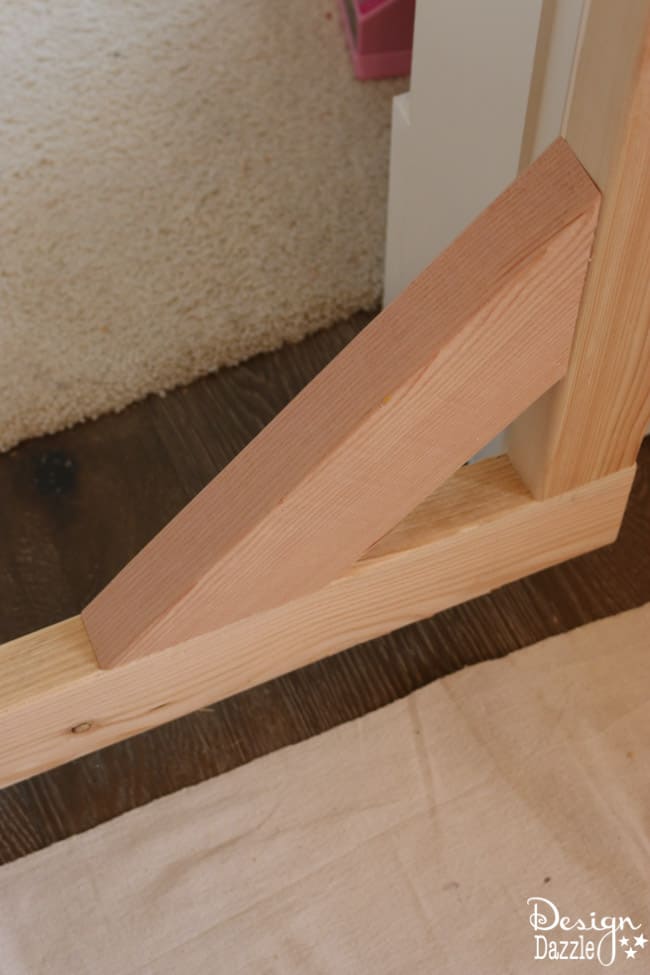
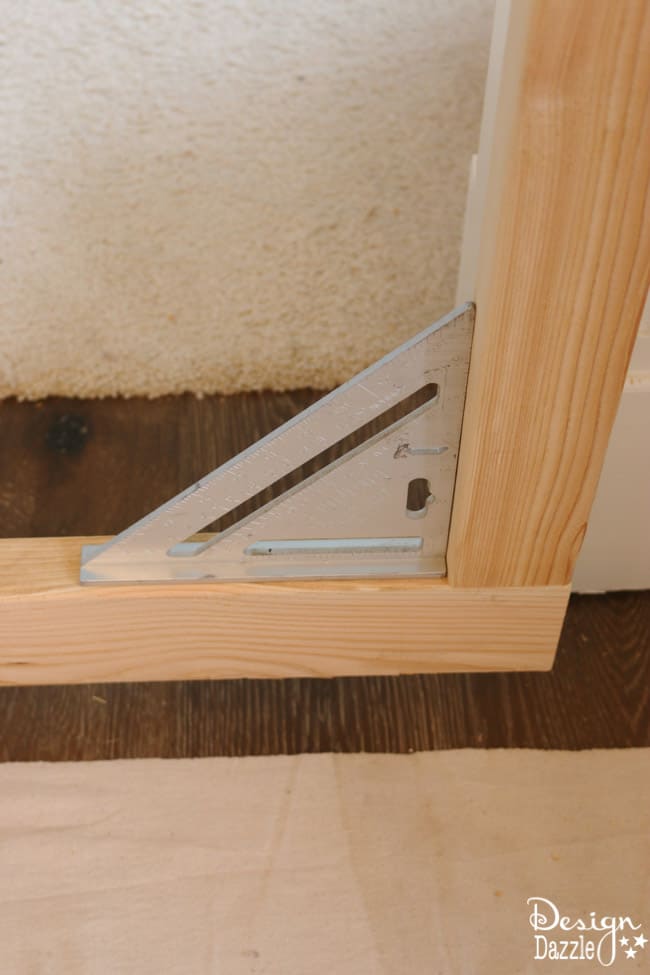
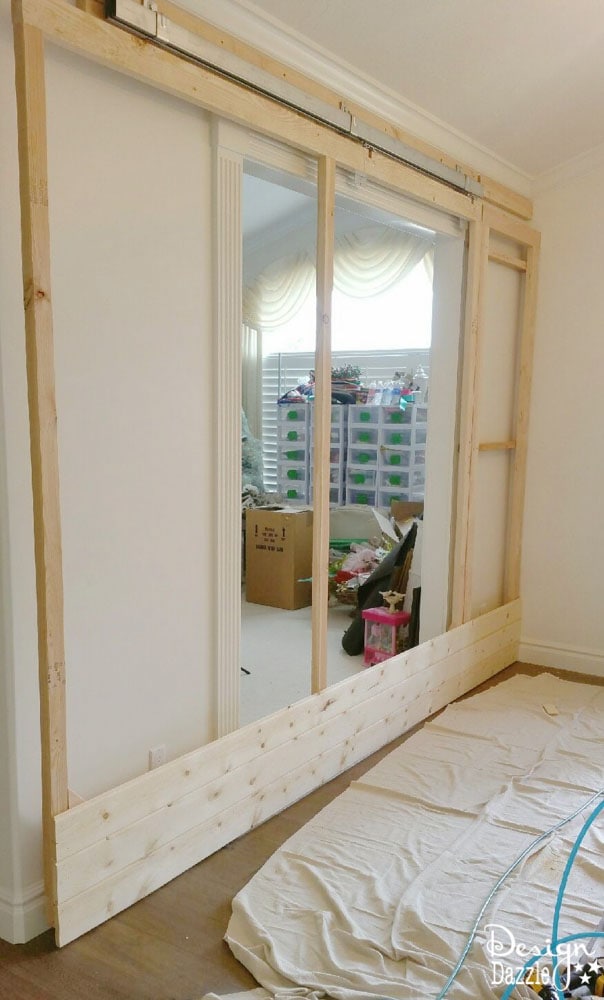
Diagonal bracing adds stability and is an important structural aspect of the wall frame. Bracing (2″ x 4″) was used in each bottom corner of the frame to square up the wall. Speed square was used to check squareness of the wall.
Step 4
A stationary frame was built on the right side of the wall. This part of the wall does not need to move, so the frame was anchored to the fixed wall. So now it would be flush with the sliding wall.
Step 5
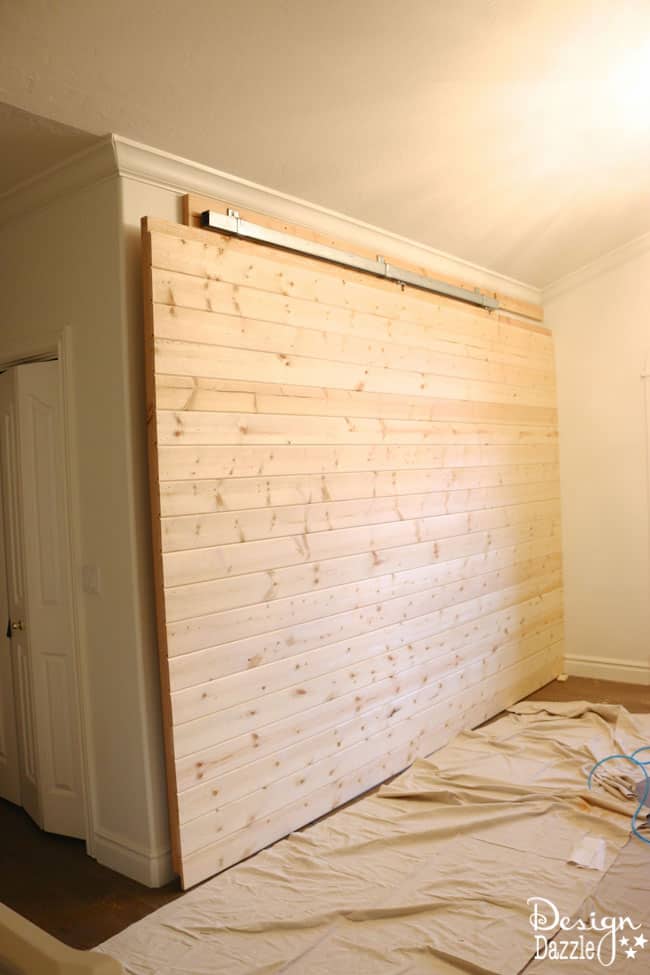
Tongue and groove 12 foot boards were nailed onto BOTH frames (the sliding frame and the stationary frame) with a finish nailer and 2 inch brad nails. Glue is on the back of every board – glued to the frame. The final tongue and groove board has not been added yet. The wall needs to be cut first. See below for more details.
Step 6
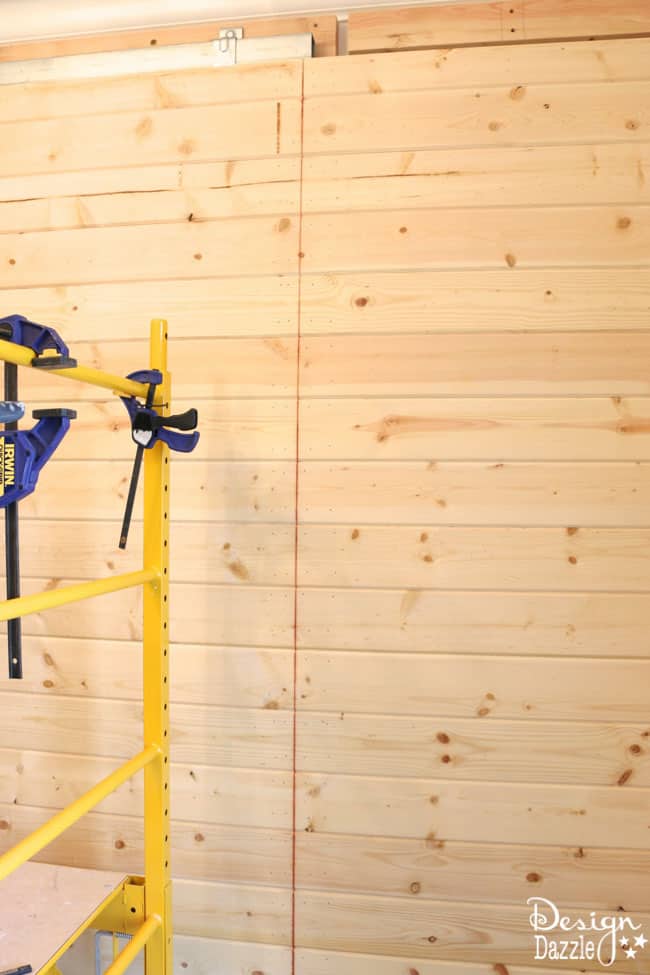
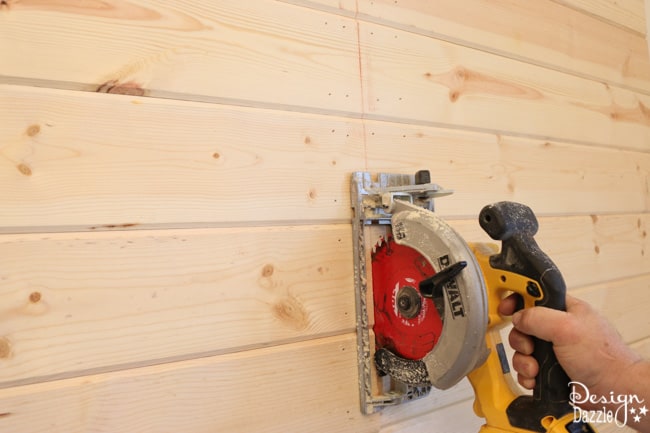
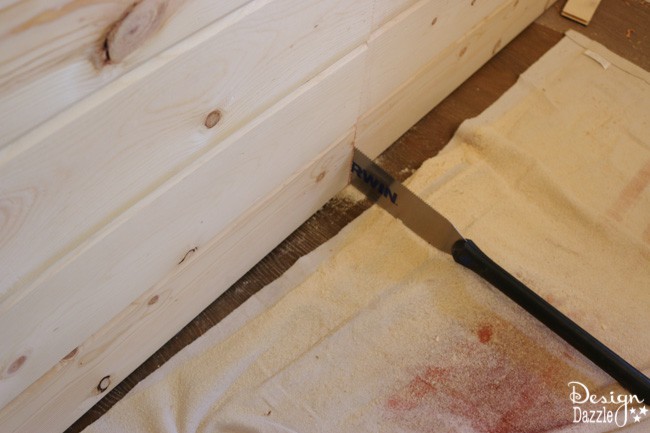
Now this is the very EXCITING part! Once the cuts are made the wall will slide. At this point we have a solid 12 foot long wall. Nothing slides yet because the tongue and groove has been nailed to both frames. A chalk line was used to create a cutting line. A circular saw created a plunge cut to go into the wood and cut down the straight chalk line. For the last part of the cut on the wall a pull saw cuts flush all to the way to the bottom.. This prevented my nice wood floors from getting a deep cut from a circular saw. Yahoo!! The wall now slides. ; )
Step 7
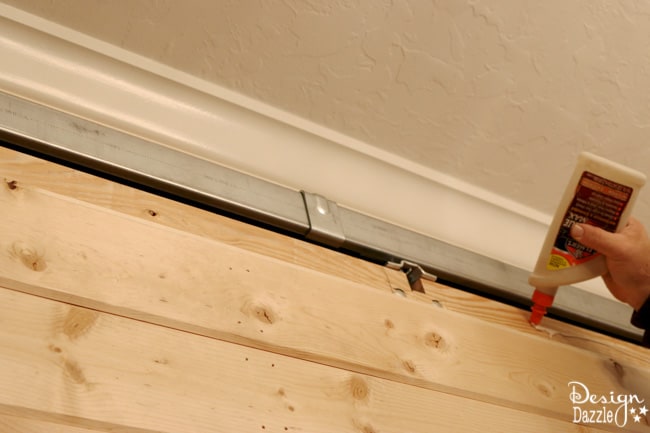
Now the very last tongue and groove board can be added to the top of the wall. Wood glue was used on this last board.
Step 8
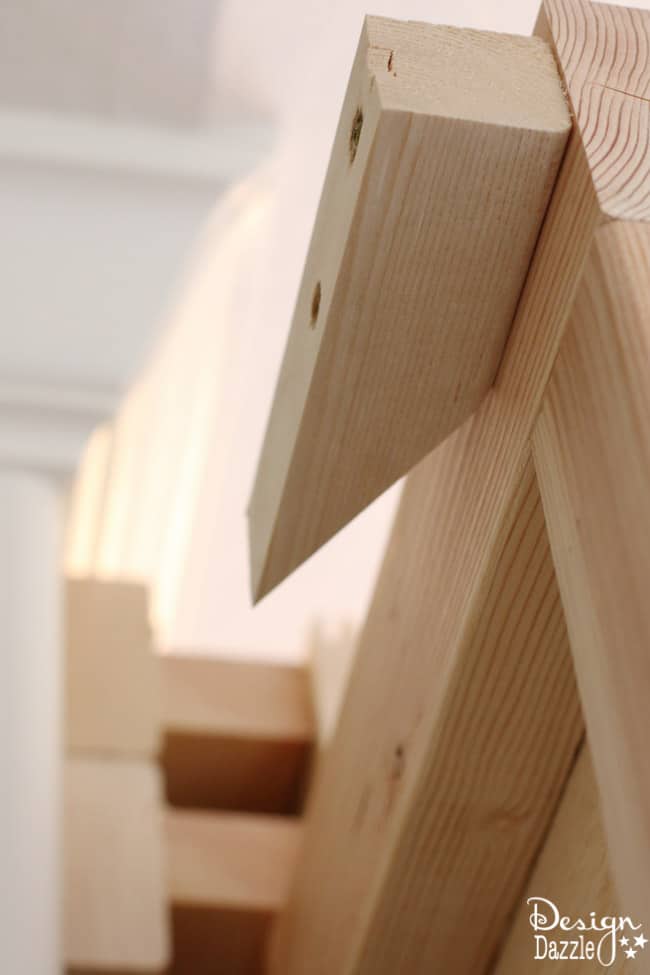
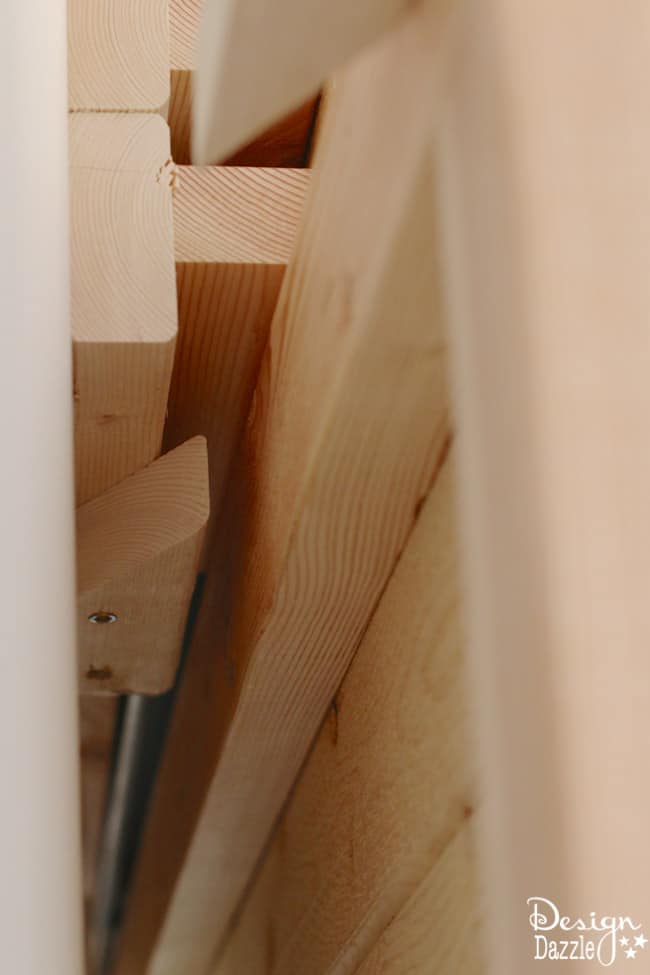
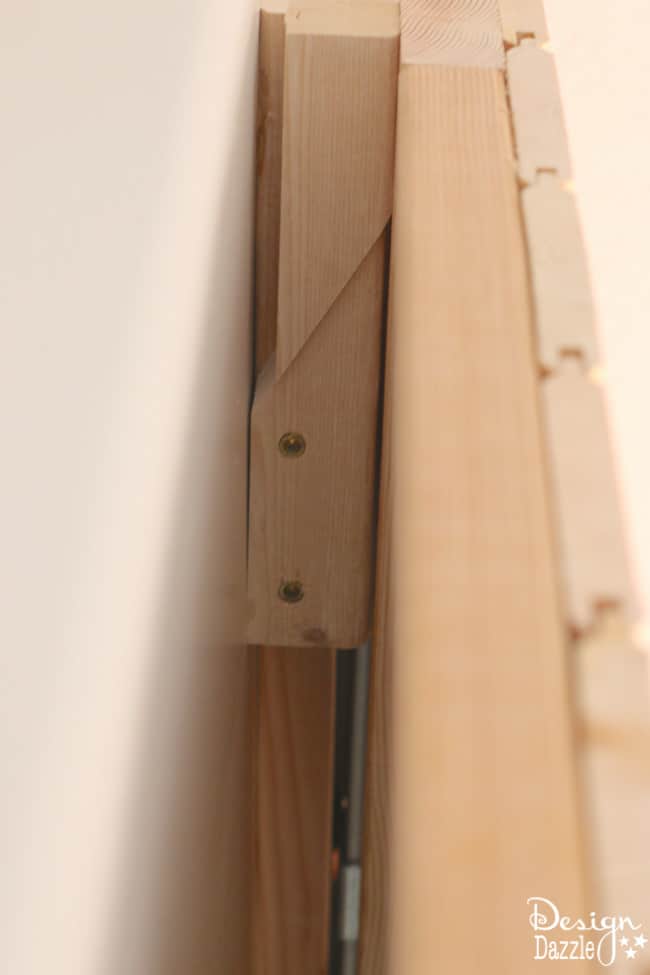
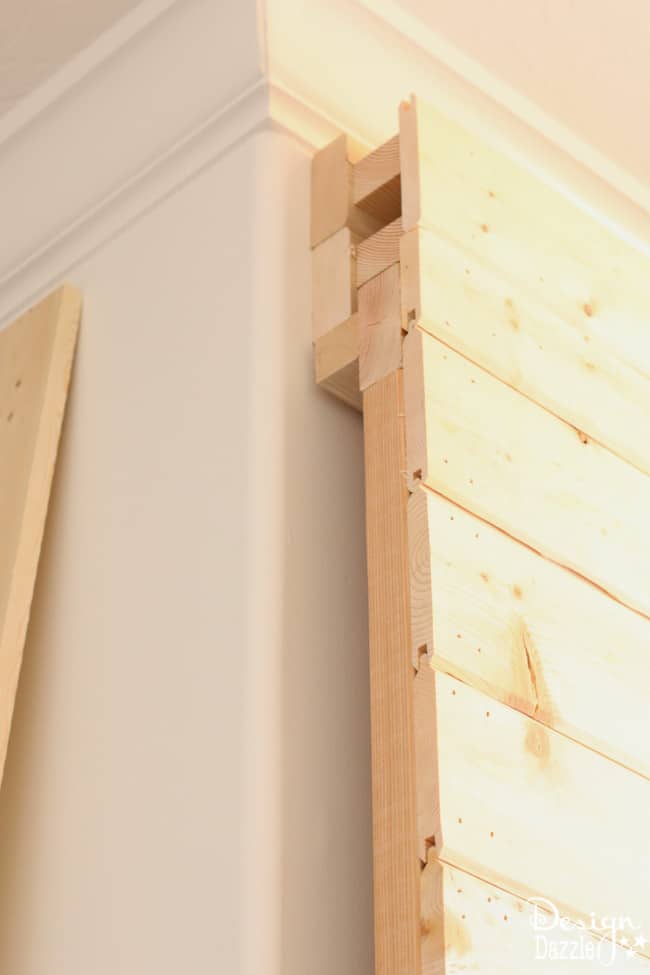
Now the really good engineering part happens. It’s called a wedge. What does a wedge do? The wedge helps pull the wall flush. There are TWO wedges one is located on the original permanent wall and the other is on the sliding wall. The images above show the wedge at the top of the wall. 60 degree cut angle was used so that the door would pull together. Check the three images above to see how it works.
There is also another additional wedge at the bottom of the wall on the other end where the sliding wall rolls into place. The wood tweaks a bit so the wedge will help keep the wall straight.
Step 9
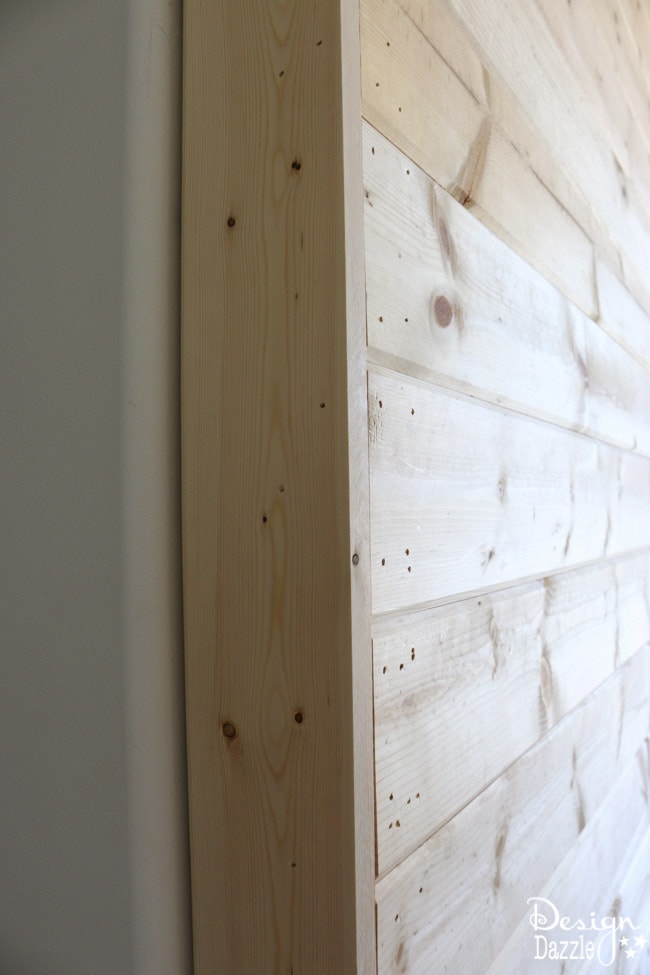
We are getting to the end! One of the last steps is to finish the edge of the sliding wall. Tongue and groove was used to create the outside edge . To create the board, the tongue portion of the wood was cut off to create the board. I love the planked wall and how this all turned out!!
There it is: How To Build A Sliding Wall!!!
So what do I need to finish up with the wall? Next week it will be painted. I’m not sure if I will add baseboard. We will see how it goes. I’m hoping the week after next I will have a gallery wall on this sliding wall.


Natasha | The simply inspired blog says
Wow!This is so incredibly impressive! Can’t wait to see the completed room.
Toni - Design Dazzle says
Thank you, Natasha! I appreciate your sweet comments!
Toni
Ashley says
This is amazing! Genius.
Toni - Design Dazzle says
Thanks, Ashley! I’ve got lots of storage I need to “hide”
Mila @jestcafe says
It looks very nice… and so much work! what color are you painting it? Did I miss that piece of information?
Toni - Design Dazzle says
Hi Mila,
I didn’t mention what color I’m painting it. The next post will hopefully have that information. I am painting it the same color as the walls. I wanted it to be neutral for the gallery wall.
Thanks so much!
Katie says
Whaaaaaa!? This is so awesome! I can’t wait to see what else you do!
Toni - Design Dazzle says
Thanks, Katie!
It’s been fun! Working hard to get everything done. Hopefully I’ll get most of my goal list done!
Ethyl says
I’m not sure if you can tell me, but l have an old picture of a bedroom, repainted in Orange, black,and gray. Also, white “trim” wood strips on middle of the walls, all around . If this sounds familiar, could you please tell me what type of wood strips apwere used.a
Thanks!
Ethyl
Toni - Design Dazzle says
Sorry, Ethyl I wouldn’t know what type of wood. A lot of time trim that has been painted is made of a cheaper wood like pine or possibly MDF.
Good luck!
Melissa says
So you are covering up your hallway when you have your sliding wall open? No one else has noticed that.
Toni - Design Dazzle says
Yes, that was figured out before this was built.: ) It’s not a problem. I slide open my door and close it when done. The hallway to our bedroom is not a huge traffic zone. Even if it was – it’s still not a problem. Just slide the wall if you need to get by.
Lynn says
I would really like to see it with the sliding door OPEN!
Toni - Design Dazzle says
LOL! It’s a junk room right now ; ) One day I’ll do some video and show how it opens and closes and what is hidden inside!
Deborah Douglas says
What a clever and wonderful way to create a gallery wall, conceal space that is not needed everyday, and it looks doable! Thank you for sharing your creativity!
Toni - Design Dazzle says
Thank you for your kind comment!! I really love this hidden room.
Carolyn Beard says
You did not say how the wall deals with the baseboard? Was it just removed?
Toni - Design Dazzle says
The baseboard on the wall is still there. Just like the trim surrounding the wall is still there. We just built the wall around it. Thanks for asking
JP says
I’m confused. This wall just slides and blocks the hallway? How does that help?!
Toni - Design Dazzle says
The room is a hidden storage room that is used infrequently. So the wall slides open when I need it to. Yes, the wall slides into the hallway (there was no other way to do this). But it hasn’t been a problem. Because it’s a storage room we slide open the wall – do what we need to do and then slide the wall closed. If we need to walk in the hallway, we just slide the wall a bit. Just like you would if you had a barn door or other door into a hall. It’s been no problem. I love my hidden storage room with the sliding wall.
Karla says
Toni, I just don’t get it. Why go to the expense and work of building a sliding wall when all that was needed was a double door. Is it just the idea of having a secret room and/or a gallery wall?
Toni - Design Dazzle says
Hi Karla,
Great question! I decorate the sliding wall all the time and have a secret room behind the sliding wall to store Christmas trees, etc. I can’t decorate doors like I can a blank wall. The double doors would have just been as expensive or more so than installing the wall.
I mainly use 3M hooks to decorate my wall for different occasions. Here are two links one my daughters Harry Potter themed bridal shower (look at the gallery wall) https://www.designdazzle.com/harry-potter-themed-bridal-shower-idea/ and my Halloween wall https://www.designdazzle.com/halloween-gallery-wall/ both posts share decor that are on the sliding wall. Thanks for asking.
Lindsay says
Hi! I’m thinking of doing something similar for our closets. Is the entire entryway exposed when the door is pushed fully to the left?
Thanks in advance!
Toni - Design Dazzle says
Most of the entryway is exposed. it’s probably about 5 feet of an opening when pushed to the left. It’s been a fun addition for sure.
Rachel says
I just found this page today because I want to do a similar project. This is fantastic! Any idea if you could do this with a Drywall over the frame instead? Thank you!
Toni - Design Dazzle says
I am not sure if drywall would work but I guess you could always try. It seems like it would be lighter than the wood (which was heavy). I would love to know how it turned out.
Paul Barkley says
Great job, including showing the details of how you created this. For those who wanted it less detectable than you needed, the horizontal boards could have been butted together and not vertically aligned, like laying bricks. Then at the “fault line”, the tips, say 4 inches, could cross the invisible line, but not be glued to the fixed part of the wall, similarly, the horizontal pieces on the fixed wall would extend a few inches to cover the slide. The result would be like interlocking fingers and would make the separation line disappear. More work than you needed, but others could do it that way.
Interestingly enough, your Halloween decorations were confined to the slide. Had you put some of them on the fixed wall, it would also have caught the eye and obscured the “fault line”. The eye would see the wall of decoration with birds spanning that line and never notice the line. Working with the pieces extending from each side, you could make sure each piece stayed on the proper wall when they separated. Three dimensional objects like the birds would be particularly effective at hiding joints, but anything that spans the joint would really obscure it. I never thought about decorations further hiding a room, but yours would have been excellent for that.
Again, all this depends on whether someone feels they really need to hide the room, and certainly with windows to the outside it is quickly discoverable no matter how intricate the door. Still, a really fun project. Thanks for publishing!
Toni - Design Dazzle says
No one ever knew that room was there unless we showed it to them. Even with the front windows and the ‘seam”. People were always shocked when we slid the wall open.
The room was originally a formal living room which we didn’t need. But I wanted a Christmas tree room to store our holiday decor and Christmas tree. So it worked out awesome. We have since sold our home and the new homeowners loved the secret room and made it into a playroom for their kids.
Thank you for your comments!
Tracy Sharp says
Great Idea! I have been looking for a solution to cover a murphy bed. I think this will work. Do you have the opening of the door?
Toni - Design Dazzle says
Happy to help. We sold the house so I can’t measure it. But it was probably about 5-6 feet wide.
Mike from Minnesota says
Outstanding project. I love it and it will be great in my basement.
Toni - Design Dazzle says
So happy to help. I would love to see pictures!!
Jean says
I need a wall like that to hide our storage space.
Toni Roberts says
It’s a great way to hide storage.
Marc Soules says
Nice concept, but it looks hideous in a formal foyer. More suited for a barn or workshop. As pocket door would have been a better choice.
Toni Roberts says
Wow, hideous?? I can’t tell you how many people have seen this in person. They all LOVE it. This is NOT a formal foyer. No, the pocket door would not have been a better choice. I wanted a wall to hang items on. You can’t hang art on a pocket door. When we sold this home the new buyers also LOVED it.