 Southern California is a place I love – having lived there for many years. Three years ago we moved to Nor Cal (and we’re really liking it). In March, my husband had a business trip to Pasadena and I went with him. You can’t visit So Cal and not visit the favorite places you use to shop at. So I called my dear friend Donna – she drove to Pasadena and picked me up and we went to our favorite haunts in LA. These aren’t just places I went to and loved, these are stores I shopped and “window shopped” at regularly. Downtown LA is bargain shoppers paradise, but it’s also known for being rundown and grimy.
About seven years ago I started a party company – Party Wishes. Donna and I became friends when she was one of my party customers. When we found out we were moving, I sold her my party company – she was the perfect party gal!
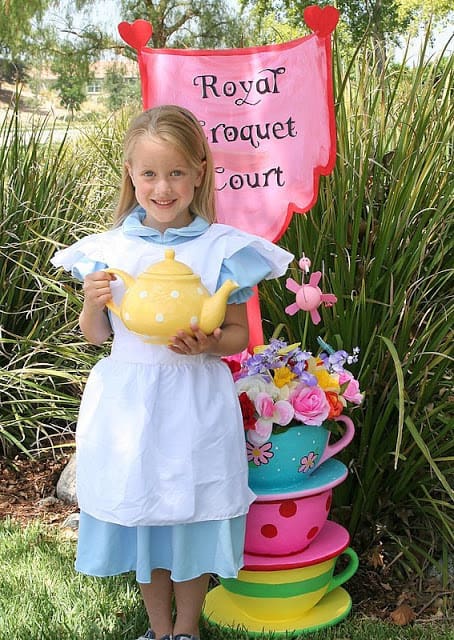
So, here we were in one of our favorite stores on the lookout for “Alice in Wonderland” items for a party she was planning. We went up and down the store aisles – I happened to look up and at the very, very top of the shelves were these enormous stacked teacups. Bingo! They were perfect – it made her day and mine as well. I couldn’t wait to see what she was going to do with the teacups (originally they were white). As you can see – she is quite the talent.
 Donna made this adorable wood tea party sign (purchase thin plywood at any local hardware store – draw your shape and cut out with a jigsaw). Her instructions for getting the lettering just right: “You don’t have to be a trained artist to get a custom painted look. I’m making signs for my Mad Hatter Tea party and I thought I would pass along my technique for custom signs.
First, I pick a font on my computer and print it out. Sometimes I have to enlarge it on my copier machine to get the right size I need.
I turn the copy over and hold it on a window (must be done during the day) to see the lettering and I use a #2 pencil and trace the letters and fill them in with a lot of graphite. I do realize that I can use graphite paper or a light box, but this is cheaper.Then, I flip the paper over to the right side and tape it on my already painted sign.
Next, I trace over the lettering again so the pressure from the pencil transfers the markings on the back of the paper onto my wood. Instead of using a paint brush, I use a paint pen. It is a lot easier to control and it’s like outlining and coloring when you were a child.”


 Thanks for being my friend Donna and continuing the stellar tradition of Party Wishes! If you live in So Cal and need to hire a party planner or would like to see some fabulous ideas, check out her Party Wishes blog!



Mrs. Limestone says
What an ingenius idea to transfer lettering. I’m not sure what I’m going to use this for but I will definitely be using it. Thanks!
Small House says
This is amazing. Oh what a boring birthday mom I was!!! Such a fun blog!Thanks,Sandra
Charlene May @ Greggy Girl says
this is the cutest thing ever!! great job. i love it
Michelle says
So adorable, what a cute picture and such a sweet little Alice!
Michelle 🙂
pinkstilettos says
Those teacups are so adorable! I love your blog too BTW~ I am going to add you to my bloglist. Daisy~