• Skip to primary navigation
  • Skip to main content
  • Skip to primary sidebar
  • Home
  • Blog
  • About
    • Contact
    • Press & Partnerships
    • Copyright/Disclosure
    • Links/Parties/Giveaways
    • HOI Friends
      • Toni Roberts
      • Tauni Everett
      • Tammy Mitchell
      • Randi Dukes
      • Michelle Stewart
      • Mariah Leeson
      • Mandy Beyeler
      • Lindi Haws
      • Kim Byers
      • Ashley Johnston
      • House of Ideas
  • Videos
  • SHOP

Design Dazzle

Inspiration for kids rooms, baby nurseries, and kids parties

  • My Home
    • Home Tour
    • Christmas Home Tour
  • My Projects
    • My Projects
    • Companies I Have Worked With
    • Michaels Makers
  • DIY/Decor
    • top tutorials
  • crafts
  • celebrations
    • parties
    • christmas
    • halloween
    • thanksgiving/fall
    • New Year’s
    • Valentine’s Day
    • St. Patrick’s Day
    • Easter/Spring
    • mother’s day
    • father’s day
    • patriotic
    • School/Teacher/Graduation
    • Gift Ideas
    • weddings
    • best ideas
  • Recipes
    • Meals
    • Instant Pot/Crock Pot
    • Desserts
    • Treats & Snacks
  • travel
  • free printables
  • Lifestyle
    • organization
    • Preparedness
    • Healthy Living
  • kids
    • kids parties
    • kids rooms
      • cool bedroom ideas
    • summer camp/crafts
You are here: Home / crafts / Mickey Mouse Party Backdrop

March 24, 2016

Mickey Mouse Party Backdrop

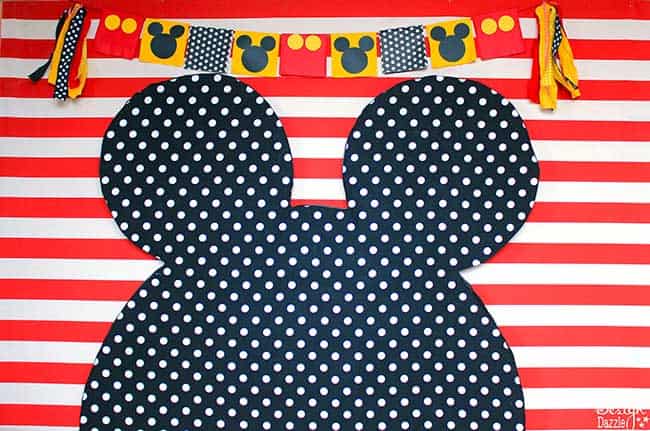
Mickey Mouse is one of my favorite characters and also one of my favorite party themes! If your kids are like mine, they were obsessed with all things Disney. This photo backdrop is the perfect addition to your Mickey Mouse party. Keep reading for how to make this backdrop and more Mickey Mouse party activities, decor, and fun!

Planning a Mickey Mouse party? This backdrop is perfect for you! Design Dazzle shows you how.

This post contains affiliate links at no additional cost to you. For further information, please see our disclosure policy.

Mickey Mouse Party Backdrop Supplies

  • Foamular (light purple with pinkish hue, comes in different thicknesses, 4×8 sheet) you can find it at Home Depot. The best thing about it is that you can cut it with a steak knife!
  • spray adhesive to attach fabric to Foamular
  • Any kind of fabric you want, but since we were making Mickey Mouse we used black and white polka dots
  • large round platter to trace the ears
  • string/ribbon and pencil

Planning a Mickey Mouse party? This backdrop is perfect for you! Design Dazzle shows you how.

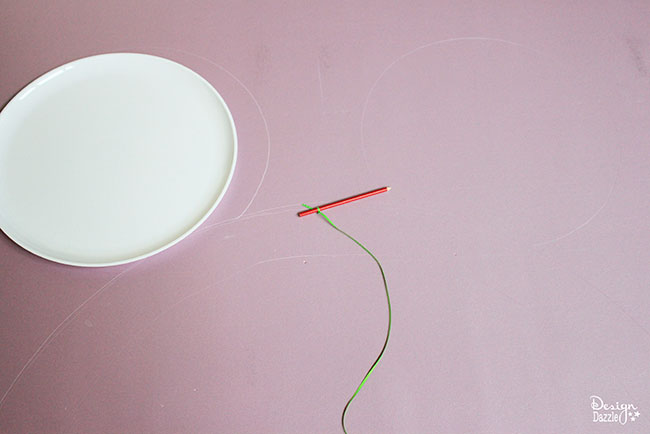
Step 1: Take your string and tie the end around a pencil. My string was probably 2-3 feet long. You want to make it as high as you want the top of Mickey’s head to be. Tape the end of the string to the bottom of the Foamular. Pull the string tightly and draw an arch with your pencil. You won’t necessarily be writing but rather kind of carving a line into the Foamular. Then, get a large platter – use it to trace around it at the top of the head to make Mickey’s ears. Just eyeball it and make sure it looks correct.

Planning a Mickey Mouse party? This backdrop is perfect for you! Design Dazzle shows you how.

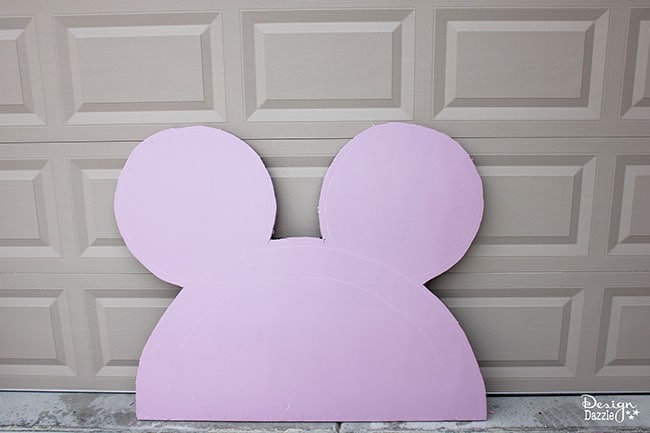
Step 2: Cut the Foamular with a sharp kitchen knife. Cut along the lines you traced. Foamular cuts surprisingly easily, but it does take some time! Cut outside it is quite messy.

Planning a Mickey Mouse party? This backdrop is perfect for you! Design Dazzle shows you how.

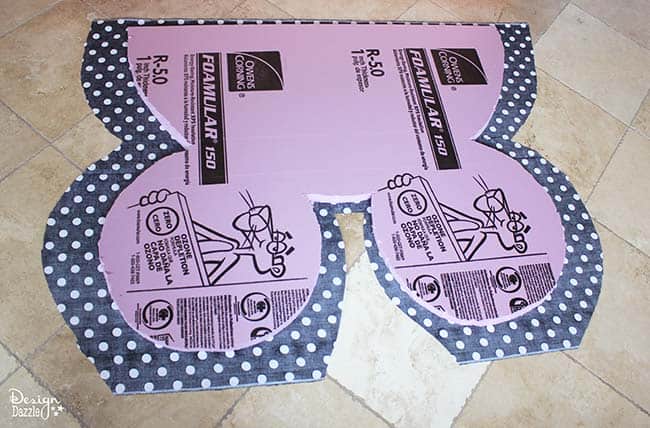
Step 3: Cut out black and white polka dot fabric in the shape of the Foamular Mickey head. Cut several inches larger than the Foamular, so you can totally cover the head. Then, spray adhesive onto the entire front surface of the mickey head. Secure the fabric by pulling and smoothing it onto the Foamular. Fold the extra fabric onto the back and secure it with spray adhesive. I also used a low-temp glue gun. Make sure to spray adhesive outside and away from anything it can get on. I sprayed it on the lawn. It is quite messy.

Planning a Mickey Mouse party? This backdrop is perfect for you! Design Dazzle shows you how.

Step 5: Use a low-temp glue gun to add black ribbon around the entire shape of the head. You are done. This is quite a cute and simple project to make for a party backdrop. I wonder how it would do for a headboard for a kids room?


Planning a Mickey Mouse party? This backdrop is perfect for you! Design Dazzle shows you how.

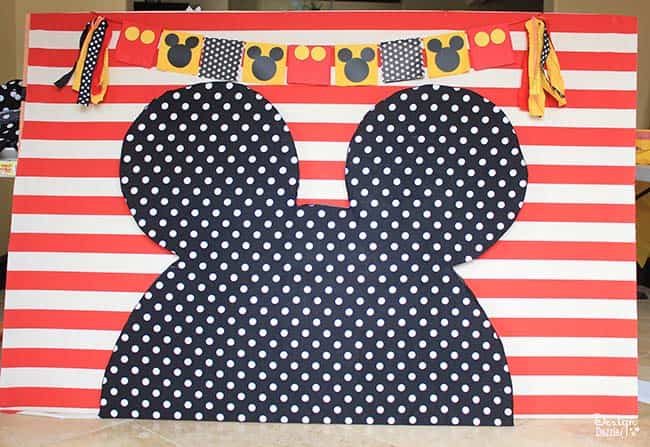
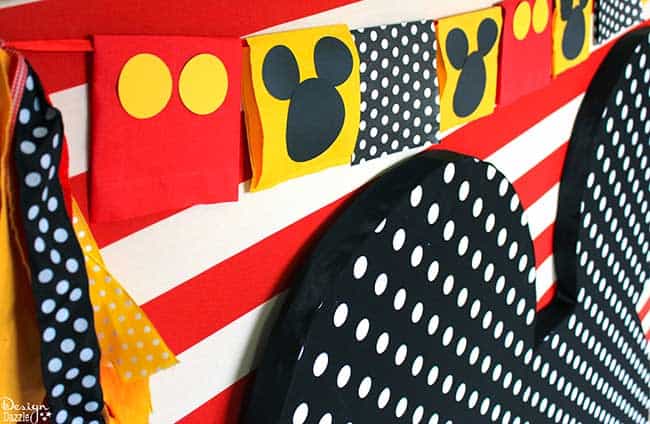
Place your foam Mickey Mouse head in front of striped red fabric either taped to your wall or in like I did – attached red fabric to a thin 4 x 8 sheet of plywood with a staple gun. To add a bit of fun along with the foam board and striped fabric, check out my tutorial for the no-sew paper napkin banner I made. It is so simple to make and adds the perfect touch!

Looking for more Mickey Mouse party ideas? Check out my cute Mickey Mouse placemats and activities and the cutest ideas for Mickey and Minnie party ideas. I hope you and your littles love these Mickey Mouse party ideas as much as I do!

signature_toni

Related Posts


How to Plan a Mickey Mouse Birthday Party


Mickey Mouse Gluten-Free Birthday Party


DIY Mickey Mouse Plate


Nautical Mickey Mouse Birthday Party


Mickey Mouse Party Ideas for One Year Old


Mini Mickey Mouse Pizza


Mickey & Minnie Mouse Party Ideas


DIY Photo Backdrop Round-Up!


15+ Awesome DIY Party Backdrops


Christmas Present Party Backdrop

Author Bio
Article Info
Popular Posts
Reagan Favreau

Reagan Favreau

Editor at Design Dazzle
    Power Bio Box by HOI
    Author:
    Reagan Favreau
    Categories:
    • crafts
    • DIY/Decor
    • kids
    • kids parties
    • My Projects
    Mentions:
    disney, mickey, photo backdrop
    Keywords:
    Mickey Mouse Party Backdrop
    Last Updated:
    February 16, 2018
    • Crazy Cake
    • Grinch-Inspired Paper Cone Tree {Large Prop}
    • A Weekend at Venice Beach Canals
    • Visiting the Ronald Reagan Presidential Library - Part 2
    • Visiting the Ronald Reagan Presidential Library - Part 1
    • Guide to The Getty - Part 2

    Sharing is caring!

    Disclaimer

    This post may contain affiliate links, which means that if you click on a product link, we may receive a commission (at no extra cost to you). See my full disclosure for further details.

    Reader Interactions

    Leave a Reply Cancel reply

    Your email address will not be published. Required fields are marked *

    Recipe Rating


    Primary Sidebar

    Img 0422

    Hi, I’m Toni! Welcome to my blog Design Dazzle. I love being a designer, DIYer, traveler, crafter, holiday lover, and memory maker. Read more.

    Toni Roberts is a participant in the Amazon Services LLC Associates Program, an affiliate advertising program designed to provide a means for sites to earn advertising fees by advertising and linking to amazon.com

    DesignDazzle.com is protected by copyright laws. DO NOT distribute or copy the content or share multiple images or collage images without written permission. You can use ONE Design Dazzle image only if there is a link back to DesignDazzle.com. DO NOT edit, crop, or remove watermarks from any image. Please contact me at toni@designdazzle.com with any questions.

    About | Contact Us | Privacy and Legal

    © 2017 Design Dazzle · All Rights Reserved. | Hosted by House of Ideas