


I’ve had a couple of requests on how-to make tissue pom flowers. I’ve posted this tutorial before. If you’re not interested in making your own poms, PartyPoms from Etsy sells great tissue pom flower kits.

Paper flowers are such an easy creation you can make with tissue paper. They’re fun, vibrant and colorful – a great way to decorate for a party or room decor. Martha Stewart sells the pom pom kit – if you would like to purchase the kit.
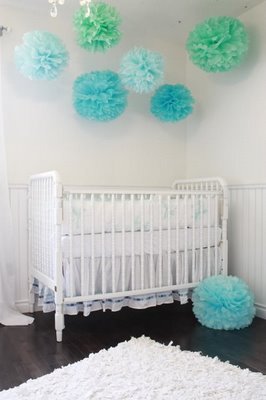
Remember the darling nursery room posted with all the flower pom poms? In case you didn’t see:
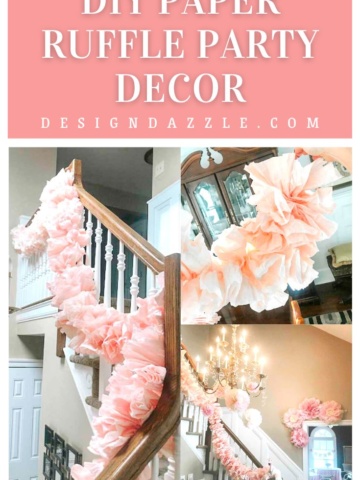
Here are easy step-by-step instructions to make giant paper flowers:
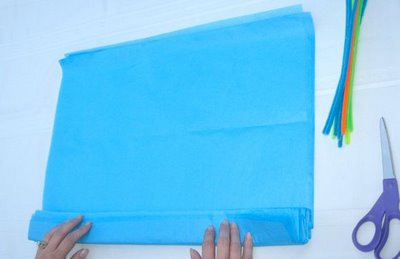
Step 1
Take 8-10 sheets of tissue paper – lay on a flat surface. I used 20″ x 30″ sheets. Starting at the short end, make a fold at least 1.5 inches wide. Simply fold accordion-style – flip tissue stack over and make another fold. Continue folding until you get to the end of the tissue. Make sure to press firmly creasing with each fold.
 Step 2
Wrap a pipe cleaner (or florist wire) tightly around the center of your folded tissue.
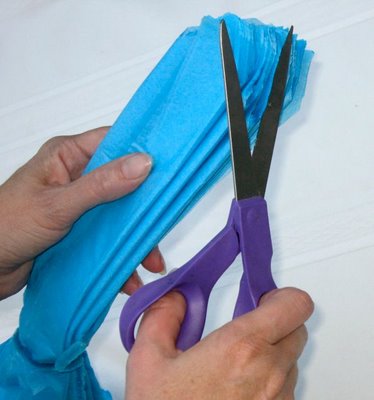
Step 3
Cut the very end of the stack to make a point or round it – depending on the look you want. Repeat on the other end.
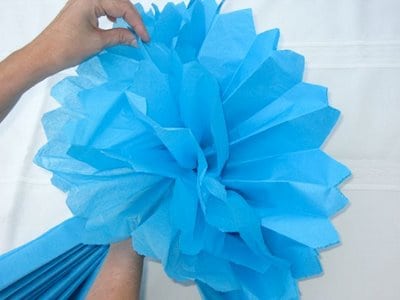 Step 4
Gently pull each piece of tissue towards the center of the flower, separate each tissue sheet from the others one at time. Fluff and fiddle with the tissue until the desired shape is found. These flowers are approximately 18″ in diameter.
 The size of the tissue sheets determines the size of the tissue flowers.
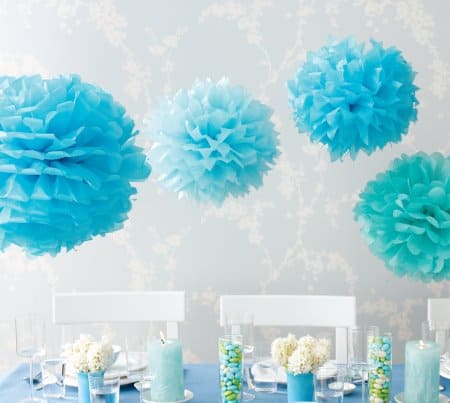
Light Pink Bulk Tissue Paper Tissue Paper Pink 20″ x 30″ Hot Pink Tissue 20″ x 30″


20 x 30 Tissue Paper Great selection of tissue paper colors White Bulk Tissue Paper


repost ; )


L + A says
I'm excited to try these! I've always wondered how people make them! Thanks for the tutorial! 🙂
chili pepper says
We have done these for the last three events we have thrown and they are a huge hit everytime. We have found so many ways to work them into the decor. I love that we can customize the colors by heading to our local party store and perusing the paper napkin aisle. And my teenagers love to fold them!
Fox Hollow Cottage says
Oh I need a reason to make those. They are SO dang cute!!
amanda boykin says
So cute!! I will definitely be making these!! 🙂
Desiree @ The 36th AVENUE says
I LOVE this tutorial… pinning and facebooking!
Blue Dog Belle says
Thank you for this! I'm having a cinco de mayo birthday party soon, so these will be perfect!
Carrie says
Whats the best way to temporarily hang them from the ceiling?
The Bishop Family says
THANK YOU!!! I was inspired by this!!! I made them for my daughter's 1st birthday yesterday and featured your link on my blog: https://bishopsfamilysite.blogspot.com/2012/04/avas-rainbow-1st-birthday-party.html
Blessings!
Janiene
Bunch of Bishops says
I featured your tutorial again. I made pom pom chandeliers for a party I threw Monday night. Thank you for your inspiration 🙂
Janiene
https://bishopsfamilysite.blogspot.com/2012/05/party-details.html
Anonymous says
how do you attach these to the roof?
Anonymous says
These are great my friend had some at her party and i have been looking forward to making some of my own. The tutorial is realy easy to follow. They dont take long to make and look great i made all sizes and carnt wait to show them to my friends
alwayslearning says
I have tried these and have not been happy with my results:( I am off to try again after your tutorial! Thanks!
Holly
Anonymous says
Awesome! So this is just a little larger version of the tissue paper flowers we used to make in Elementary School, then? What have you found is the best/easiest way to hang them from the ceiling? Fishing line?
Anonymous says
I love these!!!! I was wondering the same thing what's the best wat to hang them??
Angie says
We hang ours with ribbon and a small thumbtack
Anonymous says
These came out great . So cute and easy. The more you practice the better they come out. Thanks for posting.
Anonymous says
At first, they don't look like they'll turn out, but they do. If at first it seems like it won't look like this, just keep going and it will. Go with 2 colors that compliment each other, like blue-green or purple-pink. Use your favorite sprot team colors, or add some glitter. My aunt made these for my cousin's birthday, and people were amazed to see how easy it was.
Sassss says
My oldest daughter had these everywhere for her bridal shower & wedding. I still don't know who made them (kept forgetting to ask!), but wondered how they were made into balls. The ones I learned how to make were half-domed. Lol, who'a thunk to use 2x the tissue paper & just not fold it in half. I feel pretty silly for not seeing it, right off. These are great! Thank you for showing us this way – I'd have felt like a dolt, finding out, in person. 😉
IricksTreasuresAndTips says
nice! i remember making these in the 70's and have been looking for the same design instructions for a while now! thanks!
DesignDazzle.blogspot.com says
I'm glad you found this post helpful! Have fun making these cute tissue flowers!
Mel@Mellywood's Mansion says
Hi Toni, Thanks for your tutorial I made these for my babies room – we're all in love with them. xo
Country Flora@Hyderabad says
All over world beautiful flowers!
campanitalinda says
This project is fantastic for any ocasion. instead of buying expensive ribbon for a a gift I make a pom pom and put it on the gift. it gives a great look.
myggee says
It has been many years since I have made these. I appreciated you taking the time to show us how.
Thanks
Anonymous says
Best DIY tutorial for paper Pom flowers! Thank you!!
Linda Lo says
What a great idea! TY!
Kayleigh says
I made these in pure white and hung them around our house for our Christmas party, they were great and looked like giant snowballs 🙂
Lesley says
These are very cute! I am going to make them for my daughters room!!
Toni - Design Dazzle says
Lesley,
I would love to see pictures of the pom flowers in your daughters room! Please share when you’re done!
Toni - Design Dazzle says
These will liven up any childs room! They are so dang cute and inexpensive!
Melissa says
Ok silly question, I just made one of these and it’s flat on one side and rounded on the other. How do I get it to look like a ball like these in the pictures?
Toni - Design Dazzle says
Meilssa,
Maybe the tissue paper is too thick? There are varying degrees of thickness. My tissue paper was fairly lightweight – maybe that is why the tissue pom was more rounded for me. It’s just a guess.
Toni
Rebecca says
I am having trouble getting mine to look like yours 🙁 I am making these for our end of year office luau and would really love for them to look as good as yours! Any pointers? Yours do not show any discernible middle where mine is glaring. I have tried to pull the paper more but I am worried about ripping. To you pull long ways or horizontally when you begin? How do you get it to look round all the way and from what point do you hang them from?
Sorry for all the questions! 🙁
Toni - Design Dazzle says
Rebecca,
Maybe use less sheets or thinner tissue paper. Tissue paper has different quality thickness. It sounds like maybe your paper is to thick. Try that and see if that works for you. I don’t think the direction (pulling which way) mattered that much. I hang it from the pipe cleaner. Good luck!
Chelsea says
Absolutely love these! I made a bunch for my brother’s graduation party and they looked so cool hanging all around our deck.
Toni - Design Dazzle says
Chelsea –
Yeah for you! What a great sister. I’m sure everyone was impressed with your graduation decor.
Thanks,
Toni
Sara Connell says
I LOVE these! Thanks for sharing! I was wondering where people found them. I can’t wait to make some of these for my classroom. 🙂
Sara
Toni - Design Dazzle says
Yeah! So happy to help. These would be so fun for a classroom!!
Enjoy!
Toni
rosalyn says
I did it! Great fun but very delicate when seperating. Mine is probably a bit too big-like a football. I will keep practising. Thanks for guide.
Toni - Design Dazzle says
Rosalyn,
So glad you tried. Keep practicing you’ll get the hang of it : )
Toni
janie hendrick says
I’m using these for my classroom….super excited. Thanks for the how to:)))))
Toni - Design Dazzle says
So glad to help out, Janie! Send us pictures when you’re done : ) We love our teachers!!
Liliantemperley says
I have loved this tutorial I am going to give it a try did do some small flowers but this seems a little more challenging will try thanks
Toni - Design Dazzle says
I enjoy couch crafting – watching TV while I craft. This was just the right craft to couch craft with. It took me a couple of tries at first. But then it worked out great!
Enjoy!
Amanda Cleckler says
Wow! I love this tutorial! Thanks so much for sharing! Have a blessed day!
Toni - Design Dazzle says
Thank you for your kind word.