

 image from MarthaStewart.com
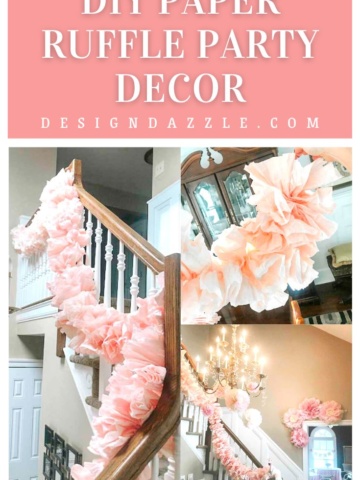
Paper flowers are such an easy creation you can make with tissue paper. They’re fun, vibrant and colorful – a great way to decorate for a party or room decor. Martha Stewart sells the pom pom kit – if you would like to purchase the kit. Remember the darling nursery room post last week with all the flower pom poms? In case you didn’t see:

Here are easy step-by-step instructions to make giant paper flowers:

Step 1
Take 10 sheets of tissue paper – lay on a flat surface. I used 20″ x 30″ sheets. Starting at the short end, make a fold at least 1.5 inches wide. Simply fold accordion-style – flip tissue stack over and make another fold. Continue folding until you get to the end of the tissue. Make sure to press firmly creasing with each fold.
 Step 2
Wrap a pipe cleaner (or florist wire) tightly around the center of your folded tissue.
Step 3
Make two cuts at the very end of the stack to make a point or round it – depending on the look you want. Repeat on the other end.
 Step 4
Gently pull each piece of tissue towards the center of the flower, separate each tissue sheet from the others one at time. Fluff and fiddle with until the desired shape is found. These flowers are approximately 18″ in diameter.

Light Pink Bulk Tissue Paper Tissue Paper Pink 20″ x 30″ Hot Pink Tissue 20″ x 30″


20 x 30 Tissue Paper Great selection of tissue paper colors White Bulk Tissue Paper


Amy says
Thank you for this tutorial! I was just thinking about adding some whimsy to my daughter’s room. This will be perfect!
Diane @ kidoozy.com says
These are soooo much more impressive than the ones the kids and I have made…..we’re going to have to practice them and hang some on the girls bedroom ceiling.
Family American Style says
They are so cute. I love the vivid colors.
Jennie Bender says
Love this, saving the thought for future wedding decor ideas! Love it! Thanks so much. I am telling my friends about your blog, it is so festive=)
V and Co. says
okay i've been waiting to feel good about buying the martha stewart ones and cant justify the $10 for tissue paper! but now i can do it! thank you so much for the tut. i'll link it if i do it on my blog!
Amanda says
Thank you!! I made these the other night for a princess party and they turned out great – I bought a 10 pack of colored tissue paper for $0.69 at a discount store.
Tammy says
Is there a reason why mine keep coming out with a flat bottom area? I am feeling really stupid that I just can't get them to be a ball shape. I am using 10 sheets of tissue. Is there a certain way you are supposed to pull the paper? I am holding the folded end and pulling it down towards that is that right. Please help I have a wedding in a week and I need to get this sorted out. Thanks
Nalda says
Ooh I've been looking for directions that were very clear. Thank you for all the wonderful ideas!!
New Reader and definitely returning.
A Magical Childhood says
I just wandered in and love this idea! I linked it on my blog. They're so lovely and my kids would have a blast making them. Thanks!
Tracy says
You can pair these with some round paper lanterns (www.beau-coup.com/round-paper-lanterns.htm) for a really great look.
The Wood's says
How is the best way to hang these or the round paper lanterns on the ceiling for a nursery?
DesignDazzle.blogspot.com says
Hang cup hooks (or utilty hooks) and attach monofilament line to the lanterns or pom poms. Make sure the hooks are large enough to hold the weight.
Toni
birguzelciftiz says
hello,this very beatiful…
I'm from Turkey…
selam ile…
Term papers says
What a great photo instruction for making Pom Pom tissue flowers. I was always afraid of making them. I should give it a try now. Thank you!
Ange says
I think they are just gorgeous, although i wonder how they would turn out if you instead used Tulle…..???? I think Tulle would look equally as fluffy & would last longer etc (although no one will be playing with the paper ones anyway). I'm going to attempt making them in Tulle for my girls bedrooms, thank you for that link , they are gorgeous & will be a lovely feature.
Tes says
I just made a practice pom-pom with clearance tissue paper I bought from Target. The pop-pom turned out really well for being multi-colored and my first attempt! Now that I know what I'm doing I can find paper to match the playroom and go crazy! 🙂 Thanks so much!
Laura says
Just made these for my son's party. They are fabulous and really give a great amount of color in the room.
Thanks so much!
https://daybydaylbc.blogspot.com/
Anonymous says
They are fabulous and really give a great amount of color in the room.
Josh and Melinda says
So cute and easy! Our local dollar store even carries oversize tissue paper 🙂 Made it, blogged it, linked back to you!
https://joshandmelindagross.blogspot.com/2010/07/ice-cream-wedding-shower.html
Lindsey says
FYI to the commenter who was thinking about tulle, i tried this one:
https://www.oncewed.com/7560/diy-wedding/decor/diy-wedding-pom-poms/
but personally, I wasn't thrilled. I felt it looked like those bathroom loofahs. I will be doing these pom poms out of tissue paper. I did several last night from Martha Stewart's kit (DONT spend money on it, it's just floral wire and tissue paper, luckily I got it from a friend), and it turned out awesome. I too couldn't quite get the bottom to fluff out, but I decided to use these as table centerpieces, so it actually works perfectly for me.
dining tables says
This is really nice. I love that you shared a tutorial. That was helpful.
theyoungjunker says
I tried making these, and they look good all except the middle doesn't get cover. No matter which was I 'fluff' the paper the middle is still exposed…what do i do? I want to make some for a wedding shower im hosting next Friday!
Linda~Blu Embellish says
Thanks for the tutorial ! They look great and love the color !
Leticia says
Thanks for the tutorial!!! I made some for my sons birthday party this weekend. Great compliments!!!
Beckah says
I bought these as a kit from an Etsy store because I just didn't want to take the time to fold them. It turned out great, all I had to do was fluff and hang! Saved me a lot of time. I love these poms, so cute!
http://www.etsy.com/shop/pomtastic
Jen H. says
These Pom Poms are fabulous. My 12 year old daughter decided to make them to hang in her room. They turned out great and add a whimsical component to her room. Thanks for the tutorial!
nightowl_72 says
Best tutorial for this I have seen!
Study in UK says
This is truly a great read for me. I have bookmarked it and I am looking
forward to reading new articles. Keep up the good work
help with dissertation says
Hello my friend! I want to say that this article is awesome, nice written and include almost all vital info. I would like to see more posts like this.
Boundless Technologies says
I would like to say this is an excellent blog that I have ever come across. Very informative. Please write more so that we can get more details.
Boundless
Anonymous says
just found 20×20 tissue 30 sheets at the DOLLAR store!
cctv karachi says
I like the design of your blog very much. It looks like a page from fairy tale. I’m really impressed!
Sherrie Kueckelhan of Kueckelhan Photography Productions says
Will be making these for my daughters wedding reception. The floral Poms are so expensive & time consuming if you go the DIY route. These seem to have the same effect. Thanks for the tutorial!
The baby's room decor a cute idea. Love it.
Sherrie Kueckelhan of Kueckelhan Photography Productions says
Read Tammy's post. Anxious to try these, but wondering if there are any hints for Tammy's difficulty with Pom having flat bottom?
ten york condo toronto says
that is great.
Jacqui says
Thank you for the instructions. I'm thinking of making these as decor for my sons 3rd birthday which is trains. I'm doing red, aquamarine blue, and navy I think! Super excited!
DesignDazzle.blogspot.com says
Thank you to everyone for the comments. I love that you found my pom pom flower tutorial helpful!!
Hugs!
Toni
JenSmith says
I remember making these out of toilet paper when I was little! LOL I think I like the tissue paper method much better! I am gonna incorporate t his into my classroom design. Thanks.
Anonymous says
Did anyone every try them in Tulle – is this the same as starched net?
Giving it a bash tomorrow and will let you know if it works
Radisson Hotel Sacramento says
Nice Blogging. I have no words for this great post such a awe-some information i got gathered. Also looking forward for more posts about that.
hotels in san diego says
Goodness, very well thought out and put together. Will forward to reading your work in the future. Thanks a lot for sharing this amazing knowledge with us.
website design company bangalore says
The blog is absolutely fantastic. Lots of great information and inspiration, both of which we all need. Thanks
Anonymous says
Hmmm really love these but mine didn't quite turn out like yours! Found it quite hard to separate the sheets near the centre folds (?)
C-STAR says
I can not get mine to look this way & don't know what I am doing wrong!
DesignDazzle.blogspot.com says
Try using a couple less tissue sheets. Sometimes if the tissue paper is too thick it will be harder to "fluff". Experiment a little bit : )
Good luck
Software Life Cycle says
Its very cute and wonderful work done by you..!
michael says
Thank you. I really love these but treasure didn't quite inning out like yours! Found it quite hard to separate the linens near the centre folds..
eid greetings | eid sms messages
sms messages says
I'm thinking of making these as decor for my sons 3rd birthday which is trains. I'm doing red, aquamarine blue, and navy I think! Super excited! eid messages
Chastity M. says
What store if you don't mind telling me?
rachelbanks22 says
Hey love this tute. However I am looking for the tissue paper on the site above that you recommended. And I can't find anything in packs. everything is reams of 480 sheets. I dont need that much! Could you guide me a little better! Thanks Rachel
Anonymous says
BLOG JE VEĽMI KRÁSNY. VĎAKA ZA INŠPIRÁCIE, SÚ NÁDHERNÉ. VYSKÚŠAM. VĎAKA ZA ZDIEĽANIE.
PEKNY DEŇ VÁM PRAJEM
ALŽBETA
doara67 says
I am looking for the tissue paper on the site above that you recommended. And I can't find anything in packs. everything is reams of 480 sheets.allbestserials || e urdu point
doara67 says
I am looking for the tissue paper on the site above that you recommended. And I can't find anything in packs. everything is reams of 480 sheets.allbestserials || e urdu point
Jesmond student accommodation says
Useful information like this one must be kept and maintained so I will put this one on my bookmark list! Thanks for this wonderful post and hoping to post more of this.
self drug test says
I read your post . it was amazing.Your thought process is wonderful.The way you tell about things is awesome.
vending machines los angeles says
hi ! i am very pleased who make this weblog. but i want to give one recommendation relevant to publish. your publish should be modify weekly. you should be modify concept of your website. over all content is awesome.
silvanagu says
what is the store of 1 dollar where i can find the paper in disscount thanks
voip providers says
very interesting and quite pretty post.
Business Broadband Packages says
Nice indeed and developing my interest though.
business broadband packages
Ingrid says
I just made this for my christmas present and they look so good! Thanks so much for the idea!! I will never by another bow in my life!!!
Amy williams says
These are great! But I found that the folding difficult as I kept on ripping the tissue paper 🙁 is there a specific way? Me and my daughter would like know kind regards Amy x
Toni - Design Dazzle says
Amy,
I haven’t had that problem. Could it be the thickness of the tissue paper? Maybe try using not as many tissue papers and if that doesn’t work try using more tissue paper. Not all tissue paper is created equal. Good luck!
Let me know how it turns out : )
Nishan Singh says
Always so interesting to visit your site. What a great info, thank you for sharing. this will help me so much in my learning.
Arun Sharma says
Glad to visit your blog. Thanks for great post that you share to us…
Toni - Design Dazzle says
You are welcome!
Allie says
Its really a wonderful idea.