• Skip to primary navigation
  • Skip to main content
  • Skip to primary sidebar
  • Home
  • Blog
  • About
    • Contact
    • Press & Partnerships
    • Copyright/Disclosure
    • Links/Parties/Giveaways
    • HOI Friends
      • Toni Roberts
      • Tauni Everett
      • Tammy Mitchell
      • Randi Dukes
      • Michelle Stewart
      • Mariah Leeson
      • Mandy Beyeler
      • Lindi Haws
      • Kim Byers
      • Ashley Johnston
      • House of Ideas
  • Videos
  • SHOP

Design Dazzle

Inspiration for kids rooms, baby nurseries, and kids parties

  • My Home
    • Home Tour
    • Christmas Home Tour
  • My Projects
    • My Projects
    • Companies I Have Worked With
    • Michaels Makers
  • DIY/Decor
    • top tutorials
  • crafts
  • celebrations
    • parties
    • christmas
    • halloween
    • thanksgiving/fall
    • New Year’s
    • Valentine’s Day
    • St. Patrick’s Day
    • Easter/Spring
    • mother’s day
    • father’s day
    • patriotic
    • School/Teacher/Graduation
    • Gift Ideas
    • weddings
    • best ideas
  • Recipes
    • Meals
    • Instant Pot/Crock Pot
    • Desserts
    • Treats & Snacks
  • travel
  • free printables
  • Lifestyle
    • organization
    • Preparedness
    • Healthy Living
  • kids
    • kids parties
    • kids rooms
      • cool bedroom ideas
    • summer camp/crafts
You are here: Home / crafts / How To Make a Party Backdrop With Paper Window Shades

July 30, 2013

How To Make a Party Backdrop With Paper Window Shades

How To Make a Party Backdrop With Paper Window Shades - Design Dazzle

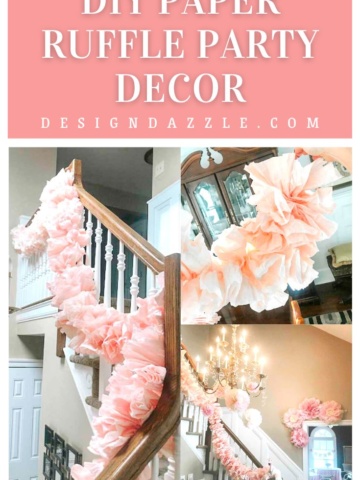
I’m sharing how to make a party backdrop with paper window shades. These rosettes are made from temporary pleated paper shades
the kind you get when you move (and you use temporarily) to cover the windows until real blinds get installed. Repurposing paper window shades into something beautiful was pretty easy! To create these x-large paper rosettes see the full tutorial below.

How To Make a Party Backdrop Out of Paper Window Shades - Design Dazzle

I shop more often at the hardware or dollar store for party decor/supplies then I do at the party store. For this DIY party project, I purchased a box of temporary pleated paper window shades 36-by-72-Inch, 6-Pack from Lowes (home improvement store). These were used to create the stunning party backdrop.

Before you begin, you will need to determine the size of the space you are decorating. One box of six shades decorated this 4′ x 8′ backdrop. The paper window shade is 36″ wide and 72″ long. Each large paper rosette shown is 36″ wide and is made from one window shade. To make the smaller 12″ rosettes, the shades were cut into three 12″ wide pieces at 72″ long. The shades are made of a lightweight white paper that is easy to cut plus they come already pleated.


How to make extra-large rosettes out of paper window shades - Design Dazzle


Steps for the DIY Paper Rosettes Using Paper Window Shades.

Lay the paper shade flat on a surface. Expand the paper shade and extend the top of the shade to touch the bottom of the shade forming a circle (see image). Each window shade comes with an adhesive strip on the top. Peel off the protective backing and adhere the edges of the shade closed. You have now made a round paper rosette!

How to make extra-large rosettes out of paper window shades - Design Dazzle

This rosette is off to a good start but without a little stability it will lose shape. Hot glue a round of poster board to the back.


Polystyrene for party props - Design Dazzle

Next it’s time to consider how to turn this one rosette into a beautiful backdrop. I’ve used polystyrene insulation sheets for craft projects for years. This 1/2″ x 4′ x 8′ sheet of foam was only $7 …perfect for craft and hobby projects. Plus it’s really lightweight so it’s easy to setup without scratching furniture or breaking your back. I used this board to hot glue the paper rosettes. If you need a smaller size to fit your space, polystyrene insulation sheets are easy to trim with a kitchen knife. Or you can purchase a similar product in a smaller size by the name Insulfoam or Expanded Polystyrene Foam Sheet


DIY: make extra large rosettes from paper window shades - Design Dazzle

Spray paint the rosette to match your color scheme. I used glitter and ribbon to jazz up the rosettes and the hot glue gun to attach it to the “polystyrene board”. Scrapbook paper was used to create some of the smaller rosettes.


How To Make a Party Backdrop Out of Paper Window Shades - Design Dazzle

Here’s the finished product. I think the rosettes add stunning texture and visual appeal. How about you? I’d love to hear how your paper rosettes turn out. Repost from 2012.

signature_toni


Related Posts


DIY: How-To Make A Freestanding Party Backdrop

Surprise Window Shades {guest tutorial}


Mickey Mouse Party Backdrop


15+ Awesome DIY Party Backdrops


DIY Roman Shades


Christmas Present Party Backdrop


DIY Photo Backdrop Round-Up!


How to DIY a Christmas Tree Party Backdrop


How to Make Your Own Wood Slice Backdrop


Amazing DIY 4th of July Easy Party Backdrop Idea

Author Bio
Article Info
Popular Posts
Toni - Design Dazzle

Toni - Design Dazzle

Owner at Design Dazzle
Toni Roberts is a DIYer, designer, crafter, traveler, holiday lover, and memory maker. Design Dazzle encompasses ideas and inspiration for life’s celebrations, home projects, DIY crafts, holiday fun (especially Christmas), travel and more.
Power Bio Box by HOI
Author:
Toni - Design Dazzle
Categories:
  • crafts
  • DIY/Decor
  • kids
  • kids parties
  • My Projects
Mentions:
how to make a party backdrop out of paper window shades
Keywords:
party backdrop made out of paper window shades
Last Updated:
August 16, 2020
  • How To Make A Balloon Garland (that's gorgeous)!!!
  • Balloon Rocket Races
  • Balloons And Flowers Make a Beautiful Fairy Arch
  • 10 Best DIY Birthday Banners

Sharing is caring!

Disclaimer

This post may contain affiliate links, which means that if you click on a product link, we may receive a commission (at no extra cost to you). See my full disclosure for further details.

Reader Interactions

Comments

    Leave a Reply Cancel reply

    Your email address will not be published. Required fields are marked *

    Recipe Rating


  1. Kristin says

    July 30, 2013 at 7:11 am

    Love this idea! Thank you for sharing!

    Reply
  2. Vanessa says

    July 30, 2013 at 10:42 am

    This is beautiful! What a great idea!

    Reply
  3. Allyson says

    August 9, 2013 at 11:51 am

    Thank you for such a wonderful idea! I am planning my daughter’s birthday right now and need to cover a window, this will be perfect and the price is right too! Thank you, thank you, thank you!

    Reply
    • Toni Roberts - Design DazzleToni - Design Dazzle says

      August 12, 2013 at 4:16 pm

      I’m so glad to help Allyson! Send us pictures when you’re done : )
      Toni

      Reply
  4. Linda says

    December 27, 2013 at 7:30 am

    Love this idea! How did you attach the backdrop? Wel’ll be at a country club so dropping from ceiling is not an option! Thanks!!

    Reply
    • Toni Roberts - Design DazzleToni - Design Dazzle says

      December 28, 2013 at 9:53 am

      Linda,
      The backdrop was attached to a counter with duct tape and a flat piece of wood to prop up the foam.
      Good luck!

      Reply
  5. Kayla says

    March 31, 2014 at 9:33 pm

    What kind of paint do you use to paint the rosettes??

    Reply
    • Toni Roberts - Design DazzleToni - Design Dazzle says

      April 1, 2014 at 7:38 am

      Kayla,
      I used spray paint.The paper shades took it well. I did light coats. The smaller rosettes are scrapbook or wrapping paper.
      Enjoy making these!
      Toni

      Reply
  6. Sana says

    June 28, 2016 at 8:49 am

    Hi there! I think this is a wonderful idea and am trying to do this for my daughte’rs 1st birthday! I bought the 36×72″ inch shades via your link on Amazon. I’ve run into an issue though. When I lay out a single shade to make the large 36″ rosette, I cannot form a circle as their just isn’t enough paper to fan out and get the ends to touch. Am I missing a step? Thank you!

    Reply
    • Toni Roberts - Design DazzleToni - Design Dazzle says

      June 29, 2016 at 11:10 am

      Hi Sana!
      Place the long end of the 72″ together – so the TOP and the BOTTOM touch. This is what makes the rosette.

      Reply

Primary Sidebar

Img 0422

Hi, I’m Toni! Welcome to my blog Design Dazzle. I love being a designer, DIYer, traveler, crafter, holiday lover, and memory maker. Read more.

Toni Roberts is a participant in the Amazon Services LLC Associates Program, an affiliate advertising program designed to provide a means for sites to earn advertising fees by advertising and linking to amazon.com

DesignDazzle.com is protected by copyright laws. DO NOT distribute or copy the content or share multiple images or collage images without written permission. You can use ONE Design Dazzle image only if there is a link back to DesignDazzle.com. DO NOT edit, crop, or remove watermarks from any image. Please contact me at toni@designdazzle.com with any questions.

About | Contact Us | Privacy and Legal

© 2017 Design Dazzle · All Rights Reserved. | Hosted by House of Ideas