• Skip to primary navigation
  • Skip to main content
  • Skip to primary sidebar
  • Home
  • Blog
  • About
    • Contact
    • Press & Partnerships
    • Copyright/Disclosure
    • Links/Parties/Giveaways
    • HOI Friends
      • Toni Roberts
      • Tauni Everett
      • Tammy Mitchell
      • Randi Dukes
      • Michelle Stewart
      • Mariah Leeson
      • Mandy Beyeler
      • Lindi Haws
      • Kim Byers
      • Ashley Johnston
      • House of Ideas
  • Videos
  • SHOP

Design Dazzle

Inspiration for kids rooms, baby nurseries, and kids parties

  • My Home
    • Home Tour
    • Christmas Home Tour
  • My Projects
    • My Projects
    • Companies I Have Worked With
    • Michaels Makers
  • DIY/Decor
    • top tutorials
  • crafts
  • celebrations
    • parties
    • christmas
    • halloween
    • thanksgiving/fall
    • New Year’s
    • Valentine’s Day
    • St. Patrick’s Day
    • Easter/Spring
    • mother’s day
    • father’s day
    • patriotic
    • School/Teacher/Graduation
    • Gift Ideas
    • weddings
    • best ideas
  • Recipes
    • Meals
    • Instant Pot/Crock Pot
    • Desserts
    • Treats & Snacks
  • travel
  • free printables
  • Lifestyle
    • organization
    • Preparedness
    • Healthy Living
  • kids
    • kids parties
    • kids rooms
      • cool bedroom ideas
    • summer camp/crafts
You are here: Home / DIY/Decor / Fireplace Remodel: Before and After

Fireplace Remodel: Before and After

This post may contain affiliate links that, at no additional cost to you, I may earn a small commission. Read our Disclosure Policy.


I am excited to share our fireplace remodel with you! We shared a sneak peek of it in my post about cleaning a gas fireplace and today I’m sharing the before and after photos!

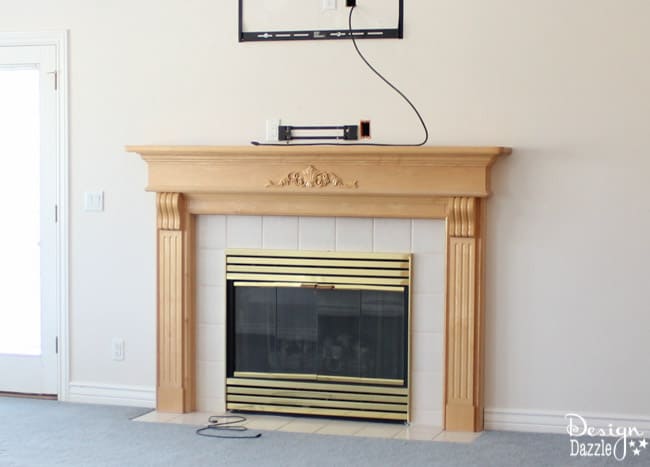
Let’s get started with the before photo – the carpet, light wood mantle, scroll overlay, plain tile, and brass fireplace trim all contribute to a boring, dated look.

Fireplace Remodel: Before and After www.designdazzle.com

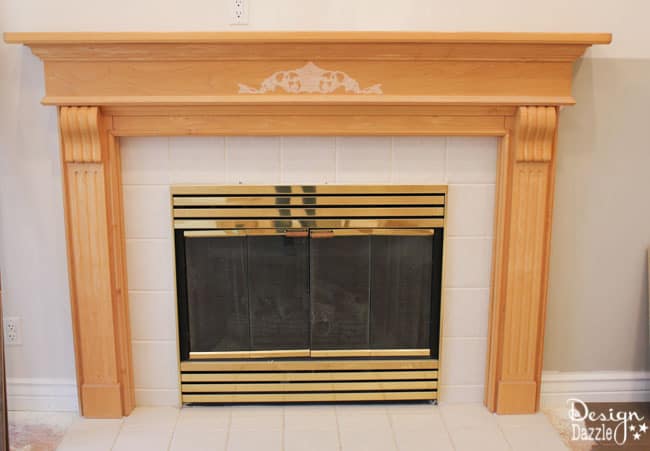
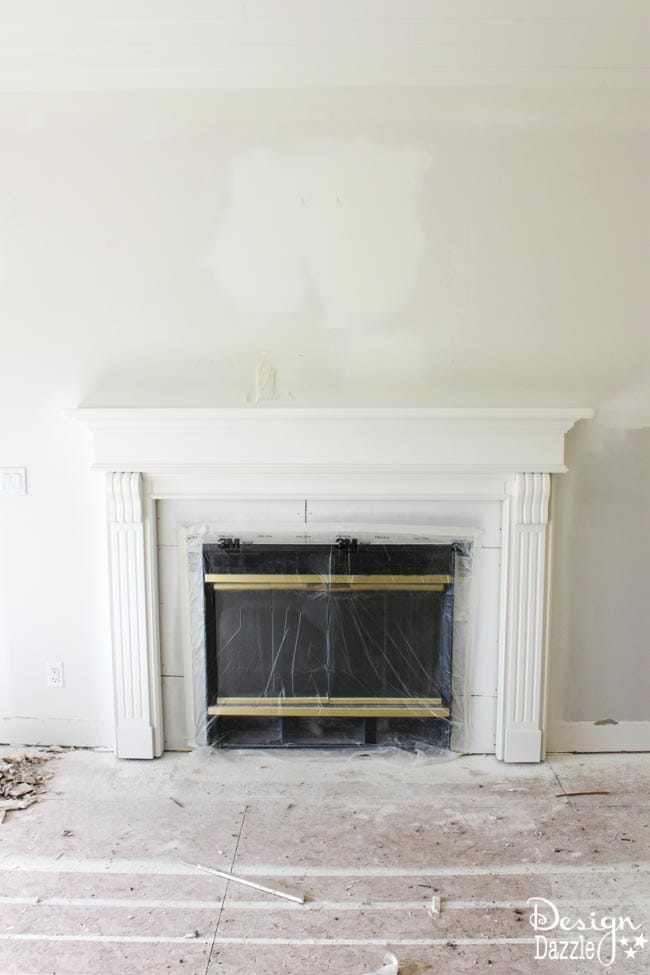
Here’s some progress! Removing the scroll overlay really helped clean up the lines of the fireplace and give it a more classic feeling. We also pulled up the carpet and padding and removed the tile fireplace hearth. The drywall was repaired above the mantle. Because we removed the flat screen TV mounts. I’m personally not a fan of the television above the fireplace. I don’t like viewing the TV looking “up”. I like my TV viewing sitting from the couch with the TV at eye level.

Fireplace Remodel: Before and After www.designdazzle.com

Next, we removed the old tile and taped over the outlet and fireplace to protect them from the paint. The color we used for the mantle is Benjamin Moore White Dove.

Fireplace Remodel: Before and After www.designdazzle.com

Here’s a look at the new flooring and tile.

Fireplace Remodel: Before and After www.designdazzle.com

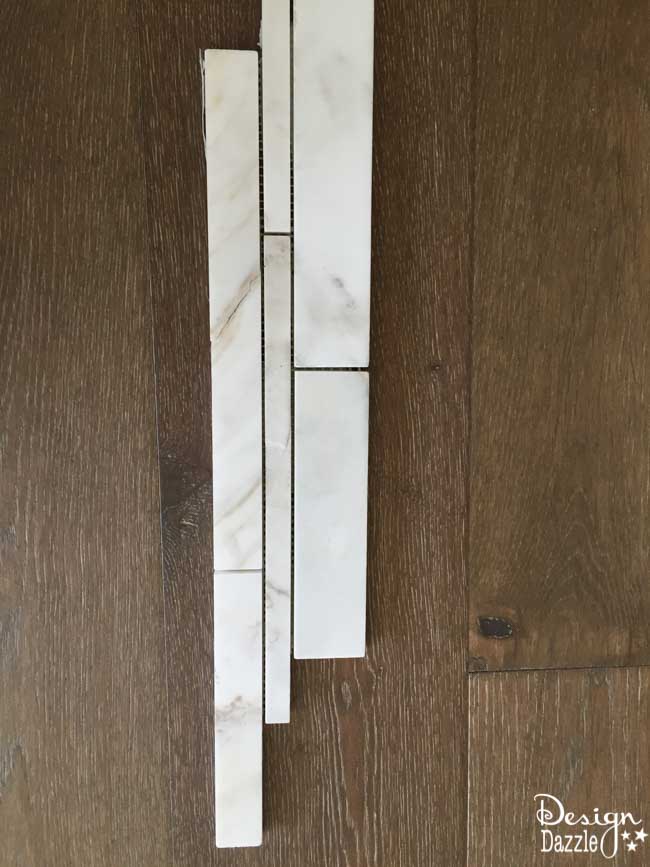
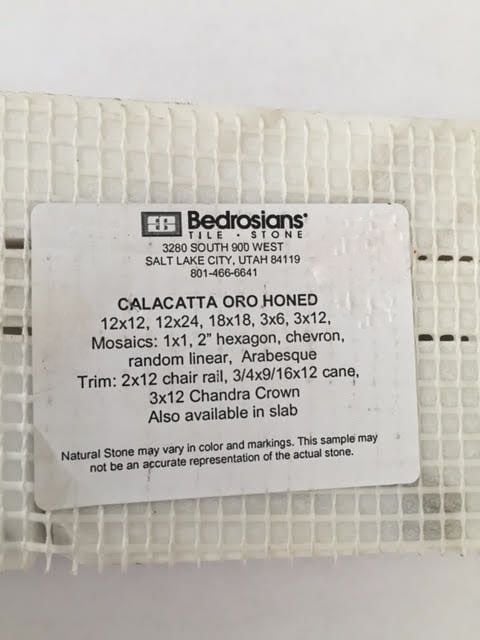
The tile I chose is Calacatta Marble Honed Tile. We installed random linear tiles that came already placed and cut on mesh. But there are several options to choose from, as shown below.

Fireplace Remodel: Before and After www.designdazzle.com

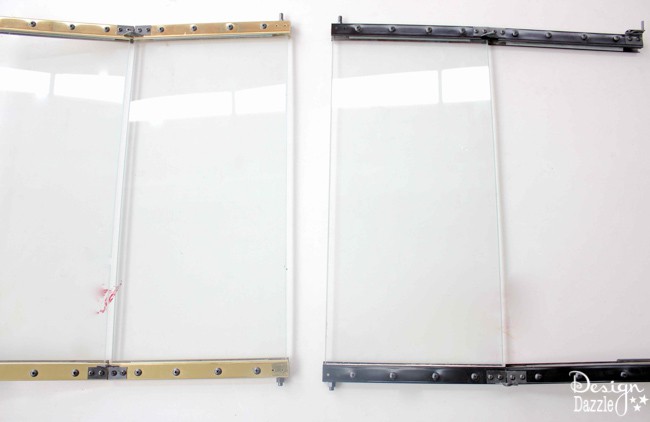
Next, we updated the brass trim on the gas fireplace. We sprayed the brass trim with Rustoleum High Heat Spray Paint Flat Black.

Fireplace Remodel: Before and After www.designdazzle.com

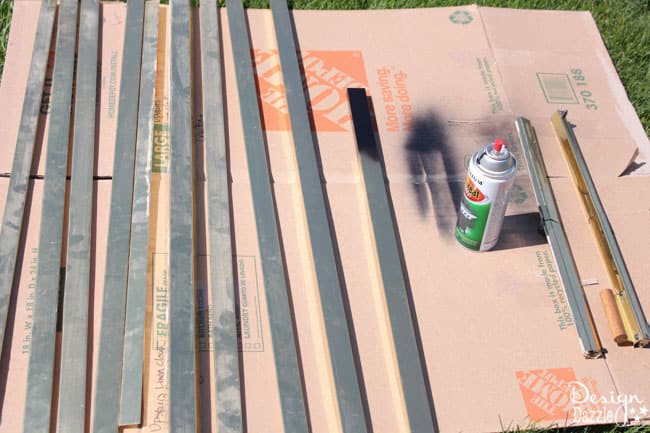
We removed the trim from the glass doors, sprayed it black then replaced it.

Fireplace Remodel: Before and After www.designdazzle.com

And now the after photo!

Fireplace Remodel before and after | Design Dazzle

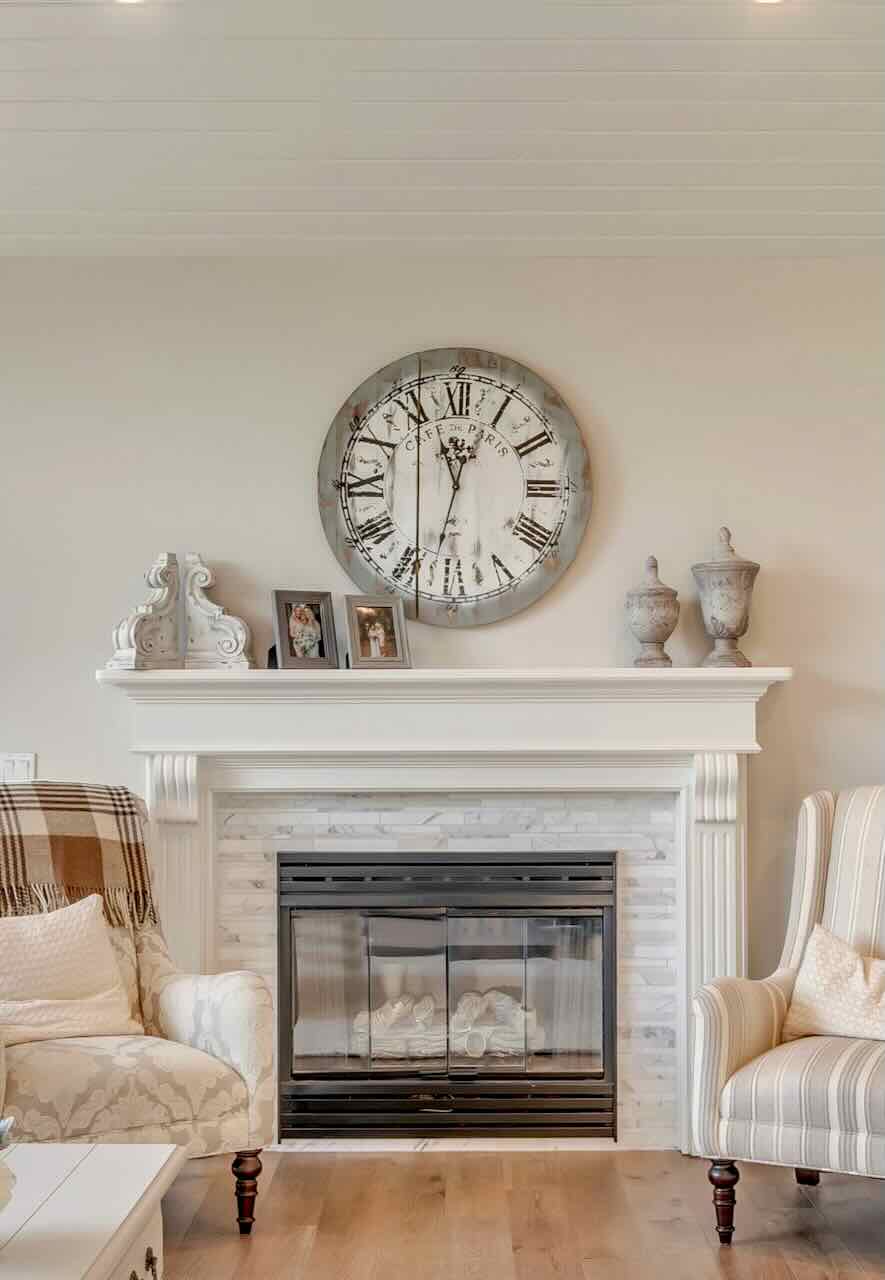
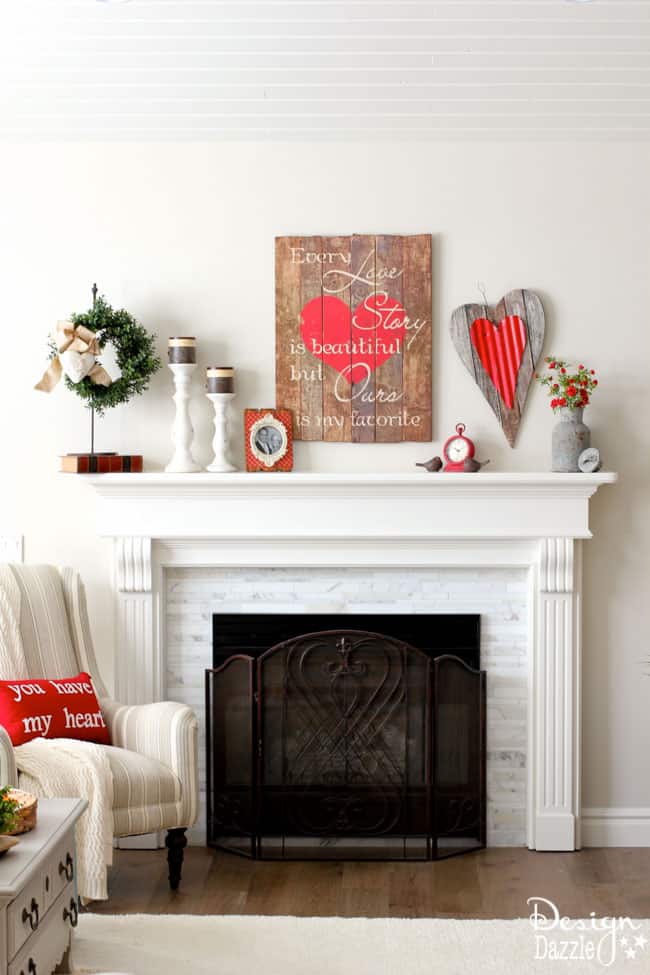
I love how the fireplace turned out. It is a classic style that will be current for years. This photo image is sharing my Valentine’s theme decor.

Fireplace Remodel before and after | Design Dazzle

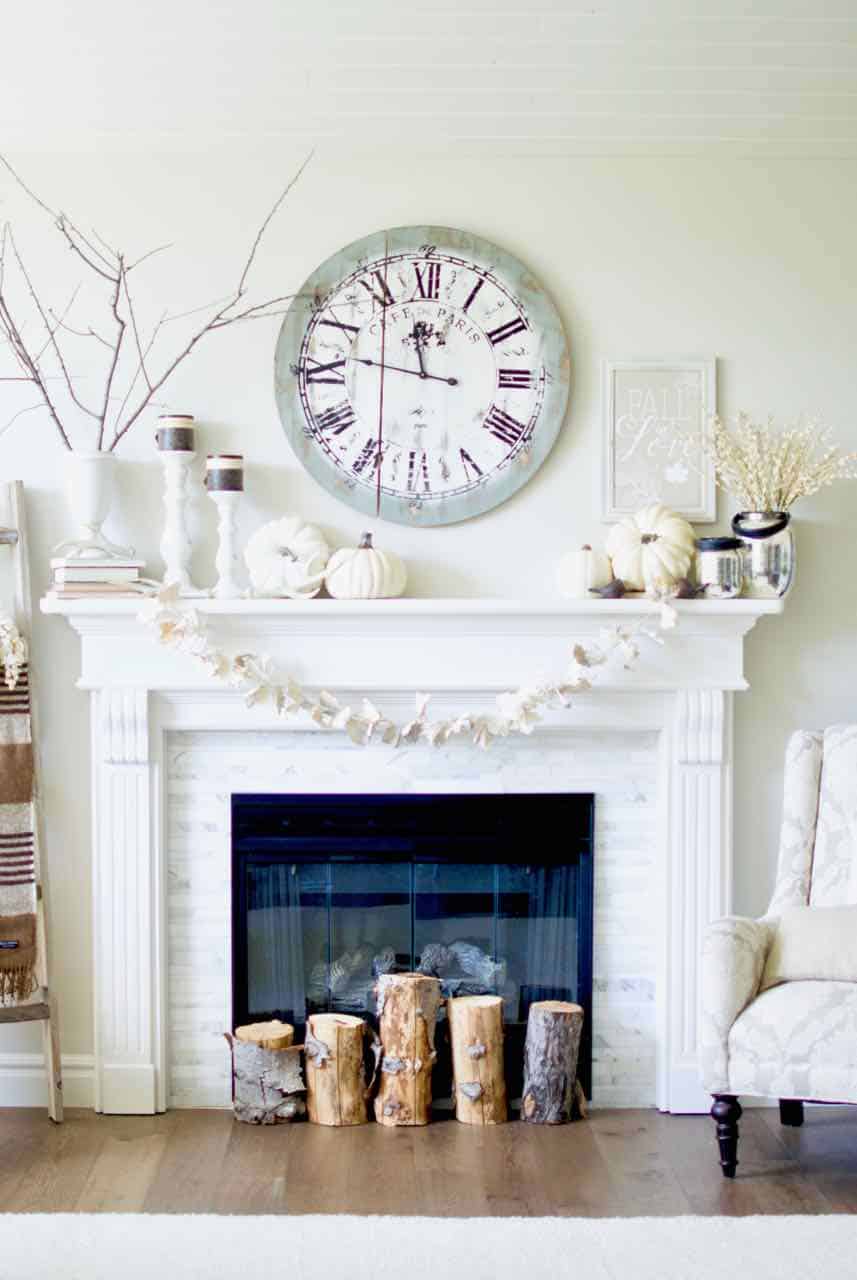
Here is a look at my fireplace decorated for Fall.

Note: There are no building requirements in my area to install a stone or brick hearth so we opted to install the wood flooring all the way to the fireplace. Be sure to check your local codes before starting any remodel projects!

Before and After of my Fireplace Remodel! Find out how to get this gorgeous look in your home!! Love me some DIY updating!

signature_toni.jpg

Save

Save

Related Posts


Kitchen Remodel: During


Faux Fireplace Mantle (for those without a fireplace)


My Dream Kitchen Remodel


Master Bathroom Remodel Before & After


How to Paint a Brick Fireplace | DIY Before & After


Gas Fireplace Cleaning: DIY or Hire a Professional?


Kitchen Remodel Final Reveal


Master Bedroom Remodel Ideas : Our Master Bedroom Remodel Before and After


Our Complete Exterior Home Remodel!


Kitchen Remodel: Countertops and Tile

Article Rating:
No rating
Author Bio
Article Info
Popular Posts
Toni - Design Dazzle

Toni - Design Dazzle

Owner at Design Dazzle
Toni Roberts is a DIYer, designer, crafter, traveler, holiday lover, and memory maker. Design Dazzle encompasses ideas and inspiration for life’s celebrations, home projects, DIY crafts, holiday fun (especially Christmas), travel and more.
Power Bio Box by HOI
You are here: Home My Projects Fireplace Remodel: Before and After
Title:
Fireplace Remodel: Before and After
Authors:
  • Toni - Design Dazzle
Categories:
  • DIY/Decor
  • My Projects
Mentions:
Not Specified
Keywords:
fireplace remodel
Last Updated:
May 16, 2018
  • Mickey And Minnie Christmas Decorating Ideas
  • 30 Most Amazing Christmas Wreaths
  • Best Selling Neutral Rugs
  • Unicorn Planner Free Printable
  • Mrs. Claus Bake Shop Sign & Printables
  • Organization: Kitchen Storage Ideas For Consumables
  • How to Decorate a Thanksgiving Table + Free Printable
  • Make Faux Birch Logs Using Pool Noodles
  • Resurrection Eggs The Story of Easter
  • Summer Camp Giant Bubbles Kit Tutorial With Free Printables
  • Santa Sacks: Simplify Christmas With A Wonderful Family Tradition!
  • DIY: Princess Castle Headboard

Sharing is caring!

Disclaimer

This post may contain affiliate links, which means that if you click on a product link, we may receive a commission (at no extra cost to you). See my full disclosure for further details.

Reader Interactions

Comments

    Leave a Reply Cancel reply

    Your email address will not be published. Required fields are marked *

    Recipe Rating


  1. Michal says

    May 13, 2016 at 12:58 pm

    Beautiful! Was it hard to remove the tile, and how difficult was it to insert the stone? What do you think the stone cost? We have green marble surround and want to replace it but don’t know who to call. Thanks for any advice!

    Reply
    • Toni Roberts - Design DazzleToni - Design Dazzle says

      May 15, 2016 at 5:07 pm

      Hi Michal!
      I hired someone to do the tile. I watched them remove the old tile – it seemed pretty simple. For installing the stone – the stone was on mesh. So, it was much easier than it would have been if linear tiles by themselves. The tile guy did a great job. He did say the linear was a trickier than regular tiles. But it worked and I love it!!

      Reply
      • Michal says

        May 16, 2016 at 1:29 pm

        Thanks! What do you guess an average would be to have someone do it? Trying to gauge if in the budget!

        Reply
        • Toni Roberts - Design DazzleToni - Design Dazzle says

          May 17, 2016 at 11:51 am

          I purchased the stone tile and grout at approximately $275. Of course, you can get much cheaper tile. The spray paint for the firebox was around $11. The painting of the fireplace surround was included in our painting budget for the entire home. I can’t remember what the tile guy charged to install. I’m thinking it was around $300 but if you’re doing it yourself then zippo!! Good luck!

          Reply
  2. D says

    May 30, 2016 at 4:36 am

    Looks amazing! How easy was it to remove the scroll overlay and did it damage the surface at all? I have three scrolls on my mantle that I have been wanting to remove for over 8 years now lol.

    Reply
    • Toni Roberts - Design DazzleToni - Design Dazzle says

      June 1, 2016 at 4:18 pm

      Hello!
      The scroll overlay was glued on and we popped it off and it hardly left any damage. It was easy to sand where the overlay used to be. So glad it was removed! It really makes a difference on the overall look!
      Toni

      Reply
  3. Judy says

    November 29, 2016 at 12:45 pm

    How did you change the color of Mantle from Oak to White. How long did it take to change the color.

    Reply
    • Toni Roberts - Design DazzleToni - Design Dazzle says

      November 30, 2016 at 1:55 pm

      Judy,
      The mantle is Maple and was sprayed with professional paint. It is a process of taping, spraying primer and then spraying with the correct paint for the surface.

      Reply
  4. Cheryl says

    May 12, 2018 at 5:59 am

    Did you put the marble tile directly over the existing builder tiles on front of fireplace?

    Reply
    • Toni Roberts - Design DazzleToni - Design Dazzle says

      May 16, 2018 at 3:06 pm

      Hi Cheryl,
      No, builder tile was removed. It’s hard to tell in the picture. But if you scroll down you can see the drywall around the fireplace surround. I love my fireplace. It is so classic looking.

      Reply
  5. Bailey says

    January 22, 2019 at 3:20 pm

    Did you have to sand before repainting the mantle? Did you paint it yourself?

    Reply
    • Toni Roberts - Design DazzleToni - Design Dazzle says

      January 29, 2019 at 6:22 pm

      Bailey,
      I hired a painter to paint the entire house so he also painted the mantle. It is an easy thing to paint yourself. Lightly sand the mantle before painting. Also, wipe all the sand dust off completely. Use a good primer and you are then ready to paint. As you can see the before and after pics are amazing. I love my mantle.

      Reply

Primary Sidebar

Img 0422

Hi, I’m Toni! Welcome to my blog Design Dazzle. I love being a designer, DIYer, traveler, crafter, holiday lover, and memory maker. Read more.

Toni Roberts is a participant in the Amazon Services LLC Associates Program, an affiliate advertising program designed to provide a means for sites to earn advertising fees by advertising and linking to amazon.com

DesignDazzle.com is protected by copyright laws. DO NOT distribute or copy the content or share multiple images or collage images without written permission. You can use ONE Design Dazzle image only if there is a link back to DesignDazzle.com. DO NOT edit, crop, or remove watermarks from any image. Please contact me at toni@designdazzle.com with any questions.

About | Contact Us | Privacy and Legal

© 2017 Design Dazzle · All Rights Reserved. | Hosted by House of Ideas