• Skip to primary navigation
  • Skip to main content
  • Skip to primary sidebar
  • Home
  • Blog
  • About
    • Contact
    • Press & Partnerships
    • Copyright/Disclosure
    • Links/Parties/Giveaways
    • HOI Friends
      • Toni Roberts
      • Tauni Everett
      • Tammy Mitchell
      • Randi Dukes
      • Michelle Stewart
      • Mariah Leeson
      • Mandy Beyeler
      • Lindi Haws
      • Kim Byers
      • Ashley Johnston
      • House of Ideas
  • Videos
  • SHOP

Design Dazzle

Inspiration for kids rooms, baby nurseries, and kids parties

  • My Home
    • Home Tour
    • Christmas Home Tour
  • My Projects
    • My Projects
    • Companies I Have Worked With
    • Michaels Makers
  • DIY/Decor
    • top tutorials
  • crafts
  • celebrations
    • parties
    • christmas
    • halloween
    • thanksgiving/fall
    • New Year’s
    • Valentine’s Day
    • St. Patrick’s Day
    • Easter/Spring
    • mother’s day
    • father’s day
    • patriotic
    • School/Teacher/Graduation
    • Gift Ideas
    • weddings
    • best ideas
  • Recipes
    • Meals
    • Instant Pot/Crock Pot
    • Desserts
    • Treats & Snacks
  • travel
  • free printables
  • Lifestyle
    • organization
    • Preparedness
    • Healthy Living
  • kids
    • kids parties
    • kids rooms
      • cool bedroom ideas
    • summer camp/crafts
You are here: Home / crafts / DIY: Top Hat Decoration

DIY: Top Hat Decoration

This post may contain affiliate links that, at no additional cost to you, I may earn a small commission. Read our Disclosure Policy.

DIY Top Hat Decoration by Design Dazzle! Easy and fun to make! Will certainly add a pop to your decor!

I enjoy making props for party decorations or room decor and I love it when a prop comes out as cute as this top hat! Top hats are the perfect accessory for many types of themes. Depending on the fabric/embellishments used, hats like this one could be made into mad hatter hats, clown hats, steampunks or top hats for New Year’s Eve party or a magic party. How about a Parisian theme with this top hat? The possibilities are endless. This project is being featured on Kirkland’s Pinning Parlor. See details at the bottom of the post on how to win $2000!!

My tutorial shows how easy it is to make these top hats with a glue gun and scissors – no sewing involved! The top hat shown is for decor purposes only  – it’s not made to wear.

Supplies needed:

  • 1 large poster board
  • Fabric –  enough to cover the poster board
  • spray adhesive
  • glue gun
  • scissors
  • embellishments for top hat (e.g. ribbon, flower, feathers, tulle)
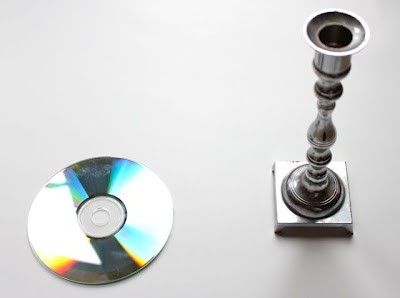
  • candle stick
  • old CD

To get started, cut the fabric to the size of the poster board and lay it on a flat surface, face down. Take the time to really smooth the fabric out so that it has no wrinkles. Then spray adhesive over the entire surface of the poster board. Starting at one edge lay the sticky side of the poster board on top of the fabric (wrong-side of the fabric) lining up the edges. Flip the poster board over so the fabric is on top. Apply pressure and smooth over – make sure there are no wrinkles or bubbles. While you don’t need to rush, you do need to work quickly to smooth the fabric before the adhesive sets.

Using the pictures above as a guide:

  1. For the hat brim, trace a 12 inch round circle onto the -poster board and cut. Remember, this hat is not destined for the top of your head, so there is no need for a hole in the brim circle.
  2. For the hat band, cut out a 10 x 22 rectangle.
  3. Roll the hat band so the edges overlap slightly and form a circle. Hot glue the hat band edge together. This will be the tube of the top hat. Snip notches every 1/2 inch along the top and bottom of the hat band.
  4. Fold in the notches on the top and bottom of the hat band and hot glue the hat band to the hat brim circle. Turn the hat upside down and trace around the circumference of the top of the hat band onto the fabric poster board and cut. Hot glue this piece of the hat top onto the hat band. Embellish your top hat with ribbons, sequins, flowers, feathers, etc!


Since this is a hat to liven up your party decor or room decor, you will need some way to display it. To make your own hat stand, start with a tall candle stick holder. I usually can find these inexpensively at my local thrift shop or at a craft store. Hot glue an old CD to top of your candle stick holder. When the glue is dry, go ahead and glue on the bottom of the top hat onto your newly made hat stand.


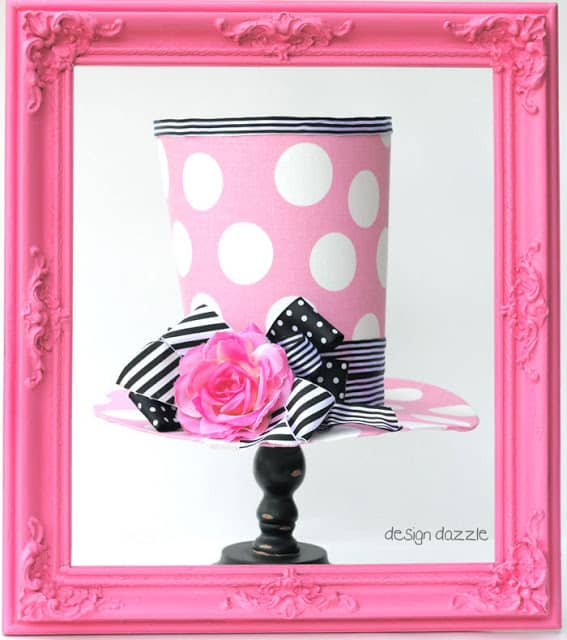
And there you have it! One amazing prop that looks great and doesn’t break the bank! I’d love to hear how yours turn out.


Related Posts


DIY Leprechaun Hats


DIY Witches Hat Fascinator


DIY: Cat in the Hat Photo Prop


DIY New Years Eve Party Hats


DIY Harry Potter Hat with Cricut


Edible Elf Hats


Easter Decorations Your Kids Can Make

Our Top Posts of 2012


10 Halloween Mantel Decorations Your Kids Will Love


25 Farmhouse Christmas Decorations

Article Rating:
No rating
Author Bio
Article Info
Popular Posts
Toni - Design Dazzle

Toni - Design Dazzle

Owner at Design Dazzle
Toni Roberts is a DIYer, designer, crafter, traveler, holiday lover, and memory maker. Design Dazzle encompasses ideas and inspiration for life’s celebrations, home projects, DIY crafts, holiday fun (especially Christmas), travel and more.
Power Bio Box by HOI
You are here: Home My Projects DIY: Top Hat Decoration
Title:
DIY: Top Hat Decoration
Authors:
  • Toni - Design Dazzle
Categories:
  • crafts
  • DIY/Decor
  • My Projects
Mentions:
craft projects, DIY projects, diy top hat. top hat party decor, no-sew projects, top hat room decor
Keywords:
Top Hat
Last Updated:
August 8, 2020
  • Mickey And Minnie Christmas Decorating Ideas
  • 30 Most Amazing Christmas Wreaths
  • Best Selling Neutral Rugs
  • Beach Themed Guest Room
  • Fall Home Tour
  • Farmhouse Bathroom IKEA Style
  • Easy St. Patrick's Day Breakfast Idea - Free Printable
  • Christmas Tree Decorating Tips & Hacks
  • No-Sew Cupcake Baker Halloween Costume
  • Free Butterbeer Printable & Recipe
  • FREE Paper Doll Printables - The Nativity, Santa's Helpers and more!
  • DIY: Princess Castle Headboard

Sharing is caring!

Disclaimer

This post may contain affiliate links, which means that if you click on a product link, we may receive a commission (at no extra cost to you). See my full disclosure for further details.

Reader Interactions

Comments

    Leave a Reply Cancel reply

    Your email address will not be published. Required fields are marked *

    Recipe Rating


  1. Michele {The Scrap Shoppe} says

    April 27, 2012 at 7:07 am

    This is SO cute! And I love that it is a no sew project. Thanks you so much for sharing the tutorial!

    Reply
  2. Chloe says

    May 7, 2012 at 9:28 am

    Great tutorial. This might come in handy for an upcoming Alice in Wonderland themed shower I'm hosting!

    Reply
  3. Kodi Miller says

    September 29, 2019 at 8:59 am

    Excited to see your projects

    Reply
    • Toni Roberts - Design DazzleToni - Design Dazzle says

      December 27, 2019 at 5:24 pm

      Thank you!

      Reply

Primary Sidebar

Img 0422

Hi, I’m Toni! Welcome to my blog Design Dazzle. I love being a designer, DIYer, traveler, crafter, holiday lover, and memory maker. Read more.

Toni Roberts is a participant in the Amazon Services LLC Associates Program, an affiliate advertising program designed to provide a means for sites to earn advertising fees by advertising and linking to amazon.com

DesignDazzle.com is protected by copyright laws. DO NOT distribute or copy the content or share multiple images or collage images without written permission. You can use ONE Design Dazzle image only if there is a link back to DesignDazzle.com. DO NOT edit, crop, or remove watermarks from any image. Please contact me at toni@designdazzle.com with any questions.

About | Contact Us | Privacy and Legal

© 2017 Design Dazzle · All Rights Reserved. | Hosted by House of Ideas