

 I am so excited to announce that Design Dazzle has been selected as a Featured Content Partner for Kirkland’s Pinning Parlor. What’s that? You aren’t familiar with Kirkland’s Pinning Parlor? Not to worry. You’re not alone. It’s all new. Kirkland’s, a chain of home-decor stores that stocks an impressive selection at very reasonable prices, has set up an online community called the Pinning Parlor. It’s a special section of their site for sharing projects, entering to win prize packages and finding inspiration for your next project. You have a chance to win $2000 in prizes!!!
For my first Pinning Parlor project, I shared this tutorial for making paper rosettes out of window shades:

I shop more often at the hardware or dollar store for party decor/supplies then I do at the party store. For this DIY party project, I purchased a box of temporary pleated paper window shades 36-by-72-Inch, 6-Pack from Lowes (home improvement store). These were used to create the stunning party backdrop.
Before you begin, you will need to determine the size of the space you are decorating. One box of six shades decorated this 4′ x 8′ backdrop. The paper window shade is 36″ wide and 72″ long. Each large paper rosette shown is 36″ wide and is made from one window shade. To make the smaller 12″ rosettes, the shades were cut into three 12″ wide pieces at 72″ long. The shades are made of a lightweight white paper that is easy to cut plus they come already pleated.

Steps for the DIY Paper Rosettes Using Paper Window Shades.
Lay the paper shade flat on a surface. Expand the paper shade and extend the top of the shade to touch the bottom of the shade forming a circle (see image). Each window shade comes with an adhesive strip on the top. Peel off the protective backing and adhere the edges of the shade closed. You have now made a round paper rosette!
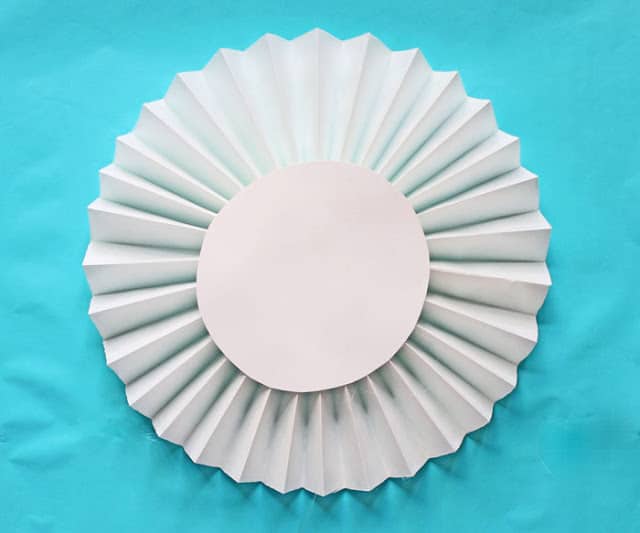
This rosette is off to a good start but without a little stability it will lose shape. Hot glue a round of poster board to the back.
Next it’s time to consider how to turn this one rosette into a beautiful backdrop. I’ve used polystyrene insulation sheets for craft projects for years. This ½″ x 4′ x 8′ sheet of foam was only $7 …perfect for craft and hobby projects. You can purchase it at Lowe’s or Home Depot. Foam sheets are really lightweight so it’s an easy setup without scratching furniture or breaking your back. I used this board to hot glue the paper rosettes. If you need a smaller size to fit your space, polystyrene insulation sheets are easy to trim with a kitchen knife. Or you can purchase a similar product in a smaller size by the name Insulfoam or Expanded Polystyrene Foam Sheet

Spray paint the rosette to match your color scheme. I used glitter and ribbon to jazz up the rosettes and the hot glue gun to attach it to the “polystyrene board”. Scrapbook paper was used to create some of the smaller rosettes.

Here’s the finished product. I think the rosettes add stunning texture and visual appeal. How about you? I’d love to hear how yours turn out. Look for more projects on Kirkland’s Pinning Parlor. Here are a few more tutorials you might be interested in…
Giant Bubbles Kit
How To Make a Diaper Cake
How To Make Tissue Pom Flowers
Oh…and one last thing. To help kick off the Pinning Parlor, Kirkland’s is hosting a Pin + Win Sweepstakes. To play, go to the Pinning Parlor. Pin any image to your Pinterest boards by clicking the “Pin it” button for a chance at a $2000 prize pack. The first time you “Pin it” you will receive a great coupon for $25 off a $75 purchase. All of the images located in the Pinning Parlor are the items you can pin to be entered to win the weekly prizes. So everything that you see at the link is eligible for pinning and winning.
The “pin it” button is located within the Pinning Parlor site. It is an actual button that you click. You must use the “Pin it” buttons on the site to pin images in order to be eligible for the sweepstakes. Using the bookmarklet will not enter you. After you successfully complete your first pin to your Pinterest boards, you’ll be prompted to fill out an entry form to be entered to win our $2,000 weekly prize pack. Each pin equals an entry, so the more you pin, the more chances you have to win. Each week until May 13th, one lucky entrant will win a $2,000 prize pack from Kirkland’s and Formica® Flooring. Kirkland’s will add new inspiration to the Pinning Parlor each week of the promotion so be sure to check back for more inspiration and chances to win! You need a Pinterest account to participate. If you aren’t a member of Pinterest visit https://pinterest.com/landing/ to request an invite. You can also leave me a comment or send me an email and I will send you an invite.


Eva {Tales of the Scotts} says
These are absolutely gorgeous! The colors!!!
DesignDazzle.blogspot.com says
Thanks, Eva! It was a lot of fun to create.
Kelly Griglione says
Brilliant!!! I always wondered how people got large rosettes for party decorations, since there's only so much you can do with the 12×12 scrapbooking paper. We have a 1st Communion Party coming up and I will definitely be using your idea. THANK YOU so much for sharing! Pinning this too!!!
Toni - Design Dazzle says
Thanks, Kelly! I hope your event was spectacular!
Jenny@NorthwestLovelies says
I adore these rosettes. I literally cannot stop looking at them! Those colors are amazing! I might need some of these in our playroom so I can look at them all the time. 🙂 Beautiful job!
Toni - Design Dazzle says
Thanks Jenny. I appreciate your sweet comment.
designdazzle.blogspot.com says
Kelly, thanks for your kind words. This would be great for a communion party. The white rosette would work perfect for your event. Of course, color would be pretty too!
designdazzle.blogspot.com says
Jenny, I'm imagining all sorts of color combinations for playrooms. I'll try to update the post with the spray paint colors used. Thank you for enjoying them : )
Mariah says
This is beautiful! I love the color combination and the creative use of making the large rosettes with shades!
Deebi27 says
This is just sooo beautiful and happy Toni! And so inexpensively you made all this possible. Wow! This would look make a great display in a living room, playroom and more! BEAUTIFUL!
Carla says
That's pretty and I love the colors.
Miss Kitty says
Wow, Toni! These rosettes are fabulous! I found them via the Kirkland's Pinning Parlor. I am also following your blog now.
Nora Vazquez says
Really creative super cute rosettes and the colors are awesome.
DesignDazzle.blogspot.com says
Thank you, Miss Kitty!
DesignDazzle.blogspot.com says
Nora – thanks for your kind words!
Janelle M says
I love the idea of using paper shades cause pleating is for the birds. I do have one question though: you have to cut the shade in half width wise correct?? I looked at one I bought and there's no way it'll make a complete circle, plus I think it would be like 72" wide (which is huge) and yours are only 36.
Heather - Chickabug says
These are SO CREATIVE and beautiful, Toni! I featured your idea as my 'pinterest pin of the week' on my blog (after checking your image usage rules!):
https://www.chickabug.com/blog/2012/07/one-pretty-pin-diy-paper-rosette-backdrop.html
Thank you for the inspiration!!
Heather : )
Nikole Vergin says
Love the colors! Can you tell me the names of the spray paint you used?
c3e017da-0779-11e2-94c3-000bcdca4d7a says
I'm doing my daughters first birthday with this color scheme!!! I'm obsessed with your awesome creation:) did u ever post the spray paint colors?
Flo says
Hey am not able to make the top and bottom meet to make the circle.mine’s from Walmart.am frustrated any tips?thanks
Toni - Design Dazzle says
Hmmm… not sure. Is it the length? Maybe make it longer so the top and bottom can reach. Good luck!
julianna says
My English is very bad, I don´t understand one thing, how did you paint the paper?? with spray?
Thanks!
Toni - Design Dazzle says
Julianna – yes I spray painted the white paper blinds.
Alice says
Does it matter what type of spray paint you use?
Toni - Design Dazzle says
Alice,
I don’t think so. I’ve used different kinds of paint to spray paper. Maybe a quick test on a scrap of paper would tell you.
Thanks,
Toni
bee says
I’m so glad I came across this! I’ve been working on a few paper rosettes for my daughters first birthday.
I have a question though. I have my pleated paper shades with the same dimension but I am unable to do Step 2. It just seems like the paper shade will not expand that far and stops half way in between and forms a fan instead. I’m not sure what I’m doing wrong but i’m not getting a semi circle or “U” shape. Any advice would be great!
Thanks!
Toni - Design Dazzle says
Bee,
The paper is not long enough. Are you sure your dimensions are the same as mine? It needs to be much longer than wide.
Let me know how it goes.
Toni
susan says
Where do you buy the foam sheet that you used for the backdrop? is it from a craft store or a home improvement store like Lowes? Also, can u spray paint the foam as well? What do you usually use to cover it?
Toni - Design Dazzle says
Hi Susan,
The foam sheets can be purchased from Lowes or Home Depot. They are located in the insulation section. I don’t spray paint foam. I covered the entire foam with the paper rosettes. One side of foam has a shiny surface that I hot glue the paper rosettes too.
Toni
Ellen Eversole says
Just made the rosettes for a circus themed baby shower. They came out great. The only thing I would add to this tutorial is to buy only the white shades as they come in a gray as well for filtering the light out. Also prime them first with white to bring out the brightness of the color that you are using.
I loved your blog.
Thank you
Toni - Design Dazzle says
Thanks Ellen for the extra tips. It’s always great to learn from each other!
Jodi Weslow says
Hi Toni – love the idea of using the insulation board for the backdrop! One question, how do you secure it to the table?
Thanks!
Jodi
Toni - Design Dazzle says
Hi Jodi,
Great question! I used thin wood strips that I taped (duct tape)to the back of the insulation board to give it support. The strips of wood just sat on the floor. Here is a wood backdrop I made that shows metal pipe and buckets. It’s the same idea but thin wood and no metal or buckets. https://www.designdazzle.com/2013/10/diy-how-to-make-a-freestanding-party-backdrop/
Lee-anne says
Love this idea – simple but elegant and very age appropriate for the residents in aged care that I work for. These will work like a charm as gold rosettes on the tables for Melbourne Cyp Lunch
Toni - Design Dazzle says
So glad this will help. Enjoy planning!
Toni
Catherine Hampton says
I realize you posted this a long time ago but hopefully you will still see this question. How did the temporary shades hold up to the spray painting? I have a box of shade and cans of spray paint but I’m hesitant to start. Did the shades paint ok?
Toni - Design Dazzle says
My shades painted great. If they change the products the shades have been made with that would be my only hesitation. I had the paper rosettes for a couple of years and they looked awesome.
Niki says
I was wondering how you secure this to the table without using a wall etc? I know you mentioned the wood board that you did with cement and metal. I am just trying to figure out after you duct tape thin wood strips to the back, how it stays up on the table. I just found your blog and it is fabulous!!! Thank you for sharing such great ideas!!!
Toni - Design Dazzle says
It’s not a wood board it’s a foam board. I copied and pasted this from my blog:
“This 1/2″ x 4′ x 8′ sheet of foam was only $7 …perfect for craft and hobby projects. You can purchase it at Lowe’s or Home Depot. Foam sheets are really lightweight so it’s an easy setup without scratching furniture or breaking your back. I used this board to hot glue the paper rosettes. If you need a smaller size to fit your space, polystyrene insulation sheets are easy to trim with a kitchen knife.”
I propped the foam boad up with some small piece of wood that were duct tapped to my counter. So part of the wood was behind the foam and the other part of the wood was taped to my cabinet. Hope that makes sense. The foam is very sturdy.
Good luck