• Skip to main content
  • Skip to primary sidebar

Design Dazzle logo

menu icon
go to homepage
  • Home
  • Home Decor / Design
  • Holidays
  • Crafts
  • All Categories
    • Facebook
    • Instagram
    • Pinterest
    • YouTube
  • search icon
    Homepage link
    • Home
    • Home Decor / Design
    • Holidays
    • Crafts
    • All Categories
    • Facebook
    • Instagram
    • Pinterest
    • YouTube
  • ×
    Design Dazzle » Crafts

    Published: Apr 21, 2015 · Modified: Aug 11, 2020 by Toni Roberts · This post may contain affiliate links · Leave a Comment

    DIY Paper Lampshade Decor

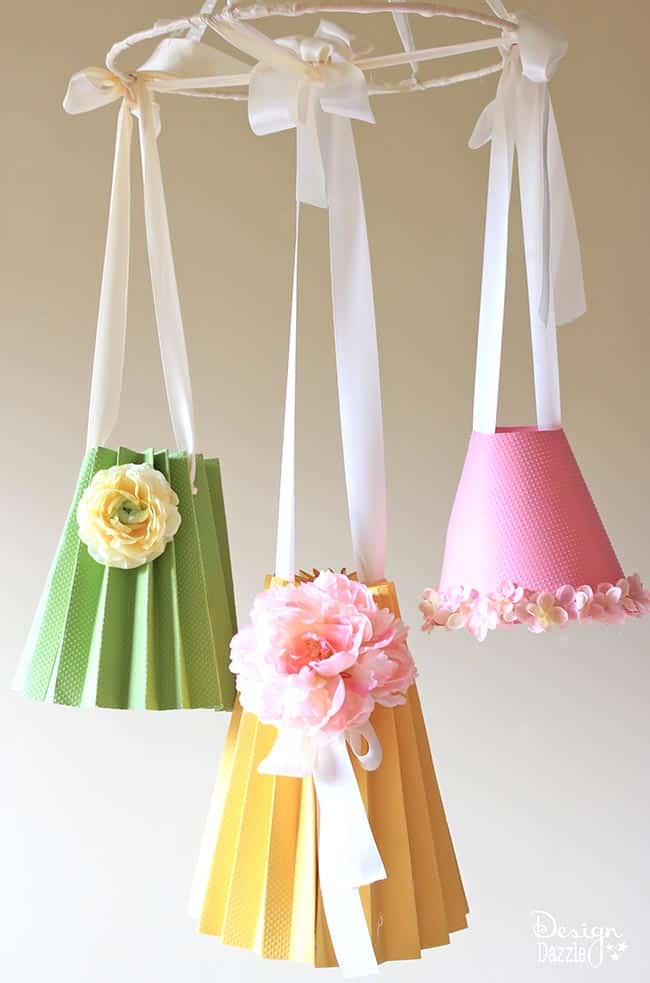
    Looking to add a bit of fun and whimsy to your kids’ rooms without breaking the bank? These sweet, colorful DIY paper lampshades are so easy to make and have such a beautiful effect! You don’t need many supplies, time, or talent to make this craft- it’s perfect for anyone.

    Make paper lampshades to hang on a sweet mobile! Tutorial on Design Dazzle.

    Supplies:

      • 12×12 card stock scrapbook paper sheets (2 for a smaller lampshade, 3 for a larger lampshade)
      • wire lampshade frame from thrift store (or metal ring from the craft store)
      • ribbon
      • embellishments
    • We R Memory Keepers Crop-A-Dile II Big Bite Punch (optional)
    • hot glue gun
    • scissors

    Step 1: If you are making a smaller lampshade, cut down your paper before you start the rest of the steps. I cut about 3 inches off of my paper, so it was 9×12 inch paper.

    Paper lampshades are the perfect addition to your kids room! Learn how to make it on Design Dazzle.

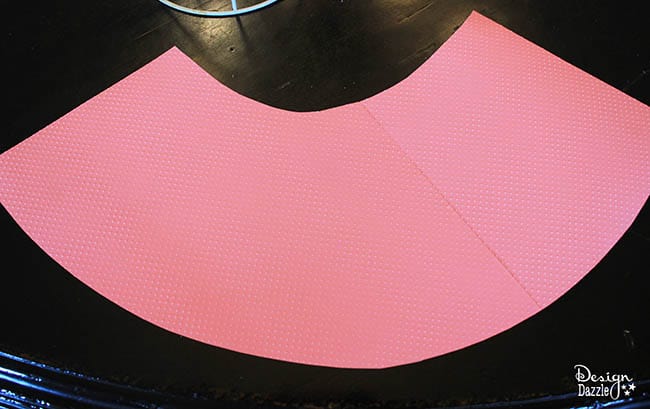
    Step 2: For the pleated shade: Fan fold (you know – fold one way, flip it over, fold it back again) your paper into 1-2 inch folds (depending on your look). Make sure you fold evenly and every fold is straight and matches up. Repeat this for a few sheets. (2 sheets for a smaller lampshade, 3 for a larger lampshade).

    Step 3: Use the crop-a-dile hole punch to make a hole through all the pleats, about 3-4 inches down from the top of the paper, wherever you prefer. Repeat this for the other sheets of paper. Make sure you keep the holes lined up- this is where you will thread the ribbon through to gather the top of the lampshade and hang it.

    Step 4: Glue the sheets together. I did this by taking the ends of each sheet of paper, and overlapping one pleat. Use hot glue (carefully!) to connect all the pages to create a cylinder.

    Make paper lampshades to hang on a sweet mobile! Tutorial on Design Dazzle.

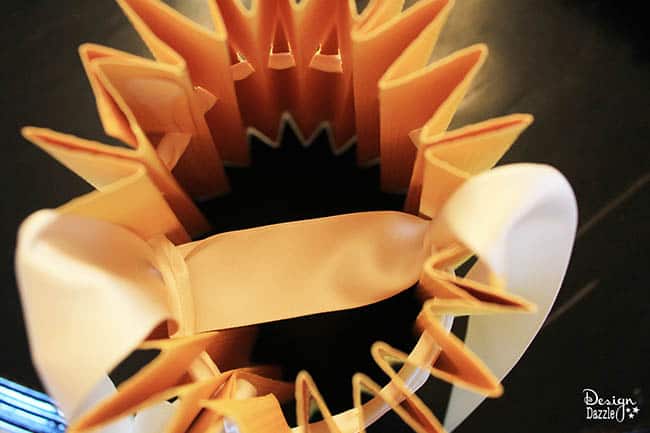
    Step 5: Thread the ribbon through the holes you punched in the top of the lampshade. Pull it to gather the top.

    Paper lampshades are the perfect addition to your kids room! Learn how to make it on Design Dazzle.

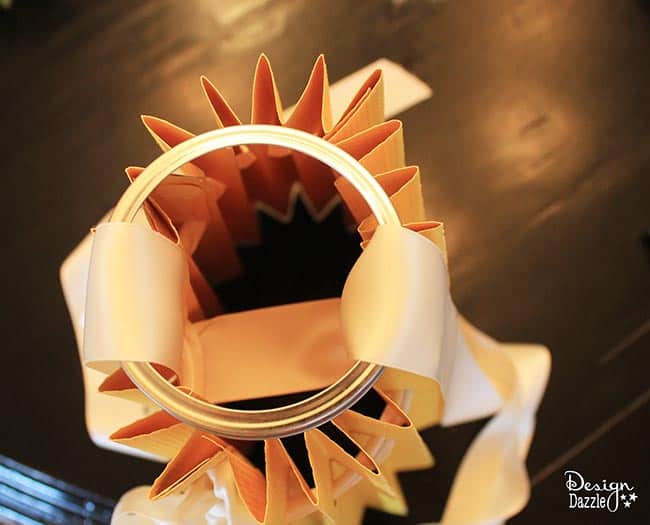
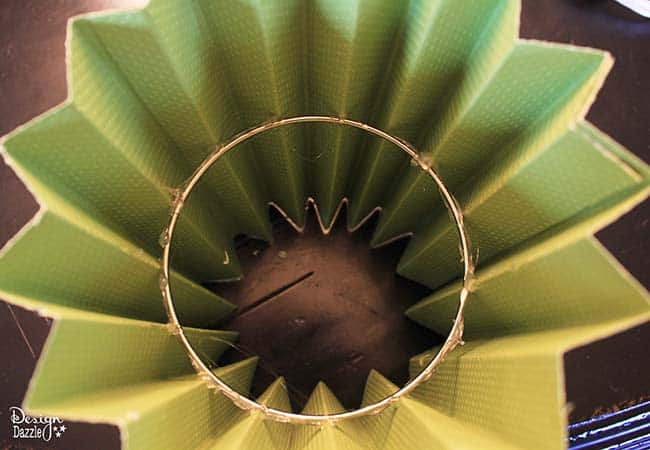
    Step 6: Use hot glue to glue in the wire lampshade frame or metal ring on the inside of the paper. You will push it up as far as you can, but don’t force it. I used a metal ring in my lampshade, but I would recommend using a wire lampshade frame because it would be much sturdier.

    Make paper lampshades to hang on a sweet mobile! Tutorial on Design Dazzle.

    Step 7: Add embellishments! I added faux flowers to mine to add a feminine touch and to cover ribbon.

    Paper lampshades are the perfect addition to your kids room! Learn how to make it on Design Dazzle.

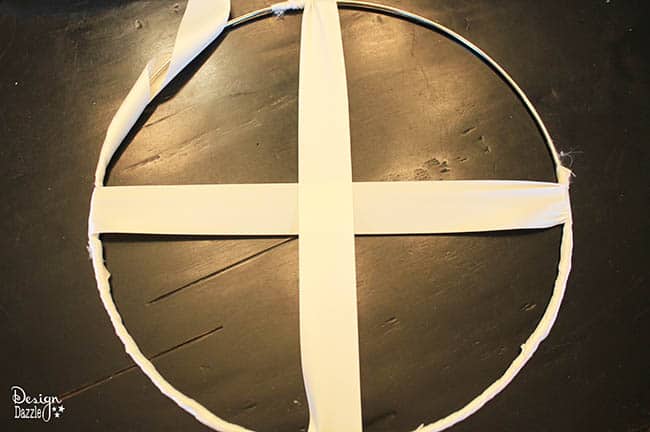
    Step 8: To create the top of the mobile, use a large metal ring. Wrap the ring with ribbon, and wrap two pieces across, like in the photo above. Tie the ribbons from the paper lampshades to this hoop and on the ribbon that is crossed.

    Make paper lampshades to hang on a sweet mobile! Tutorial on Design Dazzle.

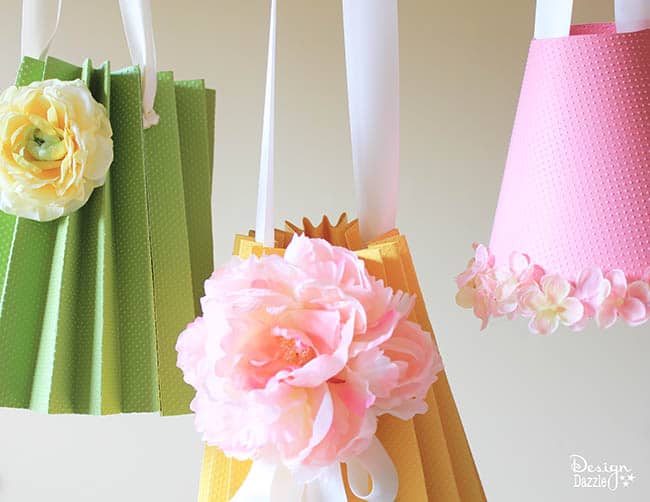
    I love how simple these paper lampshades are to make! Plus, you can be creative and tailor these steps to make a paper lampshade exactly how you want it! I hope you enjoy getting creative and making your own DIY paper lampshade!

    These lampshades are used as hanging decor only and not used on an actual lights.

    Affiliate links are included in this blog post.

    signature_toni.jpg

    More Crafts

    • Creative Ways to Paint Rocks
      20 Creative Ways For Painting Rocks
    • Energetic Whipped Grapefruit Body Butter
      Whipped Body Butter Recipe
    • DIY Paper Ruffle Party Decor made with paper towels!
      Easy DIY Paper Ruffle Party Decor
    • Holiday Santa Sack
      Santa Sack: Do Not Open Until December 25th

    Sharing is caring!

    Reader Interactions

    Leave a Reply Cancel reply

    Your email address will not be published. Required fields are marked *

    Recipe Rating


    Primary Sidebar

    Toni medium

    Hi, I’m Toni! I love designing and decorating. Join me for home inspiration and creative living! More about me →

    Popular

    Spring/Easter

    • Setting an Easter Table
      Decorating An Easter Table
    • elegant recipes with rose
      Rose Petal Sweets
    • IMG 9043
      Simple Easter Table Decor
    • Edible Bunny Box with candy inside. - Design Dazzle
      It’s An Adorable, Edible Easter Bunny! D-I-Y

    Footer

    ↑ back to top

    About

    • Privacy Policy
    • About Toni

    Contact

    • Contact
    • Press & Partnerships

    Toni Roberts is a participant in the Amazon Services LLC Associates Program, an affiliate advertising program designed to provide a means for sites to earn advertising fees by advertising and linking to amazon.com

    DesignDazzle.com is protected by copyright laws. DO NOT distribute or copy the content or share multiple images or collage images without written permission. You can use ONE Design Dazzle image only if there is a link back to DesignDazzle.com. DO NOT edit, crop, or remove watermarks from any image. Please contact me at [email protected] with any questions.

    Copyright © 2024 Design Dazzle