

Our Christmas Wonderful series starts today! Look forward to some amazing Christmas posts from our talented blog friends. This is our 6th year of sharing Christmas Wonderful! Please check out the amazing ideas that have been shared for the past 5 years.
Christmas is the perfect time of year for crafting, and these pretty pillow created with Deco Foil are sure to bring cheer to any room!

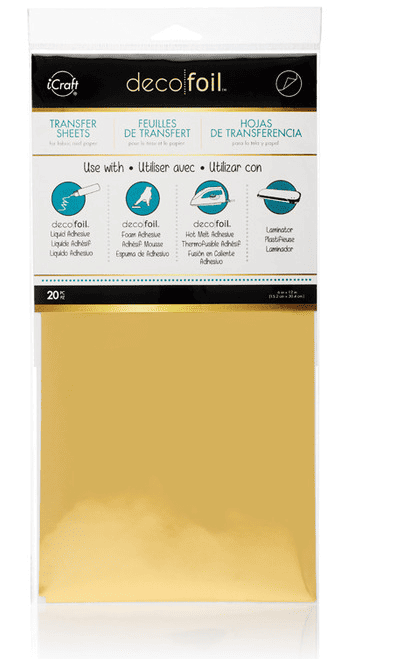
It is so satisfying to make something that you can find in the stores. I used these Deco Foil Gold Transfer Sheets and the iCraft Deco Foil Hot Melt Adhesive to make this project a breeze! This project makes it easy to upgrade any plain pillow and turn it into a one-of-a-kind piece! The pillow covers were purchased at IKEA for under $5. So it is an inexpensive project too! Check out Therm O Web’s online site. You will find some fun crafting projects.
Deco Foil Hot Melt Adhesive is a hot melt adhesive perfect for wearables, cards and so much more. This adhesive is also washable on fabric projects. Use Deco Foil Hot Melt Adhesive in punches, die cutters and electronic cutters. Deco Foil Hot Melt Adhesive also works great in most laminators.
Before you start, you want to make sure that you’ve got a smooth surface. This is going to help the foil to adhere well and not peel off. If you’re using a pillow cover, make sure to wash, dry, and iron it for the best results.

I used my Cricut to cut out the “Merry Christmas” lettering with the adhesive sheets. You want to make sure that there isn’t any extra bubbling around the letters when you cut out your design or letters, because this is where the foil is going to stick.
***Make sure to pay attention if the template needs to be placed mirror image for text with the products you are using.
After you’ve cut out the adhesive sheets, place the cut-out adhesive lettering where you’d like it on the pillow. After you’ve got it placed, iron on the adhesive. Just follow the instructions on the packaging for this!
Once you’ve let it all cool – peel away the liner, leaving only the adhesive, it’s time to get your foil. The awesome thing about this project is that you don’t have to worry about cutting the foil perfectly to match the lettering. All you need is to cover the adhesive with the foil and iron it on according to the package.
The foil will magically only stick to the adhesive, so when you peel away the liner you are only left with the foil exactly where you want it!
There you have it! It’s so easy, but looks like it would take a lot of time and work – which is exactly what you want everyone to think, right?

I just loved how this turned out!
If you don’t have a cutting machine, sign-up below for our free Merry Christmas template/pattern. You can print out the template/pattern, trace onto the hot melt adhesive and cut out the adhesive.
This “Merry Christmas” template is FREE and available for immediate download by subscribing to Design Dazzle!
To receive this free printable – enter your email address in the box below and click submit. Make sure to check your inbox for an email from Design Dazzle. You will have access to all of our FREE printables and also will receive a monthly newsletter filled with lots of great information. Don’t worry your email address will never be sold
Printable files are for personal use only. They are not for commercial use.


Leave a Reply