


Hi! It’s Kendra from My Insanity. I’m happy to be joining in on Christmas Wonderful again this year.


I love to try and make Christmas wonderful and memorable for my family. That often happens as we make gifts for each other or do holiday projects together.
I have been wanting to do a Christmas focused on “Peace on Earth” and “Joy to the World” for a while now and have been collecting ideas on my Pinterest board. These peace on earth DIY ornaments will look great on our tree this year, and would also make neat gifts for neighbors or teachers.

You only need a few basic supplies: Clear ornaments–if the kids are doing these, you make want to make sure you get the plastic kind. Mine are glass, blue or green fine-tipped permanent marker, craft paint in shades of blue green and white–You may want to make sure that you get enamel paint or paint that says it will stay on glass.

Here is the evolution of the ornament. This was my order of operations.
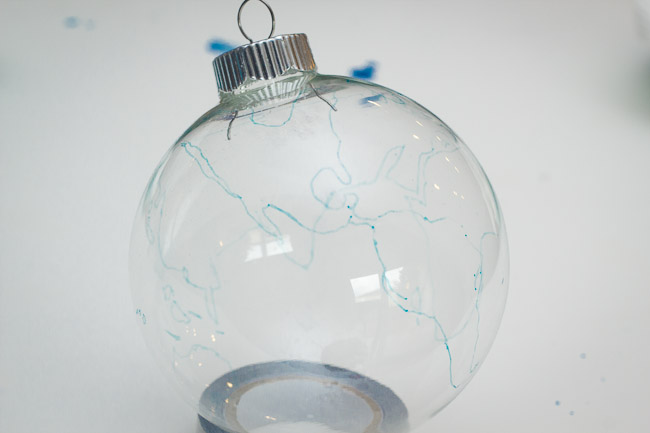
I started by drawing my globe outline with the marker. This is the most time-consuming part. I referenced some maps on-line to make sure I was getting the right basic shapes. It is helpful here to remind oneself that these are little works of art, not necessarily scientific globes to be used for technical purposes. So if Africa ends up a little big or India doesn’t line up quite right with the equator, it isn’t the end of the world. (Get it?) I used a blue or green marker so that the outlines would basically disappear once I painted.
Next I painted the continents green on the outside of the ornament. If you wait until you do the blue paint, it will be too hard to see where to paint. I did Antarctica in white and added to white to northern Russia and Canada. You’ll need to let this dry a bit, or be really careful about where you hold the ornament. This is the fun part and the kids would love to get involved here!

Take the top off of the ornament and pour in paint in a couple of different shades of blue. Depending on the thickness of the paint, you will probably need to water it down a bit first, so that it with swish easily. Then you just swirl and swish and maybe shake the ornament around until all of the clear spaces have turned blue.

It is fun to see the variations and patterns that occur as the paint blends together. I should warn you that in my experience, the lid does not seal off the paint, so you’ll have to be careful as you work it up toward the top of the globe, if you don’t want blue paint all on the outside.
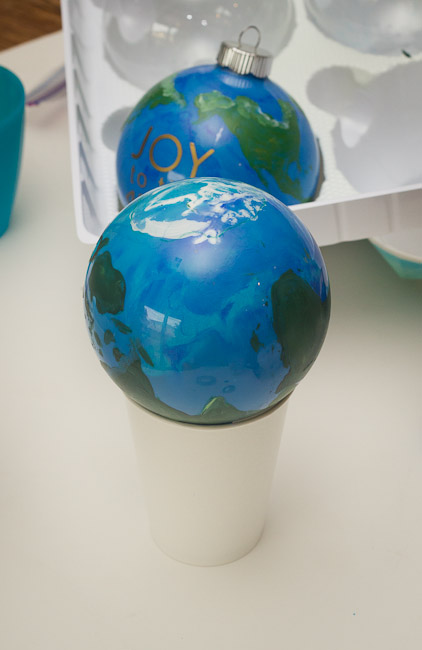
I then turned the open ornament upside down in a cup to drain out the excess paint. You can move on to the next step, but it will likely take a couple of days of the ornaments sitting out with out their caps for the paint inside to dry as it is thick and enclosed.

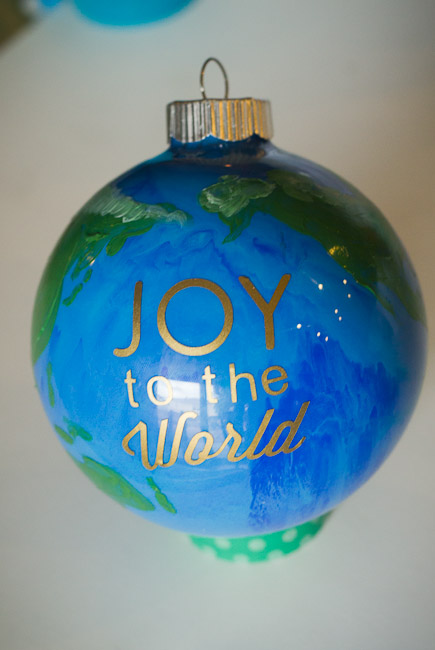
I designed my sayings on my Silhouette software on my computer, and cut them out in gold vinyl.

It is a little tricky to apply the vinyl to the curved surface of the ornament, but I love how it came out!

I didn’t get this far yet, but I would probably add a thin gold ribbon before hanging from a tree or giving to our friends.
Don’t these fill you with “goodwill toward men”?

Thanks for having me, Toni! Best wishes to all of you for peace and joy for all this holiday season!


Leave a Reply