• Skip to primary navigation
  • Skip to main content
  • Skip to primary sidebar
  • Home
  • Blog
  • About
    • Contact
    • Press & Partnerships
    • Copyright/Disclosure
    • Links/Parties/Giveaways
    • HOI Friends
      • Toni Roberts
      • Tauni Everett
      • Tammy Mitchell
      • Randi Dukes
      • Michelle Stewart
      • Mariah Leeson
      • Mandy Beyeler
      • Lindi Haws
      • Kim Byers
      • Ashley Johnston
      • House of Ideas
  • Videos
  • SHOP

Design Dazzle

Inspiration for kids rooms, baby nurseries, and kids parties

  • My Home
    • Home Tour
    • Christmas Home Tour
  • My Projects
    • My Projects
    • Companies I Have Worked With
    • Michaels Makers
  • DIY/Decor
    • top tutorials
  • crafts
  • celebrations
    • parties
    • christmas
    • halloween
    • thanksgiving/fall
    • New Year’s
    • Valentine’s Day
    • St. Patrick’s Day
    • Easter/Spring
    • mother’s day
    • father’s day
    • patriotic
    • School/Teacher/Graduation
    • Gift Ideas
    • weddings
    • best ideas
  • Recipes
    • Meals
    • Instant Pot/Crock Pot
    • Desserts
    • Treats & Snacks
  • travel
  • free printables
  • Lifestyle
    • organization
    • Preparedness
    • Healthy Living
  • kids
    • kids parties
    • kids rooms
      • cool bedroom ideas
    • summer camp/crafts
You are here: Home / celebrations / Homemade “Cupcake” Lotion Bar for Mother’s Day

April 1, 2016

Homemade “Cupcake” Lotion Bar for Mother’s Day

My Michaels Makers post for this month is Homemade Lotion Bars for Mother’s Day. Probably most mother’s love natural ingredients and something handmade. So, why not combine the two? Body bars really can help with dry skin. I’m one of those moms who love lotions and natural products. Of course, these could be made for grandma, school teachers, neighbors, etc. I’ve made two versions of lotion bars – one is very simple (heart shaped bar) the other is a “cupcake” lotion bar that just takes a few more steps.

DIY Mother's Day gift! Make a "cupcake" shape lotion bar with natural ingredients for Mom! #mothersday #mothersdaygifts #mothers Design Dazzle

Mother’s Day is celebrated in the USA (and also other countries) on the second Sunday in May. It’s a great day to show respect to my mom who showed such devotion in raising me!

Make a "cupcake" shape lotion bar with natural ingredients. Great way to add lotion to dry skin. Design Dazzle

Make a "cupcake" shape lotion bar with natural ingredients. Great way to add lotion to dry skin. Design Dazzle

Make a "cupcake" shape lotion bar with natural ingredients. Great way to add lotion to dry skin. Design Dazzle

Make a "cupcake" shape lotion bar with natural ingredients. Great way to add lotion to dry skin. Design Dazzle

Recipe for Homemade Lotion Bars for Mother’s Day:

Ingredients/Supplies:

Shea Butter

Coconut oil

Essential oils – I used Lavender

Icing Bag and tip

Silicone Mold – I used a heart shape and a teacup both purchased at Michaels

Make a "cupcake" shape lotion bar with natural ingredients. Great way to add lotion to dry skin. Design Dazzle


This is the recipe I used for this exact one shown in the images. I would not use this recipe in a warm climate or during the summer months. See recipe at bottom of post for more of a solid lotion bar.

  • 12 oz shea butter
  • 4 oz coconut oil
  • 15-20 drops essential oil

Use a double boiler and place the butter and oil in the saucepan. Make sure you have water in the bottom of the double boiler – not in the saucepan you will be using. Turn on your cook top, place your ingredients (except essential oils) in the double boiler and heat until the oils are melted. It shouldn’t take longer than a few minutes. Remove from heat, add essential oils.


Make a "cupcake" shape lotion bar with natural ingredients. Fun way to add lotion to dry skin. Design Dazzle

Pour the liquid into silicone molds of your choice. To hurry along the process place the molds in the fridge or freezer.


Make a "cupcake" shape lotion bar with natural ingredients. Great way to add lotion to dry skin. Design Dazzle

I saved about 1/3 of the mixture and let it solidify just a bit and then I placed in a mixing bowl in my Kitchenaid. I added a few drops of coloring and then beat. Beat the mixture until it looks like frosting. Forgot to take a picture.

Make a "cupcake" shape lotion bar with natural ingredients. Fun way to add lotion to dry skin. Design Dazzle

This is what the mixture looks like after being beaten in the Kitchenaid and placed in an icing bag. Make sure to place a tip in the bag.

Lotion Bars-10

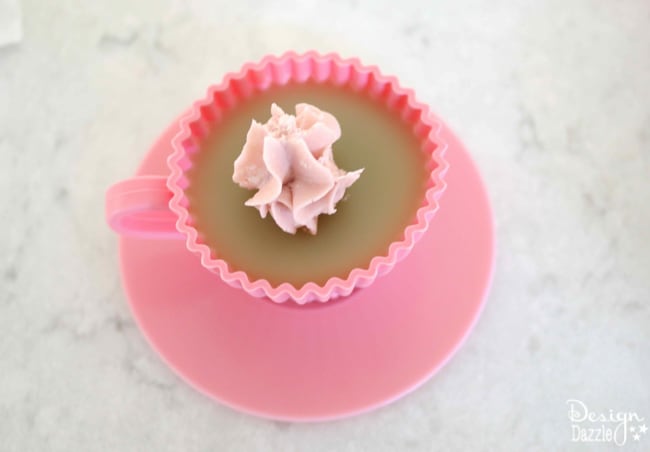
Place a dollop of the “lotion frosting” in the middle of the cup. This will help support the frosting that you will place on top. Sorry I don’t have a picture of this. It’s just like icing a cupcake.

Lotion Bars-14

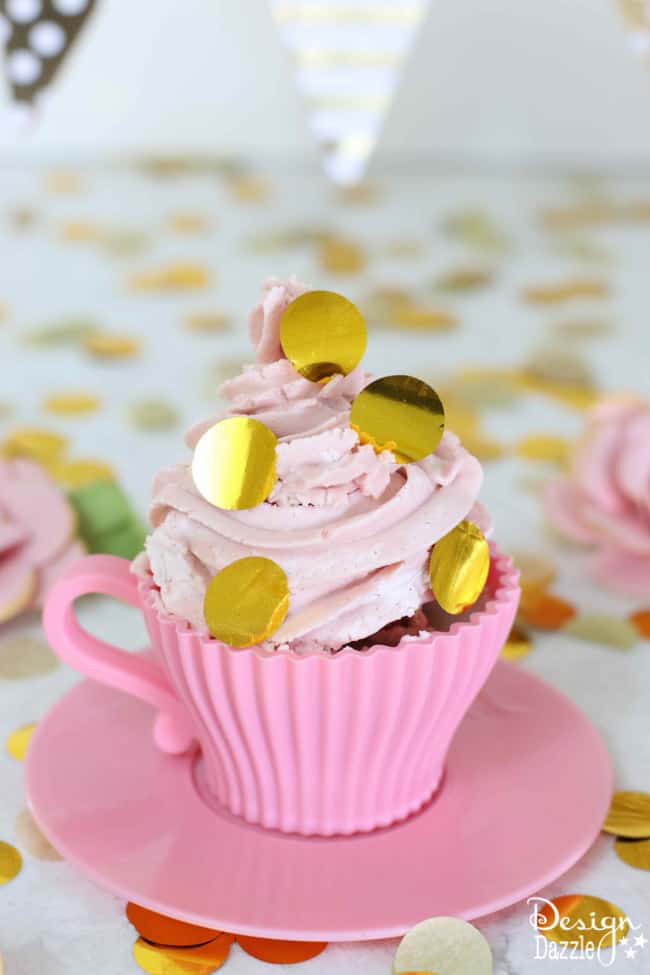
Here’s the finished product. I added a few gold confetti to make it a bit whimsical. The recipe I used had no beeswax for it’s nice to have a container for the “lotion”. This will not hold it’s shape once you start using it. Just dip your fingers into the icing and use as a lotion.

Lotion Bars-16

Michaels has some beautiful jewelry plates that could be used as a base for a lotion bar.

Lotion Bars-17

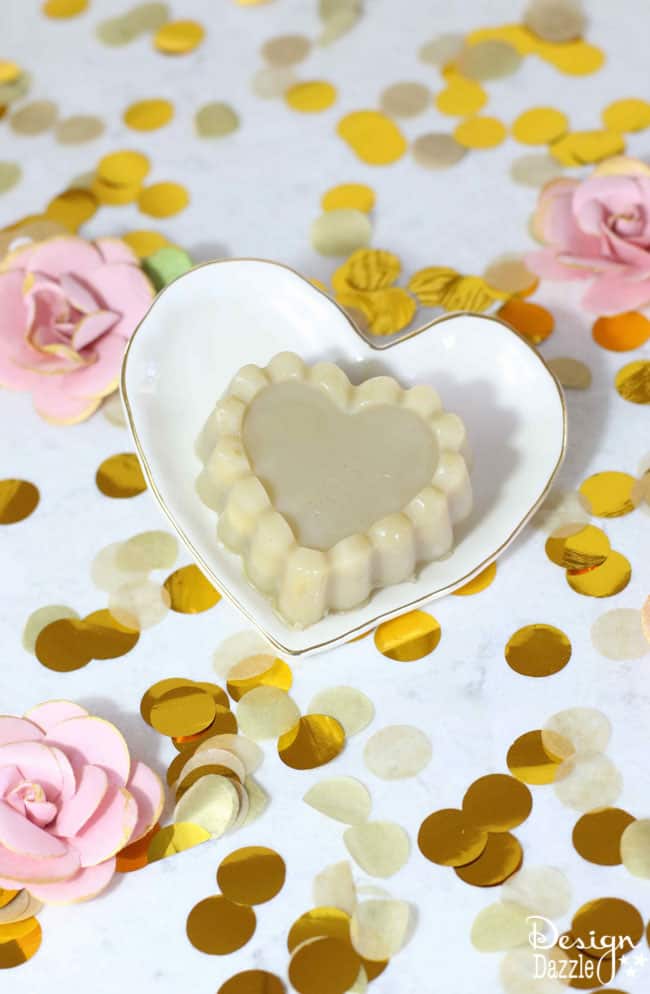
I used my silicon heart mold for this lotion bar. Again, it doesn’t hold it’s shape to well so this will be for dipping your fingers into to put lotion on.


If you would like it to hold the shape better, check below for a recipe using beeswax.


IMPORTANT:

The following recipe I’ve used before I just didn’t have beeswax on hand for the version I made today. If you live in a warm climate, make sure to use a recipe that has beeswax in it. It will hold the shape better and won’t be as soft.

  • 1 cup shea butter
  • 1 cup coconut oil
  • 1 cup beeswax
  • 15-20 drops of essential oil – your flavoring choice

Use a double boiler and place the butter, oil and wax in the saucepan. Make sure if you have water in the bottom of the double boiler – not in the saucepan you will be using. Turn on your cooktop, place your ingredients (except essential oils) in the double boiler and heat until the oils are melted. It shouldn’t take longer than a few minutes. Remove from heat, add essential oils. Pour the liquid into silicone molds of your choice. To hurry along the process place the molds in the fridge or freezer. The beeswax helps hold the shape better especially if you live in a warmer climate.


28116_MS_MM_AprilChallenge_s

  • Check out Michaels for everything you need to craft the perfect handmade gift that will make Mom a happy gal on Mother’s day.
  • If you don’t know where to begin, you can always take a look at some of the fun projects on Michaels.com or the other 49 Makers’ ideas on The Glue String for to see how they personalized their crafts!

As always, you get to check out my friends Mother’s Day challenge and see what they are up to:


 Loading InLinkz ...


SaveSave

Related Posts


40 Homemade Mother’s Day Gift Ideas

Homemade Valentines


25 Homemade Father’s Day Gift Ideas


Mother’s Day Printable Cards and Gifts


Kid Friendly Mothers Day Gifts


12+ Handmade Gifts for Mother’s Day


14 Mother’s Day Brunch Ideas


About My Mom- Mother’s Day Free Printable


You Are My Sunshine – Happy Mother’s Day Free Printables


14 Meaningful Mother’s Day Gifts

Article Rating:
No rating
Author Bio
Article Info
Popular Posts
Toni - Design Dazzle

Toni - Design Dazzle

Owner at Design Dazzle
Toni Roberts is a DIYer, designer, crafter, traveler, holiday lover, and memory maker. Design Dazzle encompasses ideas and inspiration for life’s celebrations, home projects, DIY crafts, holiday fun (especially Christmas), travel and more.
Power Bio Box by HOI
You are here: Home My Projects Homemade “Cupcake” Lotion Bar for Mother’s Day
Title:
Homemade “Cupcake” Lotion Bar for Mother’s Day
Authors:
  • Toni - Design Dazzle
Categories:
  • celebrations
  • crafts
  • mother's day
  • My Projects
Mentions:
Not Specified
Keywords:
lotion bar
Last Updated:
May 8, 2019
  • Our Complete Exterior Home Remodel!
  • 20 Best Pool Toys For Summer
  • Delicious Strawberry Bread
  • Family Game Night Fun
  • Wood Slice Christmas Signs with Free Template
  • China Cabinet Makeover
  • Save Time and Store Your Decorated Christmas Tree!
  • Merry Christmas: It's The Most Wonderful Time of The Year Home Tour
  • Christmas Tree Decorating Tips & Hacks
  • Halloween Birthday Party
  • How To Make Tissue Pom Flowers
  • Vintage Snowman

Sharing is caring!

Disclaimer

This post may contain affiliate links, which means that if you click on a product link, we may receive a commission (at no extra cost to you). See my full disclosure for further details.

Reader Interactions

Leave a Reply Cancel reply

Your email address will not be published. Required fields are marked *

Recipe Rating


Primary Sidebar

Img 0422

Hi, I’m Toni! Welcome to my blog Design Dazzle. I love being a designer, DIYer, traveler, crafter, holiday lover, and memory maker. Read more.

Toni Roberts is a participant in the Amazon Services LLC Associates Program, an affiliate advertising program designed to provide a means for sites to earn advertising fees by advertising and linking to amazon.com

DesignDazzle.com is protected by copyright laws. DO NOT distribute or copy the content or share multiple images or collage images without written permission. You can use ONE Design Dazzle image only if there is a link back to DesignDazzle.com. DO NOT edit, crop, or remove watermarks from any image. Please contact me at toni@designdazzle.com with any questions.

About | Contact Us | Privacy and Legal

© 2017 Design Dazzle · All Rights Reserved. | Hosted by House of Ideas