


Family Tradition: Santa Sacks! Can you believe Santa has never left wrapped Christmas gifts under the tree in our home? The reason? Santa Sacks! Santa Sacks have been a tradition in my family for decades. What are Santa Sacks? They are reusable fabric gift sacks that are slightly larger than a pillowcase. On Christmas Eve our kids leave their very own empty Santa Sack at the end of their sleeping bag (we sleep as a family next to our tree in the family room). Some families leave the sacks under the tree or beside their bed. Santa leaves gifts in the Santa Sacks (instead of under the tree) to be opened on Christmas morning. Each child takes turns “opening” their Santa Sack and brings out one gift at a time. Since it is a drawstring/elastic opening you don’t see all the gifts at once. The BRILLIANT idea behind these sacks…there’s no wrapping of Santa gifts!! We do wrap our family and friends gifts for under the tree. Grandma made Santa Sacks for each kid before their first Christmas. These are now family heirlooms ; )

My family is Australian (I’m half Aussie). I’ve grown up with Santa Sacks and so have my children. This is a Christmas tradition in Australia and in other parts of the world. I’m not sure of the origins – but I was told that back in the day (decades ago) Christmas trees were expensive (they still are). So for the families that had no Christmas tree – the kids would leave their pillowcases at the end of their bed so Santa would know where to leave the gifts on Christmas Eve. I know every family does it different – some leave unwrapped gifts under the tree and some wrap each gift from Santa. Maybe this will be a new tradition for your family??
Santa Sacks are very easy to make…
Supplies:
1 yard of fabric
thread
46″ ribbon length for encasing (2.5″ wide)
48″ ribbon length for bow (2.5″ wide)
1″ wide elastic (24″ length)
Instructions:
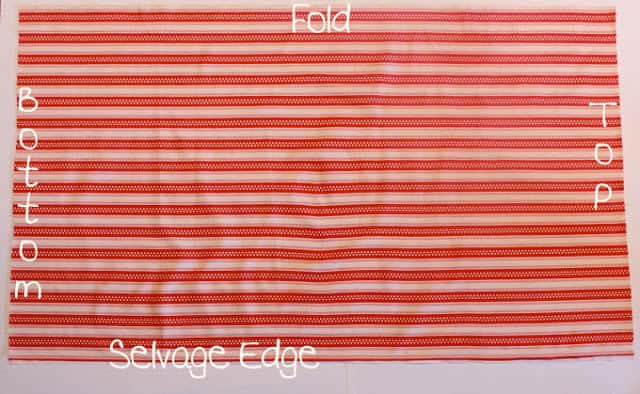
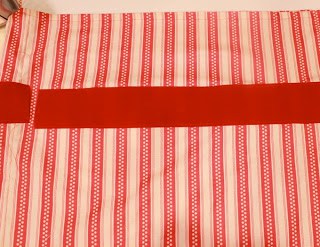
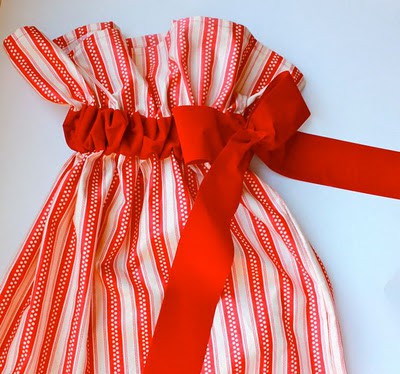
Fabric should be approximately 36″ long. The fabric I chose is about 44″ wide. With right sides together, pin the selvage (factory finished edge) edges together and the bottom edge together. Sew a seam (about ⅝″) along the selvage edge and the bottom edge. You now have a “bag”. The top is open and the side fold doesn’t need to be sewn.
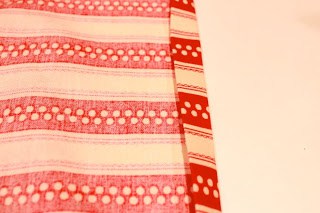
Turn the top edge of the bag over ½ inch and press with the iron. Do this to the entire edge of the fabric. Turn the edge over again and press.
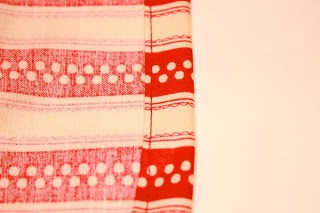
Sew the entire top of the bag (folded edge). The raw edge is encased and the top of the bag is now hemmed!
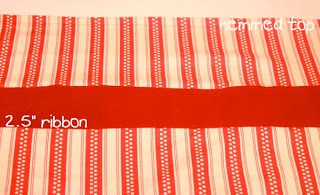
Cut the ribbon length to fit around the perimeter of the bag. To make the channel for the elastic, pin the ribbon 5″ from the hemmed top around the entire perimeter of the bag. The ribbon was topstitched at the top of the ribbon close to the edge and at the bottom of the ribbon. This creates an encasing (channel) to thread the elastic through.
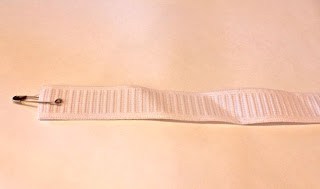
I use a safety pin pinned onto the elastic to help “thread” it through the encasing.
Insert the elastic through the small opening in the encasing. Sew the elastic ends together and hand stitch the encasing opening making sure not to catch the elastic. There are several ways to make a drawstring/elastic bag. Instead of making a casing with the ribbon (like I’ve shown) you can make the casing at the top of the bag where the “hem” is.
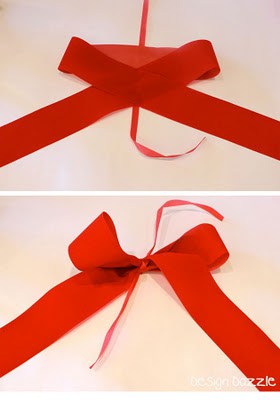
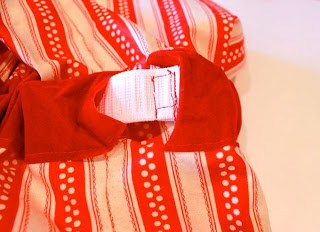
Cut a piece of ribbon the length needed and overlap the ends as shown. Tie a short length of ribbon in the middle tightly into knot. Pull on the loops a little and fluff. Sorry I didn’t take a close up of the finished bow. Hand stitch the bow onto the casing (don’t catch the elastic)

Here’s how I simplify Christmas…
Why I LOVE Santa Sacks…
1. Saves moms sanity! Have you ever found yourself staying up late at night on Christmas Eve wrapping gifts? Well, not with Santa Sacks – place Santa’s gifts in the sack and voila all done!! It takes me all of 5 minutes. There is no wrapping of Santa gifts – none, nada, not one bit! Santa Sacks leave a lot less mess to clean-up Christmas morning!
2. Eco friendly – completely reusable year after year! Such a perfect way to prevent waste of money on gift wrap.
3. Odd sized or bulky gifts – these can be so difficult to wrap! Santa Sacks make it easy : ) Our Santa Sack measures 21″ x 33″
4. My children LOVE their Santa Sacks. They talk about how they will carry on this tradition when they have kids.
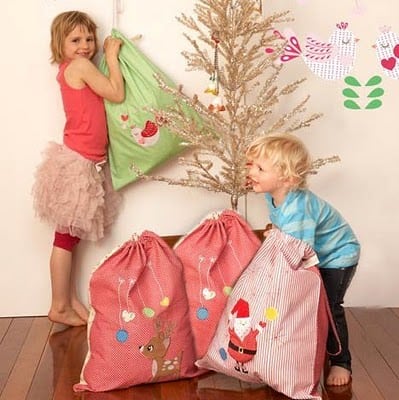
Here are a few Santa Sacks for those who don’t want to make their own…


Terri says
This is such a great idea! Thanks for sharing!
Christie says
This is a darling idea!
Anonymous says
i really, really like this! i'm going to start this with my family.
Sanja says
Thank you very much for featuring my Santa Sacks on your blog! Very much appreciated!
Sanja from Kozzzee
KidSpace Stuff says
Started using these years ago when my kids were small, after one Christmas when we had a mountain of wrapping paper. Santa gifts were never wrapped but the sacks replaced all my wrapping paper for family gifts.
Our bags were smaller but I love the large size you show. I just used rubber bands to close the top and cover with curling ribbon….selvages were the top edge so I just serged the side seams and it was finished.
Still use the same bags after 15 years….right now they are being used around a tree I decorated for a local festival of trees. (If you want to see a photo, go here: https://www.kidspacestuff.com/blog/2011/11/baby-themed-christmas-tree-crosley-festival-trees/)
Anonymous says
I love this idea ! You need a PIN IT button to spread the word
Mac says
I found Santa Sacks on Pinterest, then found your tutorial–love the elastic insert on your design! But, when I was explaining the concept to my husband, he heard me say something else instead of “Sacks”–and it was funny. I tell the story (and link back to you) here:
https://thehappyhomester.com/uncategorized/lets-talk-about-sacks-baby/#more-3287
Toni - Design Dazzle says
Thank you for sharing my link. Cute story!
You will LOVE the Santa Sacks and so will your family!