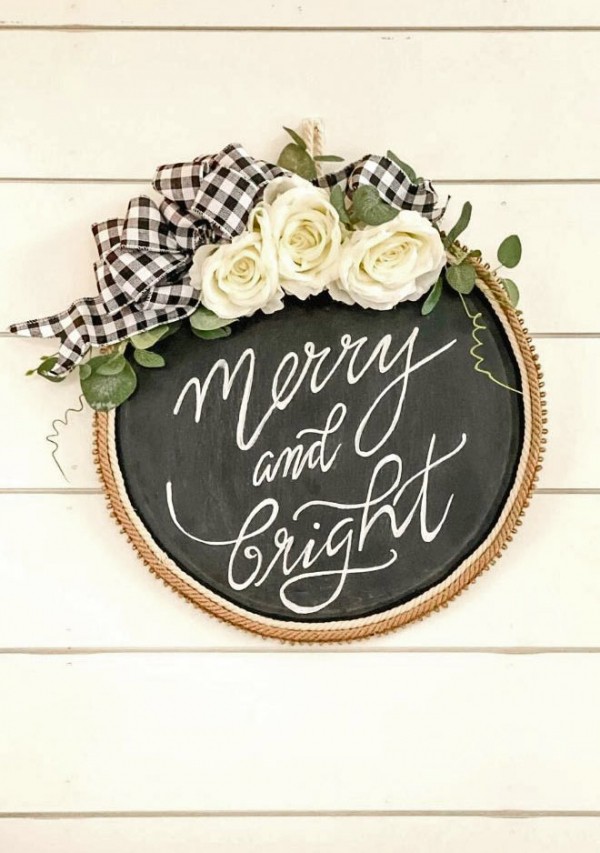
This adorable holiday wreath is perfect for a farmhouse style Christmas; and here’s a surprise, it’s made from a dollar tree pizza pan!

Hello, fellow crafty Christmas lovers! I’m Christie Troxell, of Ritzy Parties and Craft Party with Christie, and I am so excited to bring you a little holiday magic with this fun creation. A mild mannered dollar tree pizza pan gets the full crafty Christmas treatment, and the end result is a perfectly polished Christmas wall decor piece that’s perfect for gifting, keeping, or both!
You’ll Need:
- One new 16″ metal Pizza Pan
- Black chalkboard paint and a paintbrush
- Small piece of light grit sandpaper
- Regular chalk, plus a White Chalk Pen or Paint Marker
- ¾ yard each assorted trims in neutral colors and textures (2-3 varieties)
- 3 yards buffalo check ribbon, wired
- 3-4 sprigs of your favorite faux greenery, silver dollar eucalyptus used here
- Three large silk flowers of your choice, white garden roses used here
- Scissors, hot glue gun and glue sticks
Step One
Using a wide paint brush, cover the surface of the pizza pan with chalkboard paint. I like to use two to three coats in this step, to ensure thorough, opaque coverage.

Step 2
Rub a stick of plain white chalk on the surface of a small piece of light grit sandpaper. Use this to gently sand the entire surface of the pizza pan, to get this muted, sort of distressed appearance. This graphite color is so appealing in farmhouse decor, and will also blend perfectly with many other home decor styles.

Step 3
Use the stick of chalk to lightly inscribe a phrase onto the surface of your project. You might choose a favorite holiday quote, a family name and the date, or a scripture. What’s great about this step is that if you want to re-work your design, you can simply erase it and start again until it looks just how you want.

Step 4
Once your writing is just how you’d like it to appear in the finished project, trace over the chalk lines with a chalk pen or white paint marker, as shown. I like to go over this two or three times to really make it pop against the black background.

Step 5
Lay out the trims you’ll be adding to the perimeter of the pizza pan wreath I like to just lay a very generous length of my trims around the edges rather than formally measuring.

Step 6
Working in small sections, hot glue the trim to the outside edge of the pizza pan. For my design, I used three different trims. The goal is to conceal the edge of the pizza pan so that it’s fully encircled in trims. You could also use greenery, ribbon or any favorite craft supplies. Just make sure you can’t see that edge!

Step 7
Once your trims are glued and set, add your faux greenery to the top center of the wreath. I like to place the sprigs of greenery in both directions. The center will be covered, so don’t worry if they overlap at this point.

Step 8
Three white faux garden roses are added to the center top of the wreath with hot glue. I like to be very generous with the glue on this step and give it plenty of time to cool and set so your florals will not move or droop.

Step 9
Create a pretty, multi loop bow, (or use store bought if you aren’t sure how to make one). Wired ribbon is a must for this step, to get this polished looking finished look. I just love the addition of a little buffalo check to my holiday decor, don’t you?

Step 10
Here’s where some of that excess trim comes in handy. Make a hanger for your wreath by laying two loose ends in some hot glue, then securing down with a strip of ribbon. Let it set, and you have an instant loop for hanging your farmhouse holiday wreath.

The completed wreath is so festive, and looks lovely on my shiplap wall. Using the tips here, you can customize these fun and inexpensive pizza pan wreaths in any style you like. Mix up the florals and ribbon, or try adding other fun crafty elements like small Christmas figurines, button, gems, or whatever your crafty heart desires!

Make this as a gift, or for yourself, or both! Find me at Craft Party With Christie for more fun and creative inspiration! You can also check out my website and Instagram for lots of party ideas and inspiration!

We are so thankful to Christie for joining our 11th annual Christmas Wonderful!





Leave a Reply