
Sometimes it’s hard coming up with the perfect gift idea for your loves ones. And as we all know – Christmas is in 25 days! Michaels asked me to come up with a DIY gift for loved ones along with a creative gift wrap idea for our Michaels Makers project for December. So I didn’t have to think to long about this cause everyone loves photos! So I decided to do a DIY Wood Photo Transfer Gift Idea using wedding pictures of my son and our daughter-in-law as an awesome gift idea. The creative gift wrap I share is a different take on a gift bag I’ve been making for years.

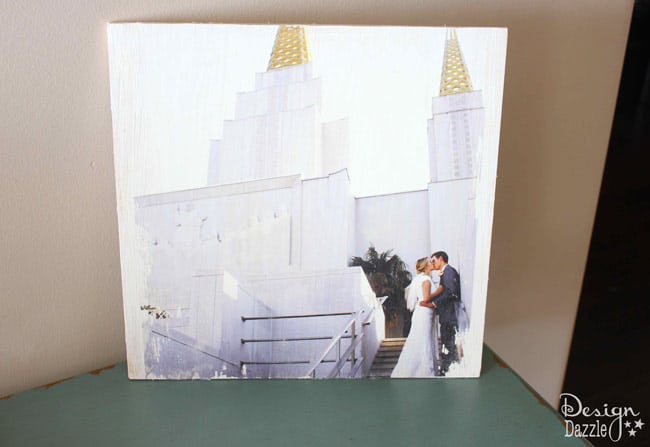
I love this beach scene they took during their bridal session. This image looks great on the wood. The wood photo images are pretty EASY to make. But you do need time to do these – due to the drying time. This isn’t a project you wait on until the night before you need them. But the great thing about this project is I purchased everything at Michaels and there was no need to cut any wood – yes!!. Michaels has a wood section where they sell birch plywood squares and plywood rectangles. I purchased the 12″ x 12″ squares. I love it when crafting is easy peasy! I share simple steps on how to transfer a photo onto wood.
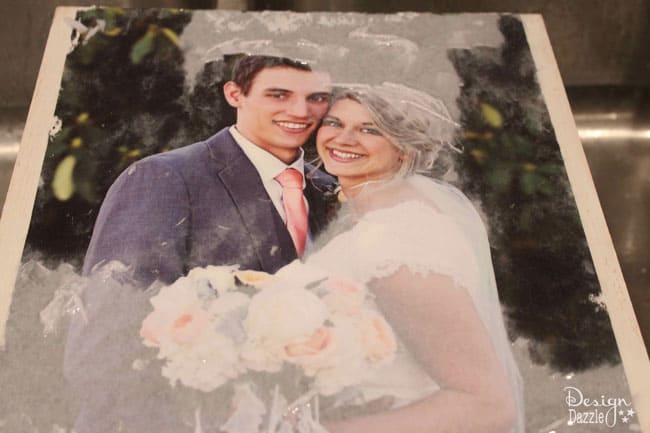
Disclosure: If you want a perfect image transfer, this is not the process for you. When transferred onto wood, you might loose parts of the image for a rustic, homespun, old-vintage appeal that is not refined. The wood grain shows through parts of the image so this is not a decoupage-look image. But it does look awesome!DIY Wood Photo Transfer GIft Idea

SUPPLIES:
- 12 x 12″ Birch Plywood Square
- Liquitex Gel Medium
- Mod Podge Matte sealer {I used vintage}
- sawtooth hangers (to hang on wall)
- foam brush
- photo copied onto lightweight paper (laser printer only) and NOT photo paper
Step 1:
Take a photo copy of the image you want to transfer to the wood. This has to be printed onto lightweight paper with a laser printer machine. If you don’t do this step, it won’t work. Cut image to the size of the board.
Step 2:
Apply Liquitex Gloss Gel generously onto the birch plywood piece with brush. Make sure to put enough gel on the board. I placed 2 tablespoons onto the 12 x 12 square. Make sure the gel is smooth and not globs of it.
Step 3:
Place photo copied image face down onto the board. Make sure it is straight. Smooth the paper onto the gel and smooth out and air bubbles.
Step 4:
Let dry overnight. If you don’t, the image won’t transfer correctly.
Step 5:
Run the dried image under the sink tap or use a damp cloth and wet the back of the paper. Begin rubbing gently to remove the paper. What you will see is the exposed transferred image coming to life – this is the fun part! Rub gently!! Once I the paper layer is off, let it dry slightly, and then repeat the process as needed to remove any paper that was left behind. Let dry completely.

Step 6:
Once dried there will be a cloudy look. To get rid of this “cloud look”brush on matte Mod Podge to use as the sealer. Once dried the cloudy look will mostly be gone. Make sure the paper is completely dry before applying the Mod Podge.

Step 7:
Paint the wood edges if you prefer. If you will be hanging the images, attach hangers to the back of the wood.
TIPS:
Use a lightweight copy paper. My images were printed on 20lb weight paper. If it is not copied on lightweight paper, you will have a hard time removing the paper and the image will come off while rubbing. Don’t ask me how I know this ; )
Use a laser copy machine only. Ink jet will not work for this process. Maybe another process but not this tutorial.
Use the Liquitex Gel. This gel medium dries clear so the ink on your image is more translucent and shows the wood grain. I would not be sure on other brands. However, I did experiment with Mod Podge FABRIC transfer because I had it on hand. It worked but wasn’t as good and it definitely did not dry clear. So the background looked more milky white than transluscent. It is a fabric medium so not specially made for wood.

Can’t wait that long? Take a look at our Christmas Wonderful archives.





Christmas Wonderful 2014 says
so cute! love the photo idea…and the bag!!
Toni - Design Dazzle says
Thank you. It is a fun project to make!
Layne says
This is absolutely stunning! What a wonderful gift. Thanks for sharing your project.
Toni says
Thank you Layne. It certainly is a fun project to make!
Susan Noble says
WOW, I love this idea Toni so creative and such a beautiful gift to give. Your Son and Daughter-In-Law gorgeous couple love that beach photo. What a blessing for your family you are.
Toni says
Thank you so much Susan. What sweet sentiments. I really appreciate reading your kind words.
Lindi Haws says
What a creative idea~ I’m totally doing this for my hallway!
Toni - Design Dazzle says
Thank you Lindi
Paula @ Frog Prince Paperie says
What a wonderful gift! I have some pictures I wouldn’t mind having transformed to wood…love the tutorial. And the Santa gift bags–so fantastic! Definitely pinning that one.
Toni says
Thank you!! Who wouldn’t want photos as a gift?? Yes, the Santa bags are super fun!
Jenny says
I love this idea and am planning on doing it with my brother and his new wife’s wedding photos! What a wonderful tutorial. Just to clarify, do I need to print a mirror image of the photos in order for them to appear correctly once transferred face down?
Toni - Design Dazzle says
Hi Jenny,
Yes, you need a mirror image. Make sure to read all the directions first. Practice, practise! Don’t let this be a last minute gift. It takes a bit of drying time, etc to make it all come together. Have fun!
Jenny says
One more question! Did you do anything special for the white of her dress to appear so bright and beautiful? If I understand correctly, there is no white ink there to transfer since it is printed on white paper originally, so how do you keep the white from simply appearing as the color of the wood?
Toni - Design Dazzle says
I didn’t do anything special for her dress to appear white. Whatever color is in your photo will show up over the wood. Don’t wait til the last minute. There is a bit of a learning curve. If you have some scrap wood, try it on there first.
Have fun.
Marian Whitehose says
I would like to be able to print one of these patterns out please
Toni - Design Dazzle says
You can purchase certain designs from Cricut. This santa bag text may cost around $1 -$2.
Mateo Pedersen says
This idea is so neat and creative! Going to try it out for my husband’s birthday. Thank you!
Annie Hamissou says
Thank you for this amazing tutorial!!! I can’t wait to try it!!!
Toni - Design Dazzle says
You are very welcome!
Annie Hamissou says
Thank you for this amazing tutorial!!! I can’t wait to try it with some of mine and my husbands wedding photos!!!
Toni - Design Dazzle says
Oh yeah!! Remember it turns out rustic looking. Which can be so awesome!