

Hi Design Dazzle readers! We are Trish and Bonnie and we blog over at Uncommon Designs. We are excited to be guest posting today as part of the Christmas Wonderful series!

![]()
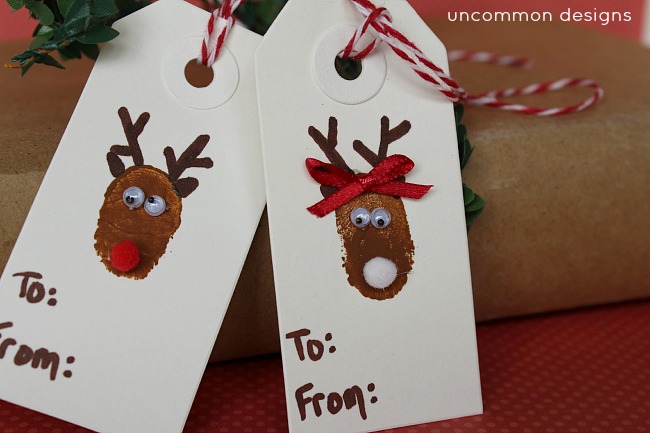
We are moms to 2 incredible kiddos each, and so Christmas is always a fun time in our homes. I am a little obsessed with thumbprint art. When I was teaching Mother’s Morning Out at our church, we made either thumbprint or hand print art for each holiday and special occasion. I just think it is a great way to involve the kids and create a meaningful keepsake. So with that in mind, today I am going to show you how to create these adorable DIY Mr. and Mrs. Reindeer Thumbprint Christmas Tags…

Aren’t they the sweetest? My kids are older now {11 and 14 } but they still like creating special projects. The best part for me is that they now come up with their own ideas!
So, let’s get crafting!

Supplies Needed for DIY Mr. and Mrs. Reindeer Thumbprint Christmas Tags…
- Blank White Tags { these came from Hobby Lobby }
- Small Wiggle Eyes
- Small Red Pom Poms
- Small White Pom Poms
- Brown Sharpie Paint Marker { fine point }
- Brown craft paint
- Thin Red Ribbon
- Red and White Baker’s Twine
- Glue gun and glue sticks
- Small foam paint brush
Step One:
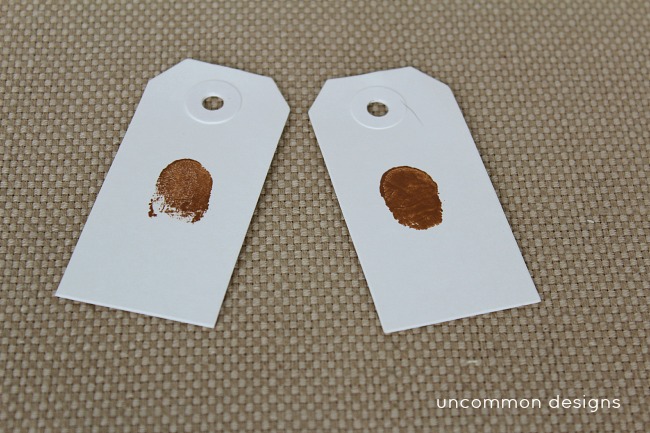
Using the foam paint brush, apply a small amount of brown craft paint on the thumb of your child. Be careful to not put too much paint on, keep it a thin layer. Then gently have them place their thumb, paint side down, onto the first tag. Repeat the process with the second tag. Allow the tags to dry fully.
Step Two:

Next let the kids draw on the little antlers using the sharpie paint pen. They may decide to make them completely different than these and that is great!
Step Three:

Have fun creating the little faces. You will be using a glue gun so make sure the little ones allow you to help and supervise. I added a red nose and wiggly eyes to Mr. Reindeer. Mrs. Reindeer got a white nose, wiggly eyes, and a bright red bow! My kids also thought they needed ears…they added those with the sharpie paint pen. Make sure and supervise the little ones so that no wiggly eyes or pom poms go in the mouth!
Step Four:

Add the fun red and white baker’s twine by looping it through the hole in the tag. Then have the kids who are able write, put the “to” and “from” on the tags. Now you have captured both their sweet thumbprints and handwriting !
That is it!

These adorable little Christmas tags are a gift in themselves to whomever receives the gift they are attached to. What a treasure and memory. These would make a great diy craft to make over the Thanksgiving break with the kids. You could make quite a few at one time for all those special gifts.
Kid’s crafts are something so special that you can bring out year after year. My kids love that I have saved so many of their “masterpieces” over the years and it is such a wonderful source of meaningful conversation and giggles in our home. They grow up so fast, so capture a few of those precious memories and have fun while you are creating them!
A big “Thank You” to Toni for having us over to share a special kid’s craft with you today! We hope that you all will hop over to Uncommon Designs and see more of our seasonal ideas and tutorials!
Bonnie


Mandy says
I love this! So simple and cute!
Toni - Design Dazzle says
Trish and Bonnie these are super cute!! I love that this is so easy to make but yet SO adorable!
Toni
Bonnie @ Uncommon Designs says
Thank you for having us over Toni! 🙂
Toni - Design Dazzle says
I love ALL your ideas. You both are so talented. Thank you so much for being a part of Christmas Wonderful!
Hugs,
Toni
Kelly says
Super cute, ladies!! I’m a big fan of thumbprint crafts… so fun! xo
Toni - Design Dazzle says
They did such a great job with these tags. Kids love thumbprint crafts!
Toni