

I’ve LOVED Halloween ever since I could remember.
It’s such a wonderful holiday season with the fall weather, yummy foods, costumes and fabulous decor!!
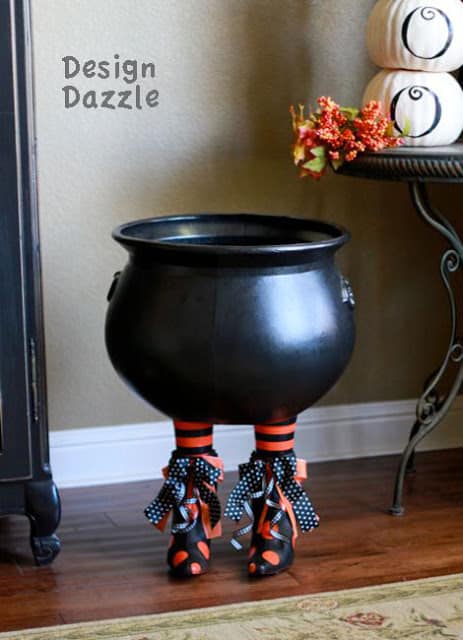
I thought it would be fun to make an unusual Halloween prop for my decor…so I added witch’s boots to a plastic cauldron for a Boot-a-licious Halloween decor.
I’ve decided to display this on the front porch with a bowl of dry ice and hot water for a spooky effect.
- Pointy boots
- Plastic cauldron
- Spray paint
- 2 heavy duty plastic cups (not disposable)
- Black electrical tape
- Plaster of Paris
- Ribbon
- 2 – Orange 1.5″ wide ribbon 36″ long
- 2 – Black/white polka dot 22″ long
- 2 – Black/white check/striped 18″long
- 2 – Orange thin ribbon 12″ long
- 2 – Black thin ribbon 7″ long
- 4 – pieces of 8″ floral wire
- 2 – pieces of wood dowel approx 6″ – 7″
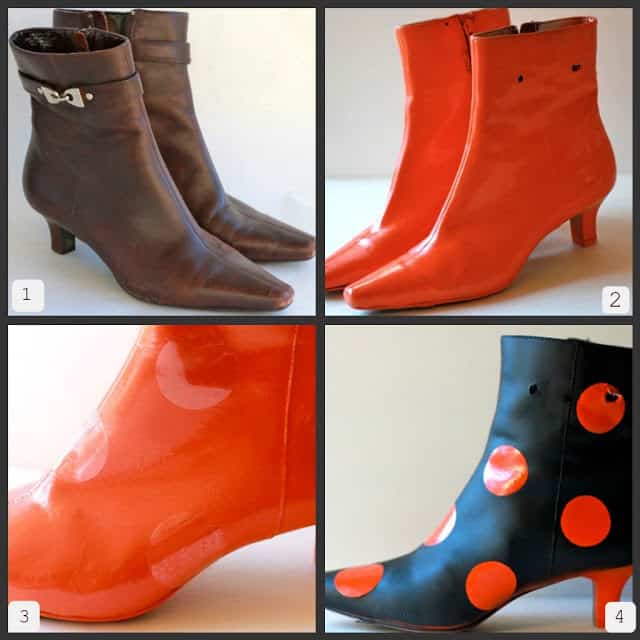
1. The boots were purchased at a thrift store ($2.50) and had hardly been worn.
Before you start any painting make sure to disinfect (all over the boots) with bleach or Lysol.
Let dry completely.
I decided I wanted black boots with orange polka dots.
I thought about decoupaging the boots but decided to paint them since I had the spray paint on hand.
2. Spray boots with Kilz primer let it dry. Follow up with orange spray paint – let dry overnight.
I used Rust-Oleum Orange Gloss.
3. Using packing tape (because it’s cheap and what I had on hand) – cut out 1 ½ inch circles with the Cricut/Silhouette.
Place circles randomly over the boot and press down firmly.
The circles barely show up in the photo.
4. Spray paint the boot black.
Gently peel the adhesive circles off before the black paint dries.
Voila orange polka dots!
If you’re fortunate enough to find black boots, orange vinyl circles would be a great and simple way to add the orange polka dots.
Of course, you can always skip the step and just paint orange circles on the black paint.
Stuff the boots with newspaper – leaving about 2 inches of space at the top.
FYI – I covered the holes on the side of the boot with ribbon.
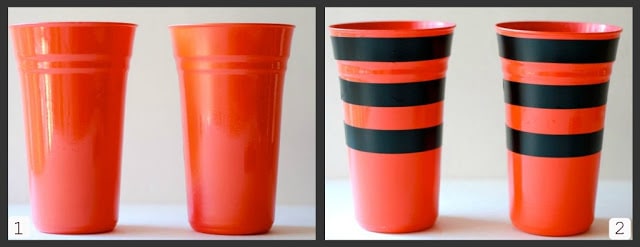
1. These heavy duty plastic cups were red until I spray painted orange.
2. To make the stripes – adhere black electrical tape around the cup – easy, peasy!!
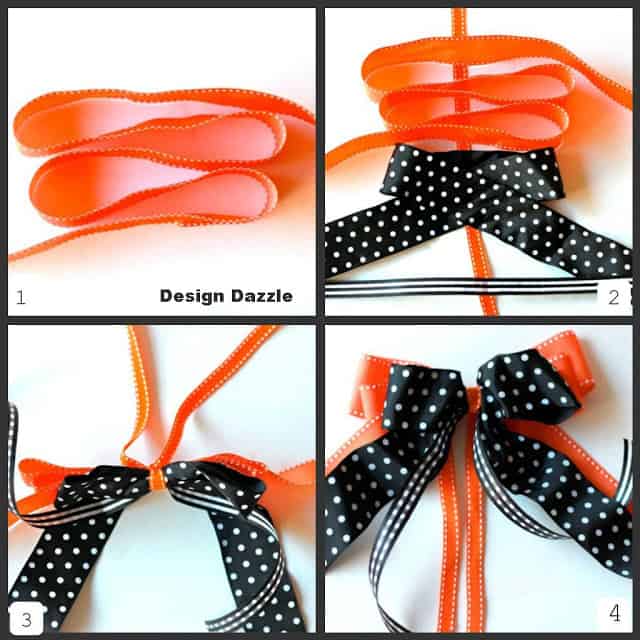
3. Tightly wrap the thin ribbon around the center point of the ribbon (the ribbon bunches up).
4. Pull at the loops. Fluff and fiddle with the ribbons until the bow looks how you want it!
1. Place the cup inside the boot and drill two small holes through the back of the boot right through the cup.
Do the same for the front of the boot and into the cup.
Thread floral wire through the back of the boot into the cup and twist the wire to secure.
Do the same to the front of the boot.
This helps secure the cup to the boot.
2. Tie a small bow to hide the wire in the back of the boot.
Tie the large layered bow to the wire in the front of the boot.
3. Mix Plaster of Paris with water inside the cup ( fill within 2 inches from the top).
Immediately place the wood dowel in the center of the cup.
Let dry for an hour or so. Do all of the above steps to the other boot : )
4. Place a small piece of duct tape adhesive side UP to the top of both wood dowels.
Arrange the boots on top of the table.
How you would like them to look under the cauldron?
Line up the cauldron on top of the boots and place lightly on top of the wood dowels.
The tape will stick to the bottom of the cauldron to mark the spot to drill two holes (shown below).
The hole shown in the center was already there.

Turn the cauldron over and slide the tops of the wood dowels through the two holes drilled in the bottom of the cauldron!
There you have it Boot-i-licious Halloween decor!
Since I don’t have enough orange vinyl on hand to make the “Trick-or-Treat Smell My Feet” saying I’ll wait til next Halloween.
To store: remove the boots from the bottom (pull) and place inside the cauldron until next year.
Which one do you prefer – the cupcake stand or the “Trick-or-Treat Smell My Feet” Cauldron?
To make the cupcake stand it’s the same steps until you get to the cauldron part.
Just substitute a round wood topper in place of the cauldron and screw the topper to the dowels with screws.


Матрёшка says
))))здорово
Крестики без ноликов says
;-)))))!!!!!
Michele {The Scrap Shoppe} says
So cute! And fabulous tutorial. I love both versions, but the cauldron is my favorite! 🙂
Lookiewhatidid says
Seriously! This is the cutest and most creative thing I've seen in a long time…LOVE it
Unknown says
How big of a cauldron did you use? And what size boots? I have a cauldron and boots but worried they aren't proportionate?
DesignDazzle.blogspot.com says
Thank you girls for your kind comments!! It is so appreciated ; )
The boots are women's size 8. The cauldron is 15" high and 18" diameter. It is really relative – a small size cauldron would work great with little kids boots.
If you make one, I would love to see pictures!
Lora says
This is adorable, I wondered how you had such perfect circles.
Jaclynn Marie says
WOW!!!! This left me speechless – how CUTE!!!
Kat Bennett says
This is the most inventive and hilarious Halloween deco I've seen yet! I absolutely LOVE it! Awesome work!
laurie @ bargain hunting says
This is soooo cute, and it doesn't look like it would be too difficult. Thanks for the tutorial. laurie
canarygirl says
Very Cute!!! I'm going to make the cake stand this year. Thank you so much for the tutorial. I'll be sure to take pics for you, too. 🙂
designdazzle.blogspot.com says
Canarygirl – I would love to see your pics!!
Aja says
Very impressive. I SO LOVE the thrift store use of the boots. Bravo.
Melanie Johnson says
This is just what I needed. How wide we're the dowels and how far out did the stick up from the cups?
Anonymous says
Only problem I had…other than finding the big cauldron, seems like they changed styles this year…was that I found it too hard to put the plaster inside the cups while the cups where in the boots and keeping them completely straight, therefore the dowl rods would move. So I took them out and did them on the floor then reattached them. Love it!!! Thank you so much!!!!!!!!!!
Anonymous says
also make sure to use wired ribbon!
Karen says
I made this this past weekend and it turned out SO CUTE!!! Made a few changes but overall it turned out perfect….very easy to make…getting ready to make another for co-worker. Great instructions!!!
cupcakekiller702 says
Spooky cute!
Deborah Camden says
Love the cauldron! I think the that a matching cupcake stand to go along with it would be just absolutely Spooktackular!👻