• Skip to main content
  • Skip to primary sidebar

Design Dazzle logo

menu icon
go to homepage
  • Home
  • Home Decor / Design
  • Holidays
  • Crafts
  • All Categories
    • Facebook
    • Instagram
    • Pinterest
    • YouTube
  • search icon
    Homepage link
    • Home
    • Home Decor / Design
    • Holidays
    • Crafts
    • All Categories
    • Facebook
    • Instagram
    • Pinterest
    • YouTube
  • ×
    Design Dazzle » Celebrations » Christmas

    Published: Dec 9, 2011 · Modified: Nov 10, 2020 by Toni Roberts · This post may contain affiliate links · 5 Comments

    Cone Star Ornaments

    Festive DIY Cone Star Ornaments featured on Design Dazzle
    I’m happy to be welcomed back to Design Dazzle to share another DIY project! For the last few weeks my daughter has been planning a Christmas party for her friends, and I’ve been planning things to do for the kids during the party—these cone star ornaments being one of them. While we designed these for the kids to make as ornaments for a tree, they are absolutely perfect for embellishing wrapped presents or using as favor tags.

    And the supplies? You probably have something that will do stashed in your ever-so-organized craft closet—just paper, a ribbon or string for hanging, and a piece of decoration of your choice.
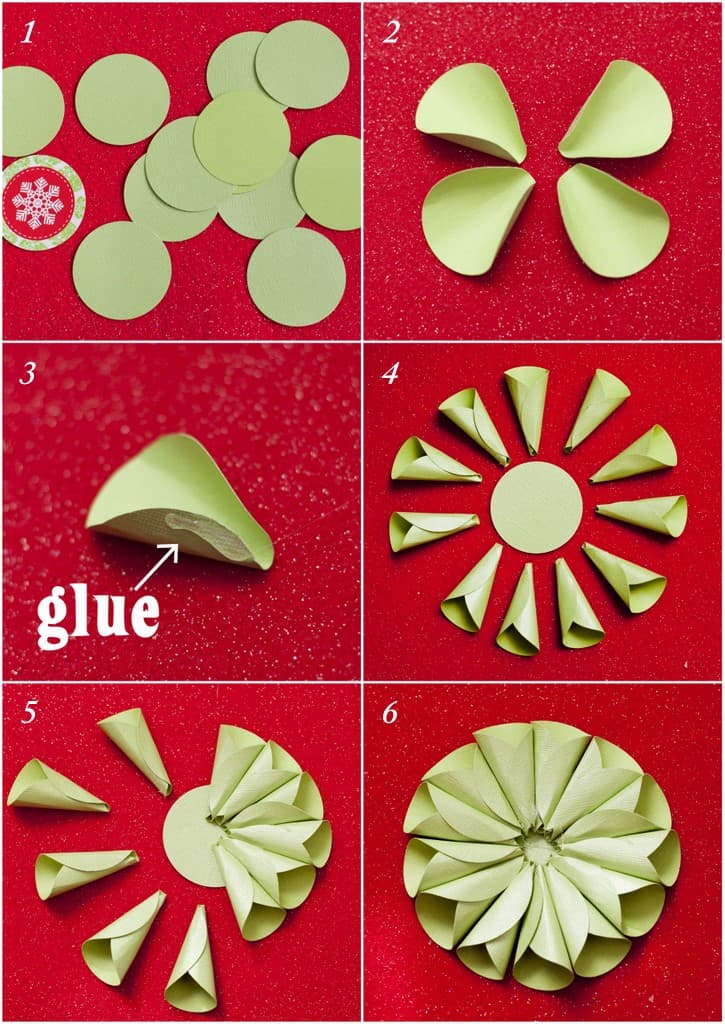
     

    How to make a Cone Star Ornament featured on Design Dazzle
    Step 1: Punch those circles! Use a circular 2-inch punch to make 14-15 circles out of cardstock. Our Christmas party is all about eye-popping color, so we picked bright green. Just make sure your paper is colored or patterned on both sides.

    Step 2: Curl the edges of the circles to make little cones. Pre-shaping the circles just makes it a tiny bit easier to glue your cone shut without having to sprout a third hand. And if you’re doing this project with kids, I highly recommend prepping the cones ahead of time!

    Step 3: Glue down the edge of your cones so they stay cone-shape like. I am infinitely impatient, so I used hot glue for its insta-dry properties. You can use double sided tape, white glue, etc.

    Step 4: Pre-position your cones on a flat 2-inch circle. How many cones you ultimately need depends on how tight you rolled them up to begin with. So do a quick pre-flight and place them all around to make sure you have enough!

    Step 5: Glue all that conical goodness down. Work two or three at a time, placing the point in the center of the flat 2-inch circle and make sure the cones are positioned very close together. Again, I used a big old pile of hot glue, but other adhesives are peachy-keen as well.

    Step 6: Stand back in amazement at the beauty you’ve just created. Yup. All you! Now you have to decide how to decorate the center.
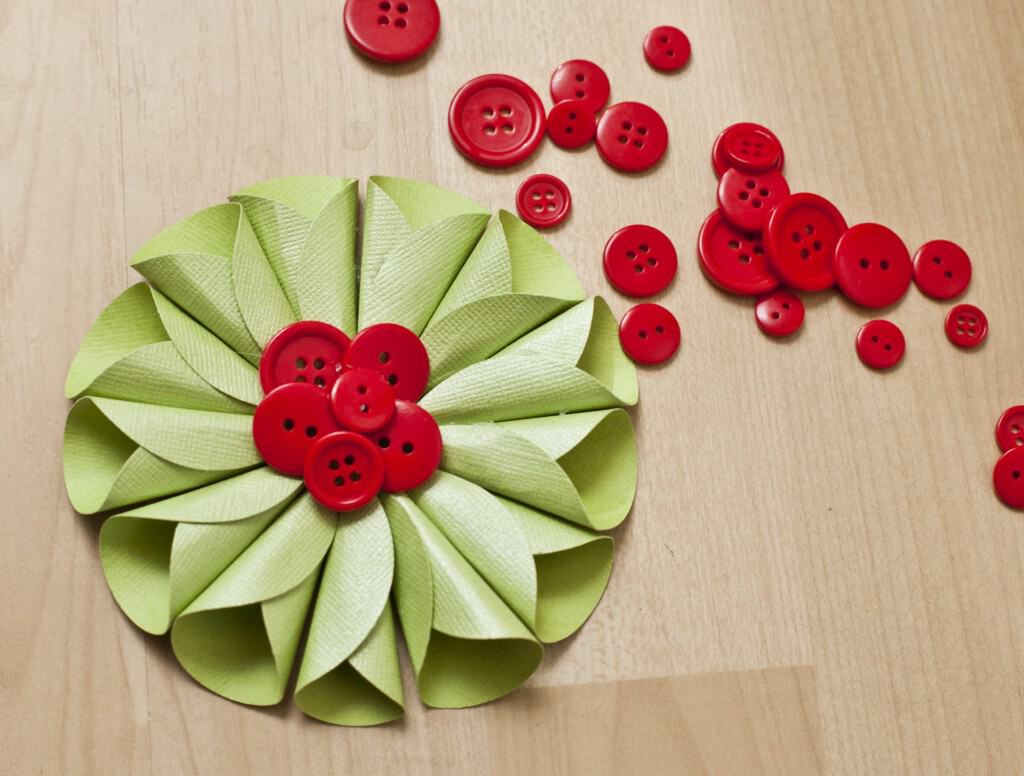
    Step 7: The finishing touches! There are a billion things you could do to cover that ugly hole in the middle of your little work of art. On our trees, I used printable 2-inch circles and buttons. But really, the possibilities of what you could use are about as endless as a Wagner opera.

    Step 8: Glue a loop to the back to hang it up on the tree or leave it as is to tape to a gift.

    And there you have it. Not as time consuming as it looks, and you can even let little “helpers” get in on the action. If you’d like to see the results of that colorful Christmas party I’m throwing, be sure to visit me at my website, www.frogprincepaperie.com!

    Paula is a party-loving mom of two tiny tots living on the sunny beaches of Melbourne, Florida. She is the woman behind the frog at Frog Prince Paperie—a printable party design group and blog dedicated to making parties magical!

    Blog: https://www.frogprincepaperie.com
    Store: https://frogprincepaperie.etsy.com
    Facebook: https://www.facebook.com/frogprincepaperie
    Twitter: https://www.twitter.com/frogprincepaper

    Red Buttons Green Card Stock
     

    Circle Punch

    More Celebrations

    • Christmas Cookie Decorating Party for Kids
      Host a Christmas Cookie Decorating Party for Kids
    • Adult Harry Potter Party Entrance
      Ultimate Ideas For an Adult Harry Potter Party
    • 17 Perfect Fall Cakes
      17 Impressive Fall Cake Recipes
    • Chocolate and caramel dipped apples
      Chocolate Dipped Apples + Caramel

    Sharing is caring!

    Reader Interactions

    Comments

    1. K says

      December 09, 2011 at 7:46 am

      ooh…can't wait to try this! Very, very cute.

      Reply
    2. The Partiologist says

      December 10, 2011 at 4:02 am

      what a beautiful idea for decorating too!

      Reply
    3. Anonymous says

      January 12, 2012 at 7:28 am

      I would like to more know about it. asthma Read a useful article about tramadol tramadol

      Reply
    4. Anonymous says

      February 17, 2012 at 7:42 am

      The article was very interesting and informative for me. weight loss Read a useful article about tramadol tramadol

      Reply

    Leave a Reply Cancel reply

    Your email address will not be published. Required fields are marked *

    Recipe Rating


    Primary Sidebar

    Toni medium

    Hi, I’m Toni! I love designing and decorating. Join me for home inspiration and creative living! More about me →

    Popular

    Spring/Easter

    • Setting an Easter Table
      Decorating An Easter Table
    • elegant recipes with rose
      Rose Petal Sweets
    • IMG 9043
      Simple Easter Table Decor
    • Edible Bunny Box with candy inside. - Design Dazzle
      It’s An Adorable, Edible Easter Bunny! D-I-Y

    Footer

    ↑ back to top

    About

    • Privacy Policy
    • About Toni

    Contact

    • Contact
    • Press & Partnerships

    Toni Roberts is a participant in the Amazon Services LLC Associates Program, an affiliate advertising program designed to provide a means for sites to earn advertising fees by advertising and linking to amazon.com

    DesignDazzle.com is protected by copyright laws. DO NOT distribute or copy the content or share multiple images or collage images without written permission. You can use ONE Design Dazzle image only if there is a link back to DesignDazzle.com. DO NOT edit, crop, or remove watermarks from any image. Please contact me at [email protected] with any questions.

    Copyright © 2024 Design Dazzle