• Skip to main content
  • Skip to primary sidebar

Design Dazzle logo

menu icon
go to homepage
  • Home
  • Home Decor / Design
  • Holidays
  • Crafts
  • All Categories
    • Facebook
    • Instagram
    • Pinterest
    • YouTube
  • search icon
    Homepage link
    • Home
    • Home Decor / Design
    • Holidays
    • Crafts
    • All Categories
    • Facebook
    • Instagram
    • Pinterest
    • YouTube
  • ×
    Design Dazzle » Celebrations » Christmas

    Published: Nov 9, 2012 · Modified: Aug 11, 2020 by Toni Roberts · This post may contain affiliate links · Leave a Comment

    Christmas Wonderful: Paper Mache Christmas Trees

    Hello Design Dazzle Readers!

    My name is Jamie and I have a blog called Scattered Thoughts of a Crafty Mom. I am so happy to be able to share our Paper Mache Christmas Trees Project with you as a part of the 100 ideas of Christmas Wonderful from Design Dazzle!

    My blog is all about sewing, crafting and fun family recipes. I would love for you to stop by sometime and see some of my other projects.

    One of the things my kids love to do is decorate the house for the Holidays. When I told them we were going to decorate these  little christmas trees with paper mache, they were doubly excited since it combined 2 of their favorite things, a fun craft and decorating for Christmas! We did a paper mache project once before (see it here) and they loved it!

    Paper Mache Christmas Trees are a fun and easy craft to do with your kids! Styrofoam cones, christmas craft paper, and a little paper mache makes festive DIY decor! Featured on Design Dazzle


    Crafting with Paper Mache is really easy and can be done with a very small child to an older kid. (Even I enjoyed making my tree!)  Paper Mache can be pretty messy, so you will want to cover your work surface with some sort of drop cloth.

    Materials needed:

    • Styrofoam cones (different sizes)
    • Very lightweight scrapbook paper (about 3 8 x 11 sheets per tree)
    • Paper mache mixture (1 cup flour, 4 cups very hot water mixed together) 
    • Modge Podge and a foam brush

    Directions:

    1. Mix up the paper mache solution and set aside to cool.

    2. Tear or cut your paper into 1 inch by +/- 6 inch strips. (I chose to tear my paper strips so the white paper core would show, but it’s your choice.)

    3. Dip your paper into the paper mache mixture, making sure it is saturated. (I put several strip in the mixture at a time so the strips could “marinate”.)  Apply the wet strips to the styrofoam cones.

    DIY Kids Christmas Tree Craft featured on Design Dazzle


    Paper Mache Kids Christmas Tree Craft featured on Design Dazzle

    4. Apply the wet strips to the styrofoam cones. Use your fingers to smooth the strips flat and try to wipe off any excess paper mache.

    Paper Mache Kids Christmas Tree Craft featured on Design Dazzle


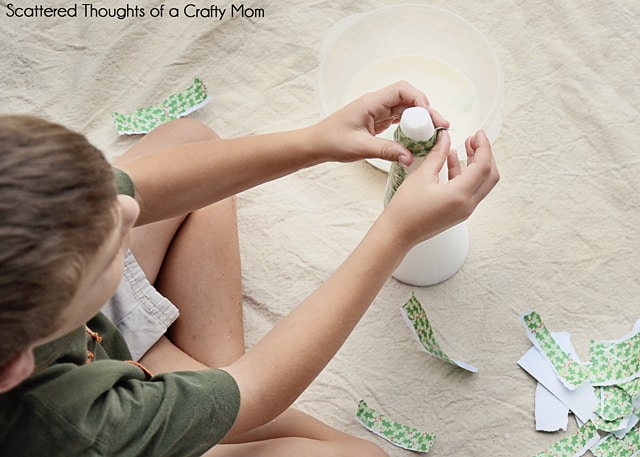
    5. Keep going until the cones are covered. Let the cones sit in a dry place overnight or until they are completely dry.

    Paper Mache Christmas Cones featured on Design Dazzle

    6. Once the trees are dry coat them with a layer of modge podge for protection.

    Festive DIY Decor featured on Design Dazzle


    That’s it! Now everyone sit back and admire what you have made!
    christmas paper mache christmas trees
    Thanks again Toni, for inviting me to be a part of your 100 ideas of Christmas Wonderful!


    275


    Thank you so much for sharing, Jamie!
    Christmas Wonderful runs until mid-December. Check back for more great ideas like this one. 🙂

    More Celebrations

    • Adult Harry Potter Party Entrance
      Ultimate Ideas For an Adult Harry Potter Party
    • Christmas Cookie Decorating Party for Kids
      Host a Christmas Cookie Decorating Party for Kids
    • 17 Perfect Fall Cakes
      17 Impressive Fall Cake Recipes
    • Chocolate and caramel dipped apples
      Chocolate Dipped Apples + Caramel

    Sharing is caring!

    Reader Interactions

    Comments

    1. Carrie Pasfield says

      November 09, 2012 at 3:44 pm

      Cute trees! My kids are going to love making these! Thanks so much for sharing. 🙂

      Reply
    2. Scattered Thoughts of a Crafty Mom says

      November 09, 2012 at 7:32 pm

      Thanks for having me Toni!
      ~Jamie

      Reply
    3. Bisani says

      November 29, 2012 at 12:12 am

      I've gone through the whole post and found it very informative exactly upon my liking, Thanks a lot for this wonderful post i will come again soon..Nokia, Samsung, HTC, Iphone, Blackberry, LG Mobile Prices

      Reply

    Leave a Reply Cancel reply

    Your email address will not be published. Required fields are marked *

    Recipe Rating


    Primary Sidebar

    Toni medium

    Hi, I’m Toni! I love designing and decorating. Join me for home inspiration and creative living! More about me →

    Popular

    Spring/Easter

    • Setting an Easter Table
      Decorating An Easter Table
    • elegant recipes with rose
      Rose Petal Sweets
    • IMG 9043
      Simple Easter Table Decor
    • Edible Bunny Box with candy inside. - Design Dazzle
      It’s An Adorable, Edible Easter Bunny! D-I-Y

    Footer

    ↑ back to top

    About

    • Privacy Policy
    • About Toni

    Contact

    • Contact
    • Press & Partnerships

    Toni Roberts is a participant in the Amazon Services LLC Associates Program, an affiliate advertising program designed to provide a means for sites to earn advertising fees by advertising and linking to amazon.com

    DesignDazzle.com is protected by copyright laws. DO NOT distribute or copy the content or share multiple images or collage images without written permission. You can use ONE Design Dazzle image only if there is a link back to DesignDazzle.com. DO NOT edit, crop, or remove watermarks from any image. Please contact me at [email protected] with any questions.

    Copyright © 2024 Design Dazzle