• Skip to main content
  • Skip to primary sidebar

Design Dazzle logo

menu icon
go to homepage
  • Home
  • Home Decor / Design
  • Holidays
  • Crafts
  • All Categories
    • Facebook
    • Instagram
    • Pinterest
    • YouTube
  • search icon
    Homepage link
    • Home
    • Home Decor / Design
    • Holidays
    • Crafts
    • All Categories
    • Facebook
    • Instagram
    • Pinterest
    • YouTube
  • ×
    Design Dazzle » Celebrations

    Published: Dec 6, 2017 · Modified: Nov 9, 2018 by Toni Roberts · This post may contain affiliate links · 2 Comments

    5-Minute DIY Magnetic Glitter Clips

    Hello and happy December! My name is Shani and I blog over at Sunshine & Munchkins. I’m so excited to be here on Design Dazzle as part of the Christmas Wonderful 2017 series. (Although I’m in a little bit of denial that it’s already the 6th, amiright?)  As I was thinking about what to share with you, I kept coming back to trying to keep things simple. Every year since my husband and I got married, we’ve been sending out Christmas cards to family and friends. It’s such a fun time of year and I love going out to my mailbox and seeing a Christmas card. We display them in our home all month (and sometimes into January) and I figure that many of you do the same, so I’m sharing these sweet and simple DIY magnetic glitter clips with you today!

    Magnetic Glitter Clips are perfect to hang photos on your fridge! Quick and easy DIY craft idea that will bring a ton of personality to your refrigerator! #DIYcrafts #magnets || Design Dazzle

    As silly as it might sound, one of things I wanted to make sure we had when we moved into our home a few years ago was a refrigerator that I could stick magnets to. I love putting up pictures, random artwork from my kids, event reminders and even our meal planning calendar! One (okay, two) of the biggest reasons why I love using these magnetic clips on my fridge–the magnets are much more heavy duty and the clips can hold thick or bulky items! Seriously, isn’t that one of the biggest complaints you have about magnets? I can’t be alone in this. *wink*

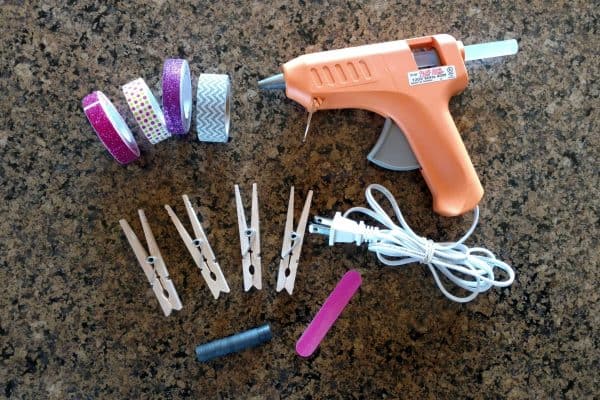
    To make your own magnetic clips, you just need a few basic supplies:

    • clothespins
    • strong circular magnets
    • washi tape (any color or pattern)
    • hot glue gun and glue
    • nail file
    • scissors

    Add a little glam and glitter to some plain clothespins with washi tape then glue on a magnet for a simple DIY project that is both fun and practical!

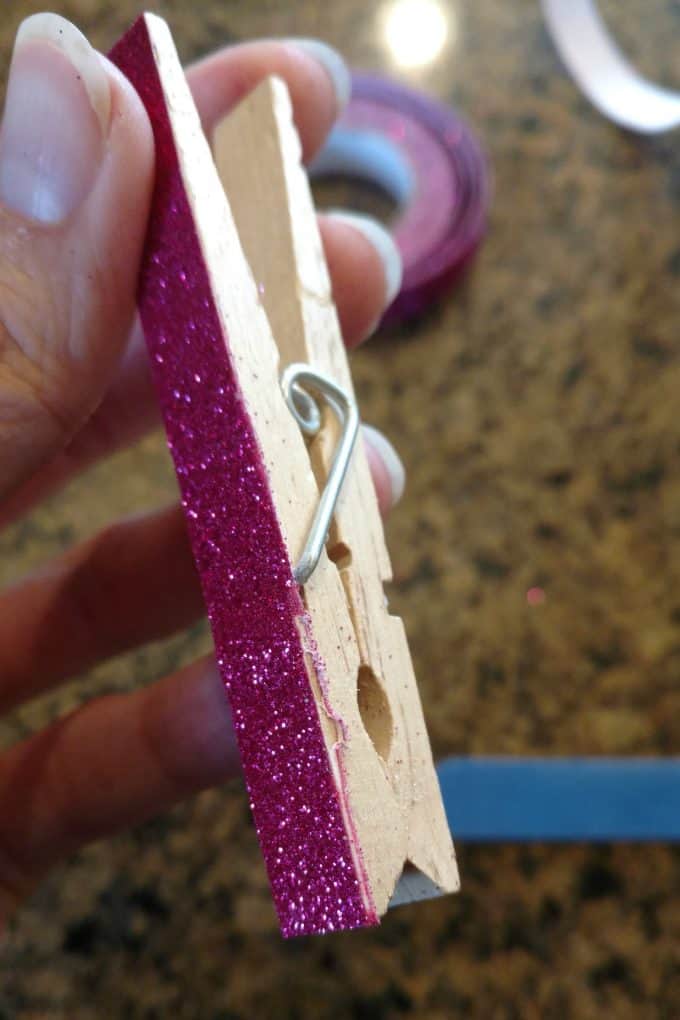
    First, grab your clothespin and washi tape. Measure out a piece of washi tape long enough to cover the flat part on the front (about 3″) and cut it off. Line up the top edge and one side of the tape with the top and side of the clothespin. This will leave you with some extra washi on one side of the clothespin and maybe a little at the end. Use your scissors to cut the extra washi as close to the edge of the clothespin as possible. Then use the nail file along all the edges to make sure there isn’t any extra hanging off anywhere and then pull off the excess. This creates a nice clean edge. Repeat these steps for each of your clothespins.

    Add a little glam and glitter to some plain clothespins with washi tape then glue on a magnet for a simple DIY project that is both fun and practical!

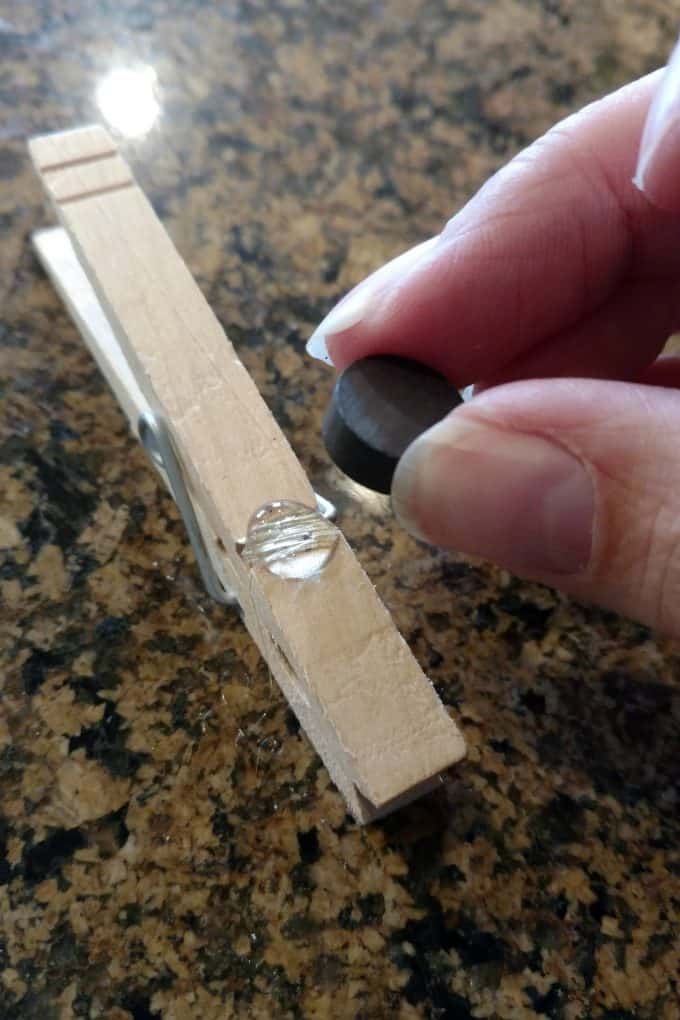
    Next, plug in your glue gun. Turn the clothespin over and place a small glob of glue on the back right over the top of the metal. Then put the magnet on top and press down for a few seconds until the glue has cooled. If there’s any excess glue that’s squeezed out the sides, just scrape it off with your fingernail before it’s completely cool.

    Add a little glam and glitter to some plain clothespins with washi tape then glue on a magnet for a simple DIY project that is both fun and practical!

    And that’s it! You can use your new decked out clothespins right away. As I mentioned, I have some on my fridge, but if you have a cute magnetic board or chalkboard, you could easily stick them there. I’m excited to display some of our Christmas cards using these sparkly clips!

    Add a little glam and glitter to some plain clothespins with washi tape then glue on a magnet for a simple DIY project that is both fun and practical!

    A few other ideas for these clips would include:

    • a simple craft at a baby shower or bridal shower
    • a birthday party take home activity/craft
    • small gifts for your kids to give their friends (would also be cute in a locker)
    • hold up bags for advent calendar
    • neighbor gifts with a cute printable

    What would you use your clips for?

    Add a little glam and glitter to some plain clothespins with washi tape then glue on a magnet for a simple DIY project that is both fun and practical!

    For more fun crafts and DIY projects, check out my blog here.

    Thank you so much for having me and I hope to see you around!

    Check out my blog for tons of fun kid activities, parenting posts, recipes, organization, crafts/DIY and holiday fun!

    Keep in touch with Shani by connecting with her via her blog, Facebook, Instagram and Pinterest!

    ________________________________________________________________
    Thanks so much to Shani for sharing these adorable and useful glitter clip tutorial with us! Be sure to check out her blog for more great crafts, DIY, and holiday ideas!

    _______________________________________________________________

    More Celebrations

    • Adult Harry Potter Party Entrance
      Ultimate Ideas For an Adult Harry Potter Party
    • Christmas Cookie Decorating Party for Kids
      Host a Christmas Cookie Decorating Party for Kids
    • 17 Perfect Fall Cakes
      17 Impressive Fall Cake Recipes
    • Chocolate and caramel dipped apples
      Chocolate Dipped Apples + Caramel

    Sharing is caring!

    Reader Interactions

    Comments

    1. Shani | Sunshine & Munchkins says

      December 06, 2017 at 9:21 am

      Thank you so much for featuring my post! I had so much fun putting it together and my clips are already getting good use out of them. I love how I can use them all year long!

      Reply
      • Toni - Design Dazzle says

        December 06, 2017 at 5:47 pm

        Shani,
        This is so darling! I love how easy it is and yes, you can use them year round!
        Toni

        Reply

    Leave a Reply Cancel reply

    Your email address will not be published. Required fields are marked *

    Recipe Rating


    Primary Sidebar

    Toni medium

    Hi, I’m Toni! I love designing and decorating. Join me for home inspiration and creative living! More about me →

    Popular

    Spring/Easter

    • Setting an Easter Table
      Decorating An Easter Table
    • elegant recipes with rose
      Rose Petal Sweets
    • IMG 9043
      Simple Easter Table Decor
    • Edible Bunny Box with candy inside. - Design Dazzle
      It’s An Adorable, Edible Easter Bunny! D-I-Y

    Footer

    ↑ back to top

    About

    • Privacy Policy
    • About Toni

    Contact

    • Contact
    • Press & Partnerships

    Toni Roberts is a participant in the Amazon Services LLC Associates Program, an affiliate advertising program designed to provide a means for sites to earn advertising fees by advertising and linking to amazon.com

    DesignDazzle.com is protected by copyright laws. DO NOT distribute or copy the content or share multiple images or collage images without written permission. You can use ONE Design Dazzle image only if there is a link back to DesignDazzle.com. DO NOT edit, crop, or remove watermarks from any image. Please contact me at [email protected] with any questions.

    Copyright © 2024 Design Dazzle